Shooting wide angle with my 18-55 mm (APSC)
Jul 2, 2019 14:29:25 #
So, I took a Bryan Peterson online class on Understanding Exposure. My 18-55 mm lens is now my new best friend, especially the wide-angle end, specifically low shots at f22. Props are my new friends, too. My main subjects seem to be mostly taken around our area, most on our own rural property, and adding props expands my possibilities and it's fun.
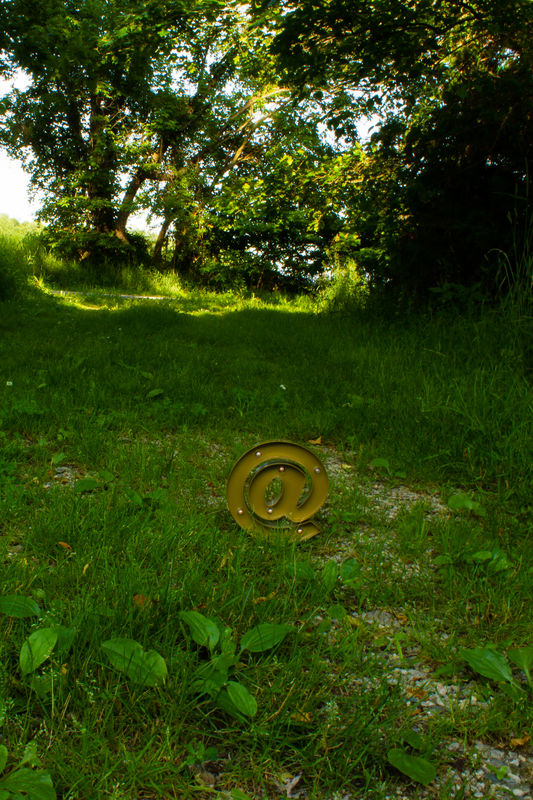
So far, my lunch and hat at the lake, my son's old Mars Rover RC model, and a new prop, a large @ Walmart thingy I found at a thrift store. Here are examples. Still figuring out the ins and outs, so these are cropped from landscape shots that I think I would have been better off taken portrait in camera.
Any comments welcome. Since the class I feel like a total newbie again.
Photographer Lunch At The Lake

(Download)
Mars After Terraforming
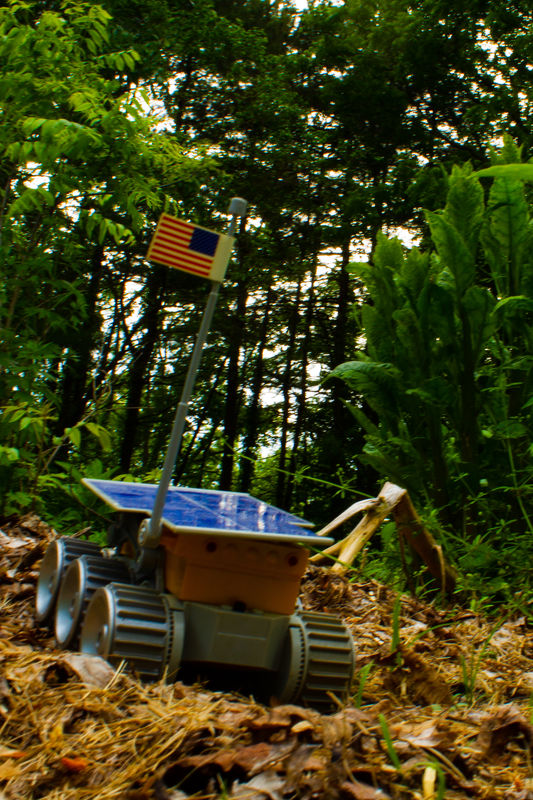
(Download)
At Country Driveway
(Download)
Jul 2, 2019 14:37:21 #

Why f/22? Take the red picnic table, do you have version of the same scene at say f/11 or f/13? Is there more depth of field at f/22? Are the image details sharper at a wider apertures (f/9 -> f/13)?
You might consider your exposure (ISO and shutterspeed) against the small aperture. The three examples are pleasing, but also all three are a bit dark / underexposed. Your white BK cup is more gray than white and the clouds are yellow, although the clouds are a WB issue where you need to bring down the K temp or move the slider toward the blue, taking out a slight bit of yellow. A brighter exposure would help with the blue of sky and lower the grain, even shooting at ISO-0100.
I like a deep depth of field. However, I prefer sharper images than f/22 will likely yield for a consumer grade 18-55 zoom due to lens diffraction. A slightly wider aperture should yield sharper images with no tangible loss of DOF, while also helping with the shutterspeed and hand-holding, even with an IS-enabled lens. A level horizon will help these types of compositions as well.
Jul 2, 2019 14:55:55 #


Jul 2, 2019 14:59:13 #

CHG_CANON wrote:
Why f/22? Take the red picnic table, do you have v... (show quote)
I agree with your analysis of these images, very good effort on Photographer, as myself as a Advanced beginner, we appreciate the advice we receive here at UHH, Thanks.
Jul 2, 2019 15:02:54 #
Jul 2, 2019 15:06:23 #
BlueMorel wrote:
So, I took a Bryan Peterson online class on Unders... (show quote)
Just a little under exposed, but We are all learning from other more experienced Photographers here at UHH.👍😊
Jul 2, 2019 15:08:47 #
CHG_CANON wrote:
Why f/22? Take the red picnic table, do you have v... (show quote)
Thank you for your detailed reply. The f22 was/is specifically for what Peterson calls "storytelling" settings using f22 taken at a low POV with a wide angle - an assignment. The picnic table one I used my CPL to bring down the exposure a couple of stops on a sunny day, might have also affected the WB? The others I probably ETTL instead of to the right, plus I tend to up contrast, lower highlights and deepen blacks in post, maybe a bit too enthusiastically.
Can't do anything about the lens yet, though after years of shooting straight-on photos, I'm finding myself attracted to wide-angle for something different. Now jonesing for a dedicated w-a lens, but moderately priced. But, leery of a momentary enthusiasm, I may just rent one.
Jul 2, 2019 15:15:45 #
CHG_CANON wrote:
Why f/22? .....
I like a deep depth of field. However, I prefer sharper images than f/22 will likely yield for a consumer grade 18-55 zoom due to lens diffraction. A slightly wider aperture should yield sharper images with no tangible loss of DOF, while also helping with the shutterspeed and hand-holding, even with an IS-enabled lens. A level horizon will help these types of compositions as well.
I like a deep depth of field. However, I prefer sharper images than f/22 will likely yield for a consumer grade 18-55 zoom due to lens diffraction. A slightly wider aperture should yield sharper images with no tangible loss of DOF, while also helping with the shutterspeed and hand-holding, even with an IS-enabled lens. A level horizon will help these types of compositions as well.
Aaaargh! I didn't even notice the horizon, something I'm sensitive to on others' pics! And next time I go out doing this I'll try it at 20-25mm. The first and third were on a tripod, so I think I'll try a delayed shutter release next time, too, to eliminate shutter shake.
Jul 2, 2019 15:18:38 #
Cany143
Loc: SE Utah
First, what CHG_CANON said. In particular, the part about diffraction/loss of sharpness at non-optimal apertures.
Next up might be focus stacking....
Next up might be focus stacking....
Jul 2, 2019 15:20:55 #
Silverman wrote:
I agree with your analysis of these images, very good effort on Photographer, as myself as a Advanced beginner, we appreciate the advice we receive here at UHH, Thanks.
Thanks for looking, Silverman! UHH is my photography encylopedia place - makes it easier for we rank amateurs (and I'm pretty rank yet) to improve bit by bit and leaps and bounds. CHG_CANON is one of the best.
Jul 2, 2019 15:29:06 #
Cany143 wrote:
First, what CHG_CANON said. In particular, the part about diffraction/loss of sharpness at non-optimal apertures.
Next up might be focus stacking....
Next up might be focus stacking....
Thanks, Cany - focus stacking? Well, maybe - I have LR and PS, after all.... The entrepreneurial photographer inside of me says, "Yes", the lazy part, says, "Maybe".
Jul 2, 2019 15:32:27 #

BlueMorel wrote:
So, I took a Bryan Peterson online class on Unders... (show quote)
Very interesting. I personally have found my 18-55mm vr Nikkor to be very soft (diffraction, I'm guessing) at small apertures. Sharpest F8 - 11.
~ Just my own experience though. If I want everything sharp (quite rare!), I'll use my phone camera or my Tokina 12-24mm. Which is actually not as sharp in it entire range but sharper some amount at the small end. Once again, just my own experience.
Jul 2, 2019 15:58:55 #
BlueMorel wrote:
Aaaargh! I didn't even notice the horizon, something I'm sensitive to on others' pics! And next time I go out doing this I'll try it at 20-25mm. The first and third were on a tripod, so I think I'll try a delayed shutter release next time, too, to eliminate shutter shake.
No worries. When focused all-in on something new, we're all likely to forget about everything else.

For another idea, try a subject that is angled / pointed toward the lens. Imagine the truck with the flag pole positioned closest to the lens, running vertically through a portrait orientation and the rest of the truck bending away from the center of the frame, maybe with you being a foot or so closer.
Jul 2, 2019 16:00:04 #
amfoto1
Loc: San Jose, Calif. USA
First of all, great to see you using the "wide end" of the lens. A lot of people get sort of stuck and only use the telephoto capabilities of their lenses, which IMO can be easier to use. Telephoto shots can be done "subtractively".... isolating features from their surroundings. Wide shots are more challenging... "inclusive" so that you have to be more cognizant of what's in the composition and work at making things hang together in a finished image. Wide lenses also have some natural distortions which can be challenging... but also can be put to good use once you learn how to use them. I see some of that in your first shot of the picnic table, in particular, where there's strong perspective in the table itself and all the way to the more distant background. But you are doing something similar in the other two images, too.
Just yesterday I was looking at a photographer's website and noticed how she'd used wide lenses a lot for dramatic and fun effects with dog portraits: http://dogbreathphoto.com/
Are you up for some critique that's intended constructively? If so read on... If not, feel free to ignore the following and keep on doing what you're doing!
First, I agree with a couple other responses about f/22... It's risky to use, due to diffraction. Read up on that, and use f/22 carefully: https://www.cambridgeincolour.com/tutorials/diffraction-photography.htm
Diffraction is an optical effect that occurs when you use "too small" a lens aperture. It varies depending upon camera sensor size, camera resolution and the end use of the image. Diffraction "robs" the image of fine detail. Using an 8x10 or 8x12" print as a baseline, with an APS-C sensor camera with resolution like yours, diffraction first starts at any f-stop setting smaller than f/7.1. It's very minor at f/8... probably no concern. There's more though, as you further reduce the size of the lens aperture. Not enough to stop me from using f/11 at times... but I avoid f/16 and, most especially, f/22! It can be fairly noticeable at f/16 and really a problem at f/22.
However, it also matters how you use the images. Display like here in your post... online at Internet resolutions (which are about 1/3 the resolution I use for high quality prints), there's little sign of diffraction. If online display at moderate sizes is the only way you'll ever use your images... no problem. But if you ever plan to make a moderately big print, it may be a problem and is something you might want to consider.
Wide angle lenses have naturally deep depth of field, so super small apertures may not be necessary. (Sometime get the Canon EF-S 10-18mm STM lens and have a blast with it on your camera!) But when extreme depth of field is wanted, and what the lens and a moderate aperture deliver isn't enough, with digital there's a post-processing technique called "focus stacking", as Cany143 mentioned. This is where a series of lenses are made with different focus points, then combined into a single image using the "sharp" portion from each of them.
There are a number of ways to do focus stacking, but https://www.heliconsoft.com/heliconsoft-products/helicon-focus/ is a fairly advanced software that's one of the tools that can be used. There is good info and a lot of good examples of focus stacking at that site, so it may be worth exploring. Focus stacking is used a lot with close-up and macro work.... but also can be applied to landscape photography and other things, such as you're shooting.
Using such a small aperture is also forcing you to use very slow shutter speeds. The first image appears to be fine in spite of that, I suspect because you were using the picnic table to stabilize your shot. The second images was shot at something like 1/4 second and shows a lot of "shake blur", as a result. I suspect that one was hand held. Many Canon lenses have "IS" or Image Stabilization, which can help... but can only do so much. At slow shutter speeds like you were using, even internal camera vibrations... from "mirror slap" and the shutter operation... can cause image shake blur (use "Live View" as a means of avoiding this... that works fine for stationary subjects like these, but is hard to use with moving subjects).
You could have used a faster shutter speed, if you'd increased your camera's ISO a little. That might have helped. Of course, reading Peterson's "Understanding Exposure" (which is a good book that I recommend often), you are probably aware of the risks of digital "noise" in images, at too high an ISO setting. You'll have to decide for yourself, based upon experience, how high ISO is "acceptable" for your purposes.
There's nothing wrong with using a slow shutter speed.... but to do so you may want to get a tripod and use it. That will make for sharper shots... and a tripod can be a valuable tool, especially for landscape and still life photos like what you're doing. To eliminate some other possible vibrations, it also can help to use a remote release to trip the shutter of your camera... or at least set the self-timer to let it fire with a delay. This is so that you aren't touching the camera when the shot is taken. Mirror lockup and Live View are other tools to help with camera stability. Another "trick" is to take a short burst of shots, instead of just a single one. That way odds are that you'll get at least one of them sharp and free of apparent movement blur.
Finally, your first image is significantly underexposed. It may be that was your intention... or that you are unaware of it because your computer monitor is like most, way too bright for accurate photo evaluation and adjustments. A "too bright" monitor causes you to adjust images too dark. They'll look fine on that monitor, but if you make a print it will appear dark. Someone else using a different monitor to view it will also likely see a "too dark" image... especially someone using a "calibrated" monitor, like mine, will see it appear under-exposed.
Virtually all computer monitors are overly bright for proper image adjustment, right from new. They also aren't as accurate rendering color as they might be. While there are ways to calibrate a monitor "by eye", it's not easy and takes a lot of practice, as well as a lot of wasted paper and ink. There are devices that are used to more easily and precisely adjust computer monitors for accurate color rendition. If one makes very many prints, a calibration device pays for itself over time, in savings of wasted paper and ink. Computer monitors change over time, too... losing brightness and shifting how they render color. So they need to be re-calibrated every so often. I calibrate mine monthly. Some people do it more often, others do it a little less frequently.
Basically a calibration device and its associated software - such as the Datacolor Spyder, X-Rite Huey and similar - measure the monitor to first help you set an accurate brightness, then run a series of tests to create a monitor profile that's used to adjust what you see for greater color accuracy.
These are all just intended constructively and as some food for thought at this point.
Good for you, what you're doing experimenting with your camera!
Jul 2, 2019 16:21:56 #
CHG_CANON wrote:
No worries. When focused all-in on something new, we're all likely to forget about everything else.
For another idea, try a subject that is angled / pointed toward the lens. Imagine the truck with the flag pole positioned closest to the lens, running vertically through a portrait orientation and the rest of the truck bending away from the center of the frame, maybe with you being a foot or so closer.
For another idea, try a subject that is angled / pointed toward the lens. Imagine the truck with the flag pole positioned closest to the lens, running vertically through a portrait orientation and the rest of the truck bending away from the center of the frame, maybe with you being a foot or so closer.
Thanks! I have a tendency to get stuck on a POV, especially when expanding my skills. Taking my toys out again in a few days when temps are down to try again. Taking all these tips with me on my phone.
If you want to reply, then register here. Registration is free and your account is created instantly, so you can post right away.