Practical Digital Photography for Beginners
Jan 25, 2019 21:06:24 #
Jan 25, 2019 21:08:14 #

JasonC wrote:
Thank you Wallen and Gene51 for the excellent suggestions/advice on how to successfully compose a photograph!
I struggle with composition; hopefully after studying the above my "previsualization" will improve.
Jason
I struggle with composition; hopefully after studying the above my "previsualization" will improve.
Jason
Jason - google Contemplative Photography - there is a trove of information on how to "see" your photographs before you press the shutter.
Jan 26, 2019 06:47:09 #
catchlight..
Loc: Wisconsin USA- Halden Norway
Glad you asked and I will surely get blasted for this set of comments but...
The quality of information presented is worth mentioning and no, I choose not to "Skip it" because I do care about what is passed of as fact to the impressionable.
If this is a personal development story, then great. That should be stated up front.
The way the article is written is questionable based on facts, and grammar. Though well intended, these are more personal thoughts that are written as professional instruction.
I will point out a few:
1. "Anything" camera? Better to look for a camera, new or used that will do all of the basics. Many on line youtube tutorials are available to get started. A point and shoot or cell phone will not inspire or teach you the basic triangle and do little to advance.
2. "Something, someone"... Odd impression, what about abstract or street photography?
3. "Imagine and decide" is very limited to portrait and landscapes. Some of the best images ever were taken by accident. Multiple burst exposures may be a better solution. Many seasoned photographers will tell you "it's the "in between or unaware shot" that will be the best image.
4. The "hero" can not always be the "main focus" because there may be more than one subject. If you want a snap shot then use a cell phone and ask the person to smile.
5. Th "Rules" are very much worth being aware of and, discarding them is foolish from the writers perspective. Rule of thirds is proven.
6b. Manual K setting? yet you ask to set the WB to cloudy? K is manual in digits and something that is important to learn.
6e. Always go for the lowest ISO... even in dim or dark environments, you still might be able to use a low ISO. For example, if you have your camera mounted on a tripod or sitting completely still on a table. In that case, you can safely use a low ISO and brighten your photo via a long shutter speed instead, since you won’t introduce camera shake.
7a. Wrong because, not all lenses are created equal. A 50mm 1.2 will have less DOF than a 200mm f 4.0 at the same frame size. and other reasons due to quality and construction of a lens.
9. "Chimping" odd perspective, really?
10. "Exposure comp first choice"? Certainly comes in second over choosing the type of metering the camera can produce. Not everything needs compensation and it takes time to adjust and may even throw off your exposure if you change direction to the light.
10. "Shutter speed last resort" Funny advise. what about pan shots or considering it as the most or least important part of the triangle?
11. Always shoot Raw. that shot you took several years ago could be invaluable later. It takes little effort to set the camera for both Jpeg and RAW. Jpeg is a finished but limited editable image. Raw is the original DNA or recipe.
The perspective apart from the wording and spelling seems to come from a seasoned instructor. Maybe that's why there is no introduction.
This could have been a personal story of how he sees things in comparison to what is general knowledge.
It comes across to me as soap boxing and ill informed at best....
I do care about what is offered as instruction on the HOG and do pay attention to postings like this.
Bill_de wrote:
Does any of that matter? If it doesn't look beneficial for you, skip it. Some folks will benefit no matter who Wallen is. 
--
--
Jan 26, 2019 08:38:41 #

Jan 26, 2019 08:45:52 #
Gene51 wrote:
I have a really simple formula to success. br br ... (show quote)
Thank you for your comments!
Jan 26, 2019 14:10:23 #

Wallen wrote:
If you want to take good pictures but knows next t... (show quote)
Very well done thank you for posting that.
Jan 26, 2019 15:15:18 #
catchlight.. wrote:
Glad you asked and I will surely get blasted for t... (show quote)
I am going do defend Wallen against your generally poorly informed and highly biased opinions offered as facts - just because.
1. Anything cameras are fine - I often teach photography using cellphone cameras. It eliminates the need and corresponding anxiety when the "triangle" is considered. People need to learn how to see before they need to learn the technical aspects of a camera. There are too many camera "experts" that take beautifully exposed but otherwise incredibly mediocre images. You don't need to know the "triangle" to take great images. And you can certainly take memorable images with a cellphone or a point and shoot.
Here are a bunch of images taken by pros using cellphones:
https://www.google.com/search?sa=X&q=images+taken+by+professional+photographers+using+cell+phones&tbm=isch&source=univ&ved=2ahUKEwimla3gl4zgAhVxhuAKHWoTAX0QsAR6BAgAEAE&biw=1920&bih=1098
2. "Something" clearly covers everything that is not landscape or portrait - and street photography is usually either something or someone.
3. Imagine and decide is solid, on point and very practical advice to give to a beginner - read the title of the thread again in case you forgot.
4. Every image should have a hero. If an image has multiple "heroes" then it is often considered a weaker composition with competing foci. A better composition is where the viewer's eye and attention is drawn to a main focus. Such photographs rarely need a narrative - they are that clear. An image with multiple areas of focus are usually more successful as a series of individual images, rather than one large image with multiple, competing areas of focus.
5. Rules are guides, not dogma, and are bound to be broken - it's what makes art interesting. Study avant garde artists, musicians, photographers, etc - you will see how breaking the rules unleashes creative potential that would never be released if everyone "followed the rules." Every new movement in fine art was met with resistance by the traditionalists, but thank goodness it didn't stop the artists. Yes the rule of thirds is a good approach for some photography, but so are many others - here is a list of 20 compositional rules that work for the specific situation, and many of them conflict with each other. Does that mean that they are any less valid? I don't think so.
https://petapixel.com/2016/09/14/20-composition-techniques-will-improve-photos/
My favorite quote regarding the rules of composition comes from Edward Weston - "Consulting the rules of composition before taking a photograph, is like consulting the laws of gravity before going for a walk." So much for the notion that any "rule" of composition is somehow "proven."
6. Once again, beginners don't need to know all about most of this - either from Wallen's narrative or yours. But at least Wallen's suggestions help a beginner interpret a scene differently.
7. If you mean that a 50mm F1.2 has shallower DoF than a 200mm F4 at the same magnification (image size in the frame) and aperture - you need to go look at some DoF charts. For the same magnification and aperture the DoF will be similar, and here is the reason why:
http://www.dofmaster.com/dof_imagesize.html
Quality and construction of a lens has nothing to do with depth of field other than the off chance that the aperture is not being reported correctly.
9. Chimping. I do it all the time in order to fine-tune my camera settings. I started doing this in the 60s when I used a polaroid film back in my 4x5 Sinar to get an instant (well, it took a minute) review image to check for lighting, depth of field, geometry and focus.
10. For a beginner - which is who Wallen wrote this for - the exposure comp button is a no-brainer and easy to adjust. Triangle doesn't come onto the beginner's radar. It's good to keep the audience here in your mind.
11. Yes, if a beginner student shows up with a camera that can shoot raw - they should never rely on the camera to produce a jpeg. However, such is rarely the case with beginners. So, in the interest of keeping things simple jpegs will suffice until the beginner starts to push the limits of what can be done with jpeg. Again, sound advice from Wallen.
Like yourself I pay lots of attention to posts like this. But I did not feel the need to tear it apart and dismiss it in lieu of presenting MY way of doing things, as fact. One of the wonderful things about photography is that there are multiple ways of getting things done, and it is eminently adaptable to individual learning styles and information acquisition rates. I am not saying that anything you brought up in your critique is flat out wrong - I am saying that much of what you presented was targeted at a more intermediate photographer, and probably not the best choices for beginners. In this respect, keeping in mind the target audience -Wallen absolutely nailed it - you, not so much. I guess you don't really teach, do you? Yo do take some nice pictures though.
Jan 26, 2019 18:11:06 #
catchlight..
Loc: Wisconsin USA- Halden Norway
I respect what you are saying.
The lengthy reference manuals published on the hog as of late are a bit seriocomic in content.
If possible I would like to see opinion posted as opinion and qualified teaching stated as that, with a formal introduction.
Some of the posts come on very strong and are quickly praised and defended contumaciously as fact when in reality, they are not at all.
All content and opinions matter for sure but how its presented maters and some don't get it...
Jan 26, 2019 20:54:46 #
Jan 27, 2019 05:27:07 #
Jan 27, 2019 05:50:34 #
Pablo8 wrote:
Question....Is 'Catchlight'. an anagram of 'Chris T'?
Is Chris T someone to avoid like the plague?
Jan 27, 2019 05:58:10 #
DonB wrote:
Thank you Wallen and Gene51 for posting these!!! I'm trying to get my grandkids more focused on seeing the shot instead of speed shooting and hoping. They now want to learn "all about photography" and want a "professional camera like you use." I'm still using a Canon T2i. Does all I want. With your permission, I would like to use what you have written as a class handout.
On my part, blaze away. It was written to be shared. Thanks DonB
Jan 27, 2019 09:18:48 #
Wallen wrote:
First of all, my sincere thanks to Gene51 for stan... (show quote)
Wallen -- your credentials were not needed to back up the validity of your original post, but I did enjoy reading them!!
Jan 27, 2019 12:04:00 #
catchlight..
Loc: Wisconsin USA- Halden Norway
Thank you for sharing your credentials.
Thank you, Great history and back round for sure. You sound extremely qualified, but I hope you can see my point about the value in an introduction with a presentation.
Not everyone is aware of who you are. I think your words would have much more value with a simple intro.
I too started with a Brownie camera back in 1964, worked with 35mm film in the 70's, 80's. Formerly an automotive technical executive, designed cars, actually started an automotive company, managed two top Ferrari restoration companies, have the highest credentials in auto restoration, fabricated race cars professionally and raced both motorcycles and cars for 40 years with several championships. Currently I am a photojournalist after many years of hard work with contributions to several magazines. I do have a deep technical understanding of Photoshop editing after years of training. When covering USA events I focus mostly on automotive celebrities, the best in automotive, and premier events. I cover venues like Amelia island, Pebble Beach and Cavallino.
Much of my executive skill came from Ford motor company inside training. I do understand structure, proper edict and presentation.
On the internet, published information starts generally with a few words about the author. It seems too many copy/past professors with long articles as of late and, many with no introductions or explanations of the source material.
Your original post is very personal and off script from the mainstream ...
I am first getting an appreciation for the author and feel much different. Your back round info was actually quite incredible and I am glad you could share it.
Cheers
Feb 24, 2019 03:30:24 #
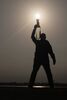
Captured some fireworks using the 12 steps process.
The full story can be seen here; https://www.uglyhedgehog.com/t-580096-1.html#9910223
The full story can be seen here; https://www.uglyhedgehog.com/t-580096-1.html#9910223


If you want to reply, then register here. Registration is free and your account is created instantly, so you can post right away.