Color Match Problem
Sep 24, 2018 12:15:37 #

There is a procedure in Photoshop that enables color correction. First you set the RGB numbers for both the white and black eye droppers. Then in some obscure part of the scene you place a standard black & white card if there is no white and black subject. Then in Curves set the cursor of the white and apply the white eye dropper, do the same with the black. This will adjust the ends of the color curve to your chosen standards. If there is a illuminant color imbalance this procedure will correct it - from white to black and everything inbetween without bias. Kelby in his books describes the procedure in detail.
Sep 24, 2018 13:52:37 #

John_F wrote:
There is a procedure in Photoshop that enables col... (show quote)
That sounds like a more thorough approach than I use, which has worked for me in sensitive painting color correction: White pice of paper off subject; use the gray (middle) eye dropper in the Curves filter in photoshop.
Sep 24, 2018 14:14:56 #
This is probably a silly solution. Why not take the toy outside to a nice green lawn area and see what that produces? I'm thinking your instructions may not allow all that processing in photoshop or elsewhere. Just a thought.
Sep 24, 2018 19:28:58 #
Do you have a monitor and is it calibrated? I had to match colors for a book and that did the trick. In lew of an overcast day, perhaps using something to soften the light like a white curtain would help since color changes during the day. I used soft box lights.
Sep 25, 2018 00:12:57 #

If you want accurate colors, buy an X-rite Color Checker Passport and profile each lens in different light. You WILL have accurate colors. But only if you have a calibrated monitor and you haven't been messing around with the color space and you shoot raw.
Sep 25, 2018 13:08:40 #
Strodav
Loc: Houston, Tx
Jolly Roger wrote:
Why not use an X-rite colour checker passport target next to the bowling pin. Take a shot, then remove the CCP and then shoot again.
In Lightroom you can then calibrate the colours from the 'target' shot.
In Lightroom you can then calibrate the colours from the 'target' shot.

You said its for a course. Have you been set up with a color that is not in the srgb color space? If your camera has an adobe rgb setting, try that.
Sep 25, 2018 14:33:13 #
I see you beat me to it. Jolly good Roger. LOL
Jolly Roger wrote:
Why not use an X-rite colour checker passport target next to the bowling pin. Take a shot, then remove the CCP and then shoot again.
In Lightroom you can then calibrate the colours from the 'target' shot.
In Lightroom you can then calibrate the colours from the 'target' shot.
Oct 18, 2018 18:10:12 #
PPP
Loc: Florence
Shoot with a white balance gray card in frame with pin! Color balance the gray card...
Oct 21, 2018 06:49:24 #
rdrechsler wrote:
I’m having an interesting problem. I am shooting a... (show quote)
Some plastics fluoresce in sunlight (especially if UV is present). It may be glowing blue.
You could try putting sunscreen on the window.

Oct 21, 2018 22:01:51 #

rdrechsler wrote:
I’m having an interesting problem. I am shooting a... (show quote)
Try filtering ALL UV out of the light source, so the plastic does not fluoresce.
Oct 27, 2018 18:32:41 #

This is reminiscent of "color crossover" we sometimes experienced in the film days- it was usually a chemistry or underexposure issue that does not actually exist in digital work but the symptoms are similar, those are, where you correct for one incorrect color and all the other colors in the scene go way out of balance.
Nowadays this can be caused by mixed lighting- light striking the subject from two or more sources where the is a vast differential in color temperature or spectral content. Perhaps another light source such as fluorescent was nearby and is influenced the color balance toward the green.
I do a ton of product photography and every now and again I run into certain materials that seem to be incomparable with the photographic process. There are many fabrics and polymers that contain ultraviolet brighteners that make them appear super white or "day-glow" to the naked eye but fluoresce under light sources with high ultraviolet content such as daylight and electronic flash. Oftentimes the color shift is toward the blue/cyan but I have greenish and turquoise tints. This is rare in digital work- it was more prevalent with color film but you might try a UV or skylight filter.
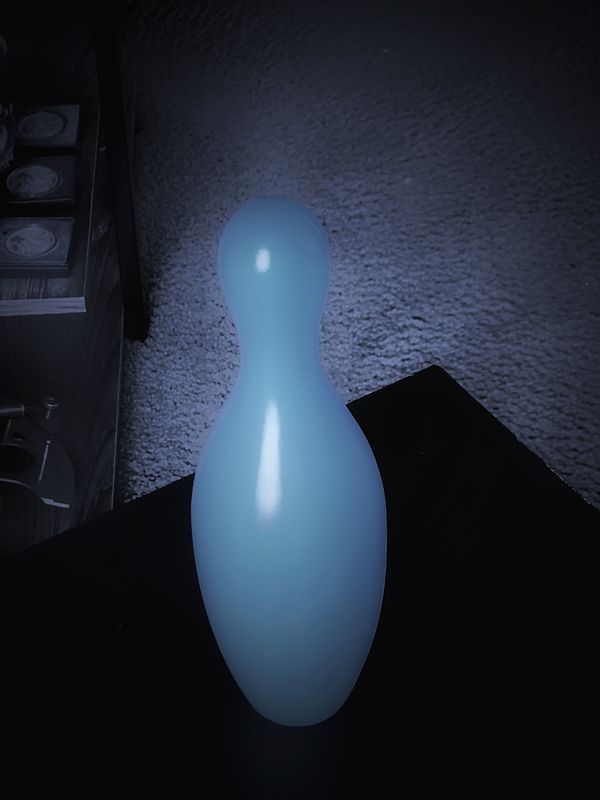
Of course, it is difficult to troubleshoot or diagnose a problem like this without a color test target and making certin that everything in you system is properly calibrated. I just assumed that the carpet that shows in the background of you image is kinda neutral and went on from there. I pumped in enough magenta to set the carpet on fire but there is still a greenish tint in the product. If this is some kinda anomaly in the material, the only remedy is local color correction in post processing. I de-saturated the color and and reduced the structure- see attached image.
If this does not occur with othere subject, there is probably nothing wrong with your system.
Nowadays this can be caused by mixed lighting- light striking the subject from two or more sources where the is a vast differential in color temperature or spectral content. Perhaps another light source such as fluorescent was nearby and is influenced the color balance toward the green.
I do a ton of product photography and every now and again I run into certain materials that seem to be incomparable with the photographic process. There are many fabrics and polymers that contain ultraviolet brighteners that make them appear super white or "day-glow" to the naked eye but fluoresce under light sources with high ultraviolet content such as daylight and electronic flash. Oftentimes the color shift is toward the blue/cyan but I have greenish and turquoise tints. This is rare in digital work- it was more prevalent with color film but you might try a UV or skylight filter.
Of course, it is difficult to troubleshoot or diagnose a problem like this without a color test target and making certin that everything in you system is properly calibrated. I just assumed that the carpet that shows in the background of you image is kinda neutral and went on from there. I pumped in enough magenta to set the carpet on fire but there is still a greenish tint in the product. If this is some kinda anomaly in the material, the only remedy is local color correction in post processing. I de-saturated the color and and reduced the structure- see attached image.
If this does not occur with othere subject, there is probably nothing wrong with your system.
Oct 27, 2018 18:37:25 #

If you want to reply, then register here. Registration is free and your account is created instantly, so you can post right away.