purple haze
Feb 22, 2018 00:59:03 #
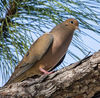
When I zoomed in on this print to view small portions a purple cast was very evident. The biggest areas are the tree fronds and then any area that has the sky for the back round. Thanks for any assistance. Tom

Feb 22, 2018 01:11:41 #

tjjm wrote:
When I zoomed in on this print to view small portions a purple cast was very evident. The biggest areas are the tree fronds and then any area that has the sky for the back round. Thanks for any assistance. Tom
tutorial on fringing, anyone?
Feb 22, 2018 03:35:13 #
Purple fringing is when you get purple colour in high contrast boundary areas in an image that was most likely taken in low light situations with a brighter background.
It is most often attributed to a chromatic aberration that occurs commonly with digital cameras, but purple fringing can also be caused by lens flare.
In Photoshop, click on “Adjustments” under the “Image” tab.
Select “Hue/Saturation”. (Or you can do this as an adjustment layer as well in case you need to mask off some areas later).
Where you see “Master”, click on it and select “Blues” to get to the blue channel.
Once you’ve selected the specific colour channel, you will have the eyedropper tool. Select the left-most eye dropper.
Then click on one of the areas in your image with purple fringing. I chose the tree branches on the right as they were one of the most prominent problem areas.
Next, go to the Saturation slide bar and move the slider to the left. Usually somewhere between -70 and -80 works best, but the exact number depends on the image and the amount of fringing.
Lastly, check your image to see if you need to adjust anything else since reducing one colour may affect the rest of your image.
(If you’ve used an adjustment layer you can mask out the parts you don’t want to be affected).
There you have it! You’ve zapped away the purple fringe!
Feb 22, 2018 03:41:07 #

tjjm wrote:
When I zoomed in on this print to view small portions a purple cast was very evident. The biggest areas are the tree fronds and then any area that has the sky for the back round. Thanks for any assistance. Tom
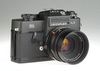
"Jimi" Fringing, actually your Tokina is fringing.
My (K-mount) Tamron 18-200mm Zoom gets that slightly too (but much less than what I see in your image). Where as my high-end Pentax f/2.8 16-50mm Apochromatic Zoom lens seems to be fringe free.
You might consider a similarly branded Canon lens for your camera.
Feb 22, 2018 05:26:25 #
Feb 22, 2018 07:13:30 #
I seen no purple anywhere on that picture. If you don't like it just hit delete....happens to the best of us!
Feb 22, 2018 12:02:49 #
There is a script for GIMP which can be used for fringing, also. GIMP is free and you must download the script and install it, also free.
Feb 22, 2018 14:49:45 #
thank you Leica and Lamiacea. The shooting conditions were as you described! I shoot mostly wildlife and was trying to get in on the cheap with the Tokina. Learning and was able to correct it some with Adobe. Thanks again.
Tom
Tom
Feb 22, 2018 14:55:16 #
kpmac wrote:
There is a script for GIMP which can be used for fringing, also. GIMP is free and you must download the script and install it, also free.
Will have to check that out. Not familiar GIMP but worth a try. Thank you.
Feb 23, 2018 12:46:45 #

Feb 23, 2018 12:59:50 #
[quote=Leicaflex]Purple fringing is when you get purple colour in high contrast boundary areas in an image that was most likely taken in low light situations with a brighter background.
It is most often attributed to a chromatic aberration that occurs commonly with digital cameras, but purple fringing can also be caused by lens flare.
In Photoshop, click on “Adjustments” under the “Image” tab.
Select “Hue/Saturation”. (Or you can do this as an adjustment layer as well in case you need to mask off some areas later).
Where you see “Master”, click on it and select “Blues” to get to the blue channel.
Once you’ve selected the specific colour channel, you will have the eyedropper tool. Select the left-most eye dropper.
Then click on one of the areas in your image with purple fringing. I chose the tree branches on the right as they were one of the most prominent problem areas.
Next, go to the Saturation slide bar and move the slider to the left. Usually somewhere between -70 and -80 works best, but the exact number depends on the image and the amount of fringing.
Lastly, check your image to see if you need to adjust anything else since reducing one colour may affect the rest of your image.
(If you’ve used an adjustment layer you can mask out the parts you don’t want to be affected).
This was a great 'mini-tutorial' I used it in my 'poor-man's' photoshop - aha Paint Shop Pro, and it worked just as you described. The OP should be pleased with the result!
Feb 23, 2018 14:18:53 #
TheShoe
Loc: Lacey, WA
And if you are using DxO PhotoLab, under Chromatic Aberrations there is a purple fringe check box.
Feb 23, 2018 21:17:56 #
Feb 23, 2018 22:45:26 #

I've done an analysis on this and don't see where the sky or tree leaves are purple. In fact, there is very little bias towards any one color throughout.
--Bob
--Bob
tjjm wrote:
When I zoomed in on this print to view small portions a purple cast was very evident. The biggest areas are the tree fronds and then any area that has the sky for the back round. Thanks for any assistance. Tom
Feb 25, 2018 16:49:58 #
illininitt wrote:
I seen no purple anywhere on that picture. If you don't like it just hit delete....happens to the best of us!
Perhaps you are color blind?
If you want to reply, then register here. Registration is free and your account is created instantly, so you can post right away.