What Raw Can do for you Lightroom and Nik HDR
Feb 20, 2018 08:16:09 #

The first thing i recommend is to go to this link.
https://topdownvideos.com/training/tone-mapping/
The interesting bit is what lightroom does to highlights and shadows it compresses them a near white sky actually has a lot more tonality in it than you realise if you move the exposure down in lightroom detail starts to appear in the highlights and if you go the other way it appears in the shadows.
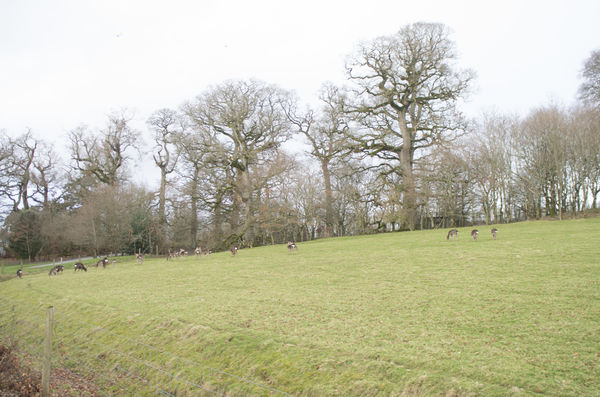
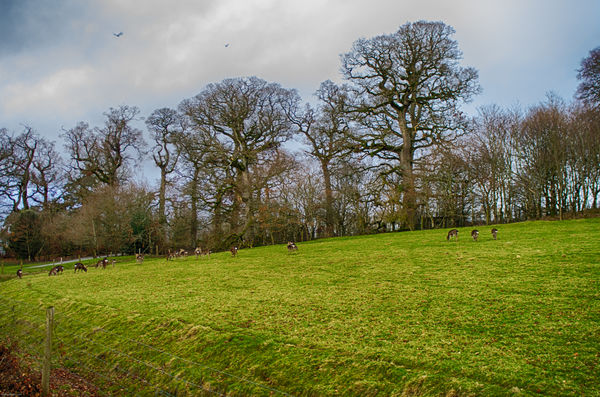
Of course neither of these gives a good photo. But what you can do is create a tiff file with the lightroom adjustments and thats what i did i created an underexposed version an over exposed version and a standard version.
I then chose to export the 3 tiff files to NIk HDR if you have nik installed it is an export preset and you can merge the three tiff files into one.
Now i've chosen not to do anything else to this photo over than that and its not a great photo and the hdr is probably over done but look at the difference :)
https://topdownvideos.com/training/tone-mapping/
The interesting bit is what lightroom does to highlights and shadows it compresses them a near white sky actually has a lot more tonality in it than you realise if you move the exposure down in lightroom detail starts to appear in the highlights and if you go the other way it appears in the shadows.
Of course neither of these gives a good photo. But what you can do is create a tiff file with the lightroom adjustments and thats what i did i created an underexposed version an over exposed version and a standard version.
I then chose to export the 3 tiff files to NIk HDR if you have nik installed it is an export preset and you can merge the three tiff files into one.
Now i've chosen not to do anything else to this photo over than that and its not a great photo and the hdr is probably over done but look at the difference :)
Feb 20, 2018 09:24:25 #

blackest wrote:
The first thing i recommend is to go to this link.
https://topdownvideos.com/training/tone-mapping/ ...
https://topdownvideos.com/training/tone-mapping/ ...
His logic is OK and his general description of tone mapping is correct. However, he does not give a correct representation of the raw file values.
At about the 8 minute mark his table is wrong. He has the number of values confused with the maximum value for each step.
Power of 2 3 4 5 6 7 8 9 10 11 12 13 14
Maximum value 8 16 32 64 128 256 512 1024 2048 4096 8192 16384
Power of 2 2 3 4 5 6 7 8 9 10 11 12 13
Number of values 4 8 16 32 64 128 256 512 1024 2048 4096 8192
And the top row is mislabeled "Exposure Value". An exposure value is a combination of aperture and shutter speed, nothing to do with his table. He should simply have labeled it "Steps".
He later continues to confuse the maximum value with the number of values although this does not totally invalidate what he is saying.
The exposure value range that he subsequently refers to (not the same as the labels on the table) applies only to ISO 100, which is the base ISO for many digital camera.
Feb 20, 2018 10:14:54 #
selmslie wrote:
His logic is OK and his general description of ton... (show quote)
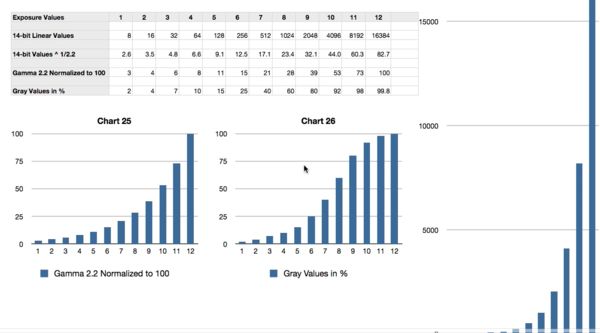
That is not his table, I've screenshot his table.
The first line is the range of exposure values that can be captured (12 stops worth if you are lucky) if a scene contains more stops than this you are going to lose detail either side of that range. Where you put that range is up to you. Normally you just find a mid gray tone to expose and your jpeg gives you detail 2 stops either side.
The second line just shows the numeric range of each tone ie 8-15 16-31 32-63 ect.
The third line gives values with gamma applied
The fourth normalises it to values between 3 and 100 (chart 25)
The fifth gives gray values as used by light room at the highlight end theres quite a small difference in brightness for quite wide ranges of linear tone
pushing the values back on to the steeper part of the curve gives contrast and the white sky starts showing clouds and even blue sky. Pushing the exposure the other way the shadow values also gain contrast and you get to see detail, your pushing up noise too of course.
if your top value is 32 and your bottom value is 16 then thats a range of 16 tonal values for that stop and if you take 32 from 64 your range is 32...
If you say your bottom value is 15 and your top is 31 would you believe there are still 16 tonal values.
It doesn't matter what iso they are not absolute EV values just a tonal range that can be recorded. It doesn't matter if its a coal mine or mid day in hawaii the most the camera can record is 12 tones as raw. It is relative not absolute.
Sorry you normally have a good grip on this but this time i'm siding with the maker of the video.
Feb 20, 2018 12:00:59 #
blackest wrote:
That is not his table, I've screenshot his table. ...
Sorry you normally have a good grip on this but this time i'm siding with the maker of the video.
Sorry you normally have a good grip on this but this time i'm siding with the maker of the video.
It seems that you are no more familiar with binary numbers than he is.
Your screen shot of his table is what I am referring to. His numbers are wrong.
In the last column of the line labeled "14-bit linear values" you will see 16,384. That is 2^14, actually, one more than the maximum value for the top zone.
The top zone contains only 8,192 values from 8,192 (2^13) through 16,383 (2^14-1). That's half of the total possible values in a 14-bit number which ranges from 0 (fourteen zeros) through 16,383 (fourteen ones).
The binary value for 16,384 is a 1 followed by fourteen zeros but that uses 15 bits..
Feb 20, 2018 12:04:25 #
You guys are waaaaaaaaaaaaaaaaaay to analytical. Work the image until the result is pleasing to your eye and you have achieved everything you set out to do.
Feb 20, 2018 12:21:06 #
selmslie wrote:
It seems that you are no more familiar with binary... (show quote)
so how many values are capable of being stored between 0 and 16,383 , isn't that 16,384 states?
honestly 1 bit in ...
It doesn't make a deal of difference right or wrong.
e.g 11 is binary 3
and
00
01
10
11
4 states
Feb 20, 2018 12:30:04 #
blackest wrote:
so how many values are capable of being stored between 0 and 16,383 , isn't that 16,384 states? ...
Yes, but the top zone will have only 8,192 values, not 16,384 as his table implied.
Now take a look at Exposure value and you will understand how he has misused the term.
Feb 20, 2018 12:35:18 #
rgrenaderphoto wrote:
You guys are waaaaaaaaaaaaaaaaaay to analytical. Work the image until the result is pleasing to your eye and you have achieved everything you set out to do.
I'm not bothered by a bit, scottie seems to be :) i mean 1 bit in 16,300 odd a third of a pixel value in any thing up to 50 million pixel values. maybe a butterfly flapped its wings and deflected a few photons at the precise moment the shutter was pressed.
The interesting bit is the way that lightroom uses the raw values pushing the exposure back can reveal a bunch of detail in what at first glance is a white sky :) also getting an idea of how the camera captures reveals how little the jpeg version keeps. If it helps get a "better" photo thats good isn't it.
even the lousy photo i've posted reveals there is more than you might expect.
Feb 20, 2018 12:40:47 #
blackest wrote:
I'm not bothered by a bit, scottie seems to be :) ... (show quote)
The main thing that the numbers tell us is that 8,192 values to define the brightest zone is gross overkill. You don't need that many. And 8 values to define the tonality 10 stops down from the maximum value may be too few.
To define the raw file's possible range of values as its dynamic range is misleading. You could use 16 bits or 32 bits and get much larger numbers but the DR of the camera depends on the sensor, not the numeric values.
Feb 20, 2018 12:45:18 #
selmslie wrote:
Yes, but the top zone will have only 8,192 values, not 16,384 as his table implied.
Now take a look at Exposure value and you will understand how he has misused the term.
Now take a look at Exposure value and you will understand how he has misused the term.
or perhaps you read it as the top ev uses twice the value space as the previous 1
16384 - 8192 = 8192 simple it doesn't really matter especially when you see that tonal range ends up in the last 2% anyway.
Seriously all it does is help show the principle of how it works and that you can have blue skies hidden in the white.
Feb 20, 2018 13:06:11 #
blackest wrote:
or perhaps you read it as the top ev uses twice the value space as the previous 1
16384 - 8192 = 8192 simple it doesn't really matter especially when you see that tonal range ends up in the last 2% anyway.
Seriously all it does is help show the principle of how it works and that you can have blue skies hidden in the white.
16384 - 8192 = 8192 simple it doesn't really matter especially when you see that tonal range ends up in the last 2% anyway.
Seriously all it does is help show the principle of how it works and that you can have blue skies hidden in the white.
Yes, the math is actually pretty simple until you do the logarithmic conversion and start to work with the tone curves. By that point the math just gets in the way.
His heart was in the right place but his explanation would have made more sense without the numbers.
Feb 20, 2018 17:10:32 #

Ha ha. I am a luddite and after the conversation rolled into the scientific, I am no closer to learning how to use this valuable concept.
Feb 20, 2018 17:28:54 #
Einreb92 wrote:
Ha ha. I am a luddite and after the conversation rolled into the scientific, I am no closer to learning how to use this valuable concept.
simple version lightroom is going to compress the highlights into a very small range of values in the photo in other words the sky looks white if you drop the exposure say 3 stops then the highlights are falling on a more spread out bit of the curve and you see detail in the highlights meanwhile the mid tones are now black as they have been under exposed by 3 stops. So if you go the other way you recover detail in the shadows and now your midtones are blown out.
So what i did was a single frame hdr created a 3 stop under a 3 stop over and a normal frame and the hdr program kept the highlight detail from the 3 stop under frame the shadow detail from the 3 stop over frame and mixed it in with the normal frame. You can kinda do this in lightroom if you pull down the highlight slider as far as it can go and push the shadows slider up as far as that can go. But it doesn't normally give you quite this amount of highlight and shadow recovery.
This will only work with raw files as the jpeg already threw out the highlight and shadow detail it wasn't using.
Feb 20, 2018 17:56:32 #
Thanks for the distillation! Sooo, this is kind of an explanation of what HDR does, only you are explaining what LR does, as per the video. Correct? I am still where Bob spoke of: figuring out how far one can push an image to the right. It seems to vary a great deal and I haven't been able to recognize a pattern. YET.
Feb 20, 2018 18:22:21 #
Einreb92 wrote:
... I am still where Bob spoke of: figuring out how far one can push an image to the right. It seems to vary a great deal and I haven't been able to recognize a pattern. YET.
I have studied this question at length using RawDigger and exposing a gray card to what the camera thinks is middle gray.
My D610, Df and A7 II all place middle gray (we often call that Zone V) between values of about 1000 and 2000 for a 14-bit raw file. That places Zone VI between 2000 and 4000, Zone VII between 4000 and 8000 and Zone VIII between 8000 and 16000.
This tells me that I cannot expect a raw file to record anything above Zone VIII, 3 stops above middle gray.
But don't just take my word for it. Download a copy of RawDigger and try it with your own camera. It's free for 30 days and only about $20 if you purchase it. It may answer all of your questions.
If you want to reply, then register here. Registration is free and your account is created instantly, so you can post right away.