Megapixel advice wanted.
Jan 29, 2018 13:08:32 #

DOF is the main issue unless you are going to stack 10-20 shots which I doubt most people are going to do...
nikonbrain wrote:
You do not need to get close, you need a light mod... (show quote)
Jan 29, 2018 13:40:45 #
amfoto1
Loc: San Jose, Calif. USA
lmTrying wrote:
My alias is modelbuilder1. I enjoy building scale ... (show quote)
This really isn't a question of megapixels, per se. More MP would simply make for more enlargeable and/or more croppable images.
It's more a problem of high ISO capabilities, trying to get good shots in low lighting.... which is where your older DSLR is bound to be struggling. Your point-n-shoot from 2015 is more "high ISO capable" than your XSi from 2008, simply because digital imaging technology has improved significantly in recent years. The image below is a high ISO test shot I did with one of my 20MP Canon 7D Mark II... at ISO 16000:
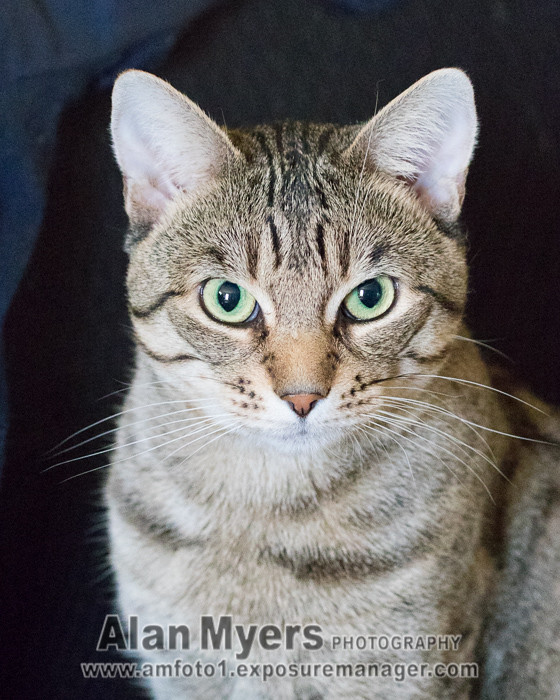
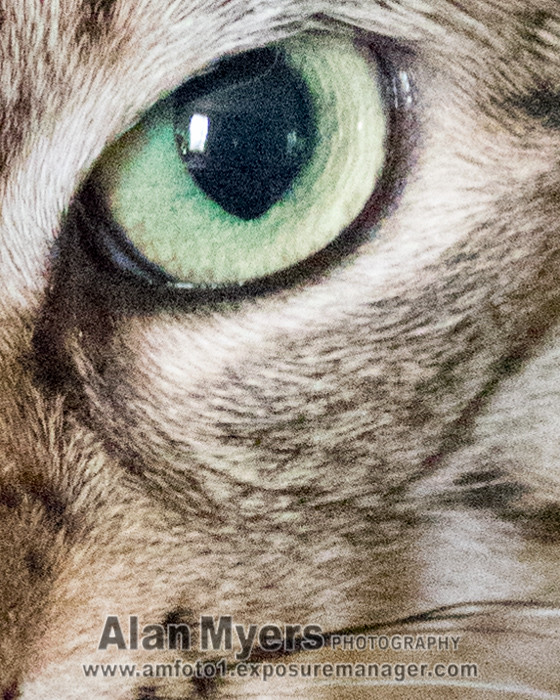
The above was shot RAW and illumination was mixed lighting... daylight from a small window about 8 feet from the subject and a single 60 watt CFL bulb about 10 feet away. I took care to avoid underexposure and the image was converted to a usable JPEG with Lightroom at it's default noise reduction setting. As you can see from the enlarged detail on the right, there's some noise... but it's pretty well controlled and I'd normally do further processing to an image in Photoshop, including add'l noise reduction with one or another of several methods and plug-ins I have for that purpose. That wan't the point here, though. The test shot was a "worst case" for noise, to see how good or bad it was relatively straight out of the camera.
Would a 24MP 80D do better in low light and at high ISOs than your old XSi? Almost certainly yes... But so would a T6i, T6s, T7i or 77D, all of which are less expensive and use the same or very similar 24MP sensor as the 80D. In fact, some of those cameras are even newer than 80D and might do better, if further tweaks to the firmware algorithms and/or newer image processor were used in them. The method of shooting and your post-processing techniques will play a big role, too. For example, I do my post-processing on a graphics quality computer monitor that's carefully kept calibrated for proper brightness and color rendition... if you're computer monitor isn't accurately displaying images, it will cause you to incorrectly adjust everything. Post-processing work flow is important, too... noise reduction needs to be done before any sharpening is done. In fact, sharpening should always be one of the last steps with an image... after it's been re-sized for it's intended use. Too much sharpening can also cause problems, so it needs to be done carefully. (Above example has no added sharpening beyond the default Lightroom applies... camera settings for noise reduction and sharpness didn't matter because shot was done RAW (CR2). Keep in mind that image was significantly downsized for low resolution, Internet display... but the enlarged detail can give you more info.
So it really isn't about the 24MP of the above models, but the combination of sensor, processor, firmware, etc. qualities that make for usable images at high ISOs. Just how high is usable is somewhat up to you, what you can tolerate and how large you'll be using the images. You also need to avoid underexposure. Any time you have to boost the brightness of images in post-processing, it will also greatly amplify the appearance of any noise, too.
It helps to "fill the viewfinder" as much as possible... in other words, do as little cropping as possible. This has more to do with the lens you use, than the camera. I didn't see mention what you were using, but obviously it needs to be capable of pretty close focusing. Your point-n-shoot probably has a "macro mode", while your DSLR doesn't... and it's lens may be only able to do approx. 0.20X (1/5 life size)... some of the better general purpose walk-around zooms can do 0.33X (1/3 life size)... The best I know of is Canon's 24-70mm f/4L IS USM, which has a macro mode that allows it to do an amazing 0.70X, nearly three-quarters life size! Unfortunately that's a $1000 lens. (Though it may be worth it, only you can say... Or, perhaps buying a lower price camera would allow for it. If interested, more info here: https://www.the-digital-picture.com/Reviews/Canon-EF-24-70mm-f-4-L-IS-USM-Lens-Review.aspx)
In addition, you mention mixed lighting as an issue. For that you might want to learn to set a Custom White Balance. It's pretty easy once you know how it's done, and can make a huge difference in image quality. It also may help to shoot RAW (instead of or in addition to JPEG), which allow a lot more flexibility to adjust white balance later in post-processing. (Note: White balance is completely "changeable" in RAW files... But while most other camera settings are ignored, all RAW processing software I know of "respect" the color temp and tint that were used at the time the RAW file was made... so it's beneficial to use Custom WB, even with RAW. "Correct" exposure is the other thing that needs to be done as accurately as possible, even with RAW... see below.)
You also mention fluorescent lighting, which present special problems with exposure. FL lighting (and some others) fluctuates, cycling on and off at a very rapid rate of 60Hz or 120X per second. Typically that's too fast for our eyes to notice, but it manages to fool our cameras a lot! Shooting under FL lighting, I used to have to always take lots of extra images, because I knew that about half would be badly underexposed (and trying to boost their brightness in post-processing made for a LOT more image noise). But now more recent Canon (and Nikon) models have an "Anti-Flicker" mode especially for use under this type of lighting. Canon introduced this feature on the 7D Mark II models I use and I've found it to be very effective. What happens when Anti-Flicker is enabled is the camera detects the light cycle and times shutter releases to the peak output. Often you don't even notice any delay, it's a mere fraction of a second... but it's reduced the number of underexposed images to a very low percentage, just a few... instead of half or more of my images during a shoot under FL and similar lighting. I know the 80D has Anti-Flicker and am pretty sure all or most other Canon models introduced since 2014 (when 7DII were intro'd) will also have it... but check T6i, T6s, T7i and 77D, if considering those models. If you have to shoot under this type of lighting, Anti-Flicker is a real "game changer", IMO.
No, I would not recommend a macro ring light flash. I use Canon's MR-14EX Ring Lite, but only on ultra high magnification shots I do with the MPE 65mm Macro lens (which does a minimum of 1X/life size and goes as high as 5X life size), where it works well for me. In my opinion, ring flashes make for "too flat" lighting at lower magnifications. I really don't like them on less than 1X or 2X. For that level of magnification I use a Canon MT-24EX Twin Lite instead... or just a single, standard flash that's diffused to allow it to be used up close, held off to the side and attached to the camera with an off-camera shoe cord. That works surprisingly well. The single flash or Twin Lite allow for more control of light/shadow, which I think looks a lot better in close-up, but not ultra high magnification.
Below are a couple examples. First a very high magnification (approx. 3.5X life size) of a tiny, freshly hatched snail, where I used the MPE 65mm and ML-14EX Ring Lite, shown on the right:


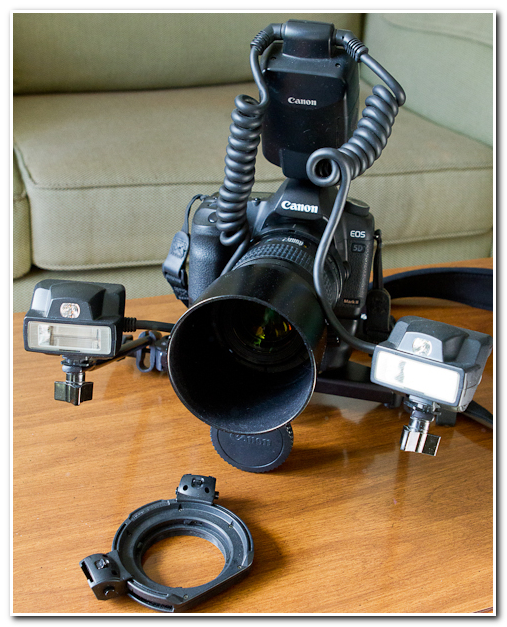
Below is an example done with the MT-24EX and Canon 100mm f/2.8 USM Macro lens. (I use the MT-24EX on a Lepp/Stroboframe dual flash bracket, which allows more positioning adjustment than the lens mount that Canon provides):
Finally, the paying mantis close-up below was done with a single, handheld 550EX flash with a rather low-tech, homemade "diffuser" (merely a couple layers of white gauze bandage held over the flash head with a rubber band). Notice that this close to a small subject a single large diffused flash actually acts sort of like a big softbox and "wraps" the light around the subject:


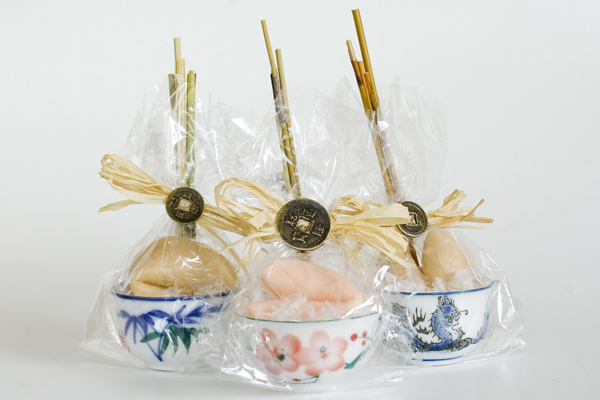
But sometimes a flash is more of a problem. For the product shot below, to be used in a client's web page catalog, a flash caused too much reflection off the transparent wrappings of the item, so I used window light (diffused North light, in fact), put the camera on a tripod, set a Custom WB and made longer exposures. I used an APS-C format DSLR fitted with a TS-E 45mm Tilt Shift lens (to be able to "dodge" my own and the camera's reflection) and for the lefthand image a circular polarizing filter (to control the amount of reflection... just enough to show the wrapping but still be able to clearly see the product inside). I used some white "flags" positioned near the products to redirect some light into the shadows too, more obviously seen in the righthand image:

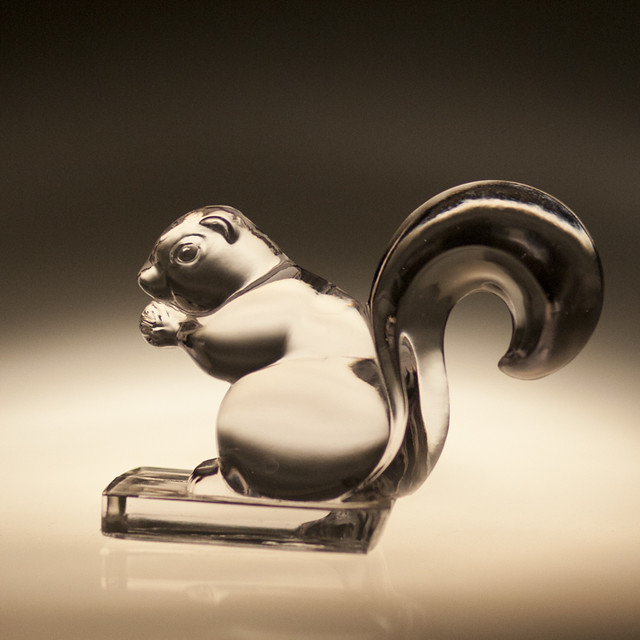
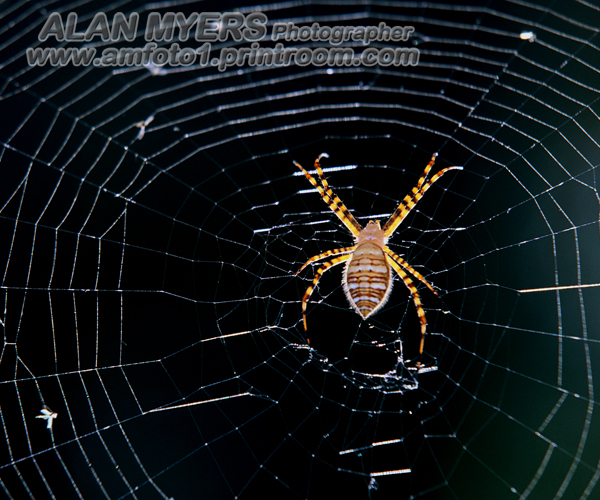
Completely transparent objects are another matter entirely... requiring special lighting to "define" their shape and form in an image. Both the test shots below were done in-studio with large softboxes, but only using the modelling lights, not the full power strobes. The lefthand image was done on a translucent surface and lit from below, with some black and white flags positioned nearby to reflect in the object, while the righthand image was illuminated more directly from behind using both white and black flags were placed nearby to help define the shape of the goblet:

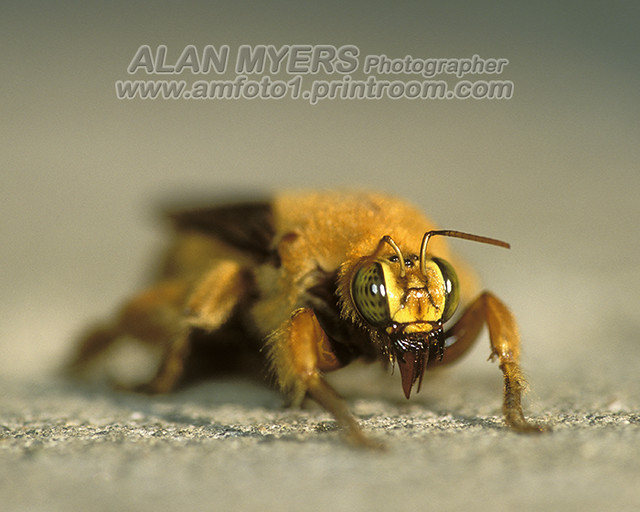
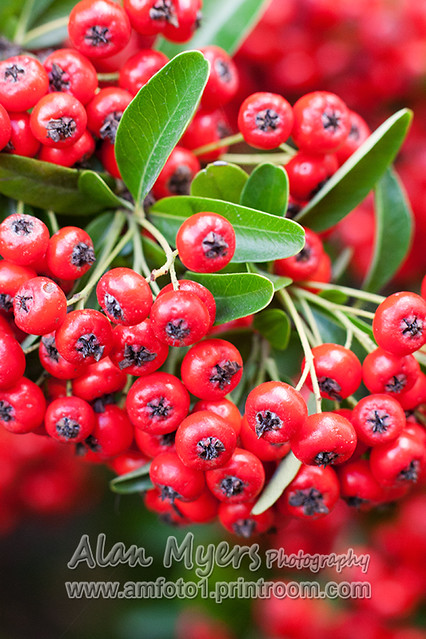
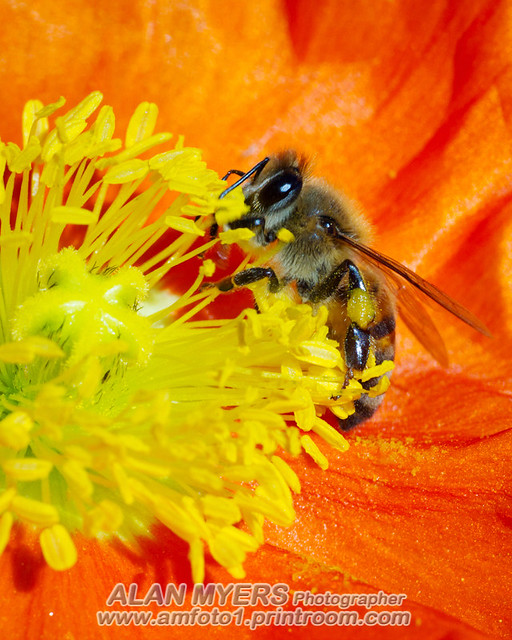
Doing close-ups and macro you also have to deal with shallow depth-of-field issues. Your point-n-shoot camera uses a tiny sensor that makes for very short lens focal lengths, which tend to render greater DoF. When you step up to using the DSLR with a larger sensor, you'll use longer focal lengths that will naturally want to render shallower DoF. This can be extremely shallow, as illustrated below where the golden bee was shot with a 180mm macro lens used with a relatively large aperture on a full frame format (actually film) camera and the DoF or plane of sharp focus is only a couple millimeters:
Stopping down, not using too high magnification and using a shorter focal length all can help increase D0F. But shorter focal lengths make for less working space between the lens and the subject, and smaller apertures require slower shutter speeds and/or higher ISOs. You'll have to find a balance that works for you. The shot below that was done with a Canon 24-70mm f/2.8 (on an APS-C camera like yours, with lens zoomed to 63mm and f/8 aperture:

Finally, a number of the shots above were done with specialized lenses (with the exception of the last that was done with a 24-70mm "walk-around" zoom at more modest magnifications). You don't necessarily need a new lens. Following images were done with standard lenses fitted with macro extension tubes (such as the Kenko set of three that costs around $110). The lefthand image was shot with a 70-200mm zoom fitted with a 25mm extension tube behind it (and a handheld, diffused 550EX flash to fill the backlit subject). The righthand images was shot with a 20mm extension on an 85mm non-macro lens (also compare to the similar subject above, which used a circular polarizer to reduce reflections, increase contrast and saturate colors... versus this shot which was done without a polarizer so reflections reduce contrast and saturation... both shots were done "in the shade" by available light only):
Or.... look for a vintage macro lens and adapt it for use on your DSLR. Following was done with a Tamron SP 90mm f/2.5 1:2 Macro lens dating to around 1985, that cost me all of $20 at a local secondhand store, plus another $40 for the Adaptall mount to fit it to EOS cameras (from manufacturers in China who are still making them)... I used a short macro extension tube to increase the magnification (lens is half life size only without it), stopped down to f/11 for as much DoF as possible and shot by available light only on a fairly bright, sunny day, handheld:
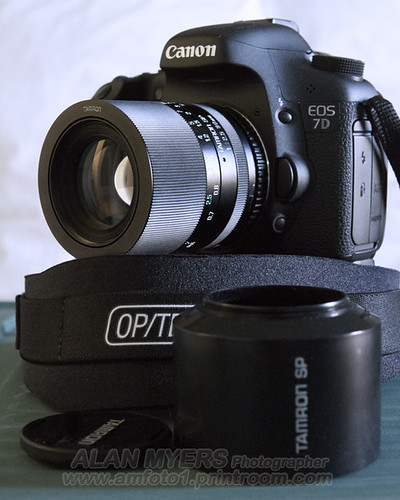
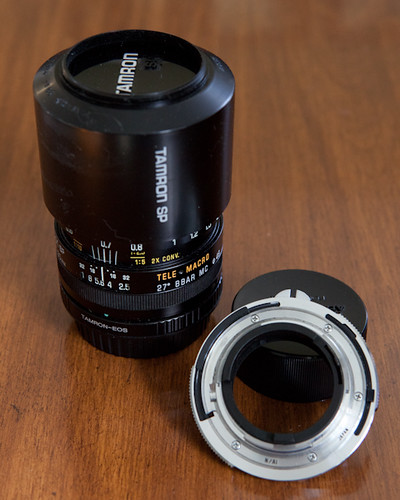
There are oodles of great old macro lenses that can still make excellent images and are easily adapted. Image above center shows the lens on one of my cameras and on the right above shows the lens with EOS/EF mount installed and a Nikon F-mount Adaptall alongside. Vintage macro lenses can be very cheap, but are slower to work with: manual focus & manual aperture only. And, when you stop them down, your viewfinder gets dimmer! Live View with Exposure Simulation can be a big help. And when using Live View an articulated LCD screen... such as 80D, T6i, T6s, T7i and 77D offer... can make low angle shots more comfortable! If interested in adapting an old lens to use on a Canon DSLR, see http://bobatkins.com/photography/eosfaq/manual_focus_EOS.html for more info about how it's done, the vintage mounts that are easily adaptable, as well as those that are not.
Hope this helps!
Jan 29, 2018 13:56:12 #

Meganephron wrote:
I agree smartphones are convenient, unobtrusive and can yield acceptable results. However, stability is an issue even if the phone says IS. OP also mentioned difficult lighting. Smartphones can’t really compensate for that with the one straight on flash.
If you choose to use a smartphone get Camera+ for better control of DOF. Easy to learn. A small Gorilla tripod, smartphone holder and remote release (volume control on ear phones will improve quality of pictures.
If you choose to use a smartphone get Camera+ for better control of DOF. Easy to learn. A small Gorilla tripod, smartphone holder and remote release (volume control on ear phones will improve quality of pictures.
A good suggestion. Camera+ is a very good addition. Gorilla pods are also excellent. Part of this discussion has to revolve around the affordances of the situation. Although it may well be possible to create much better images using extensive equipment, tripods, macro lenses, multiple light sources, and so forth, that really applies to a studio environment, or at least private access, not just an exhibition. It simply may not be possible to do those things at an exhibition or in a similar situation, so using the equipment available and suitable is sometimes the only choice. Any image is usually better than no image.
Jan 29, 2018 14:15:09 #
Very nice results. However, not everyone has access to such equipment, - I have some, but is the cost worth it for the purpose? - I do have a Canon macro lens, and a Canon ring flash, not inexpensive.
For many, a humble smartphone camera may produce 'good enough' results. My wife works for a high end jewelry company. They need images of their product. For most of their needs a smart phone provides acceptable results and is much easier to use. For high end shots they use the high end photography equipment that they own, but good enough is good enough for the purpose required.
Sometimes a smartphone is good enough.
Jan 29, 2018 15:39:51 #

Meganephron wrote:
I agree smartphones are convenient, unobtrusive and can yield acceptable results. However, stability is an issue even if the phone says IS. OP also mentioned difficult lighting. Smartphones can’t really compensate for that with the one straight on flash.
If you choose to use a smartphone get Camera+ for better control of DOF. Easy to learn. A small Gorilla tripod, smartphone holder and remote release (volume control on ear phones will improve quality of pictures.
If you choose to use a smartphone get Camera+ for better control of DOF. Easy to learn. A small Gorilla tripod, smartphone holder and remote release (volume control on ear phones will improve quality of pictures.

I've used Camera+ since the days of the iPhone 3Gs. I have a smartphone holder and knock-off of the Gorilla 'pod. And I always have my headphones.
As for lighting, since the iPhone has such great automatic white balance (best of ANY camera I have ever used), I tend to not use the flash, but grab someone else's phone and bounce its flashlight off a white card, napkin, or sheet of paper. With a second phone and a flashlight app, I can move the light around and get the effect I want.
As an aside, I've used "crowd lighting" to take nighttime portraits with an iPhone. When several people gather around with their flashlight apps set on high, they can be instructed to position them for reasonably decent portrait lighting effects. It's not umbrella or soft box lighting, but for social media snaps... it works.
Jan 29, 2018 15:55:23 #

burkphoto wrote:
Yep. iPhones are great for close work.
if the subject is not moving and is properly lit.
Jan 29, 2018 16:22:00 #
Cdouthitt wrote:
if the subject is not moving and is properly lit.
True. Although I've worked in some pretty low light. The stabilization in the iPhone 7 Plus is excellent.
I often photograph wine bottle labels to remember good wines I've sampled. And I use the phone to save grocery lists and business cards and other small items, the details of which I need to remember. For those purposes, it's more than sufficient. Would I photograph fine jewelry for eBay postings? Uhh, no.
Jan 29, 2018 16:22:58 #
burkphoto wrote:
True. Although I've worked in some pretty low light. The stabilization in the iPhone 7 Plus is excellent.
I often photograph wine bottle labels to remember good wines I've sampled. And I use the phone to save grocery lists and business cards and other small items, the details of which I need to remember. For those purposes, it's more than sufficient. Would I photograph fine jewelry for eBay postings? Uhh, no.
I often photograph wine bottle labels to remember good wines I've sampled. And I use the phone to save grocery lists and business cards and other small items, the details of which I need to remember. For those purposes, it's more than sufficient. Would I photograph fine jewelry for eBay postings? Uhh, no.
labels don't move much...unless I have drank their contents ;-)
Jan 29, 2018 16:36:38 #
burkphoto wrote:
True. Although I've worked in some pretty low light. The stabilization in the iPhone 7 Plus is excellent.
I often photograph wine bottle labels to remember good wines I've sampled. And I use the phone to save grocery lists and business cards and other small items, the details of which I need to remember. For those purposes, it's more than sufficient. Would I photograph fine jewelry for eBay postings? Uhh, no.
I often photograph wine bottle labels to remember good wines I've sampled. And I use the phone to save grocery lists and business cards and other small items, the details of which I need to remember. For those purposes, it's more than sufficient. Would I photograph fine jewelry for eBay postings? Uhh, no.
Funnily enough a smartphone camera can serve well enough for fine jewelry, although not for ebay, mainly between a wholesaler and clients. For ebay or equivalent online marketplace, my wife does a much better job, but still uses an old Canon P&S although she has much better equipment available. It's all about the requirements for the result and the quality that is required.
Jan 29, 2018 16:41:03 #
Peterff wrote:
Funnily enough a smartphone camera can serve well enough for fine jewelry, although not for ebay, mainly between a wholesaler and clients. For ebay or equivalent online marketplace, my wife does a much better job, but still uses an old Canon P&S although she has much better equipment available. It's all about the requirements for the result and the quality that is required.
True. For eBay, you don't need much.
Themyscira? Really? You should read some books by my old friend, author Nancy Northcott, if I get your comic book reference...
Jan 29, 2018 21:41:07 #
burkphoto wrote:
True. For eBay, you don't need much.
Themyscira? Really? You should read some books by my old friend, author Nancy Northcott, if I get your comic book reference...
Themyscira? Really? You should read some books by my old friend, author Nancy Northcott, if I get your comic book reference...
Having just watched Wonder Woman again - great movie and excellent stuff about daguerreotypes on the blue ray edition extras - it felt like Themyscira would be a great place to live, or at least have a vacation home!

Sad that we just lost Ursula K Le Guin. She was a force in the fantasy literature world. I'll look up Nancy Northcott.
I've just looked up Nancy, and read some of her 'about Nancy' to my wife, who said, "Sounds like an interesting person", and we have friends who fit into a similar sort of background, so it's another small world kind of thing!
Jan 29, 2018 22:18:23 #

lmTrying wrote:
My alias is modelbuilder1. I enjoy building scale ... (show quote)
I'm afraid your title has confused people. For photographing models, DoF is the biggest issue. The SX710HS is best, not because it is 20mb, but because it's 1/2.3" sensor naturally provides deep DoF. Cameras in smart phones have small sensors, so a smart phone might be the best for this application; otherwise you want another camera with a small sensor.
Jan 30, 2018 06:52:35 #
lmTrying wrote:
My alias is modelbuilder1. I enjoy building scale ... (show quote)
Going with 24 vs 20 mp will only increase resolution by 10%. (It goes by square root) Unless you are making huge prints you will not notice the difference. Other suggestions are right on. You need a good lens first and to shoot where you have a depth of field that will keep everything in acceptable focus. For close ups you might need a macro lens. Focus stacking is a good solution also but will require that you use a tripod. The double flash set-up is also a great idea to use as either the main light or fill light.
Feb 8, 2018 00:51:19 #
lmTrying
Loc: WV Northern Panhandle
rehess wrote:
I'm afraid your title has confused people. For photographing models, DoF is the biggest issue. The SX710HS is best, not because it is 20mb, but because it's 1/2.3" sensor naturally provides deep DoF. Cameras in smart phones have small sensors, so a smart phone might be the best for this application; otherwise you want another camera with a small sensor.
After 66 years I have found that most people only hear or read what they want, not necessarily what is said or read. I could have put more detail in my OP, but that can backfire too. But after reading all the responses I now understand things I did not when I made my initial post. I'm not sure I understand all the why's.
It seems like everyone says a full frame camera is best for landscape photography. Landscape photography as I understand it requires deep DoF. But you're telling me that the smallest sensor in my 710 is better for DoF than the sensor in my XSi or an 80D. So if logic follows, the XSi would be likewise better than a full frame. I have seen some outstanding landscape photos posted using a p&s.
Guess I'll take my 710 and a small flashlight next week. I used my Motorola last fall when I forgot my cameras. It took really bad photos. But I did it really fast.
If you want to reply, then register here. Registration is free and your account is created instantly, so you can post right away.