Two questions about this image
Nov 23, 2017 01:09:59 #

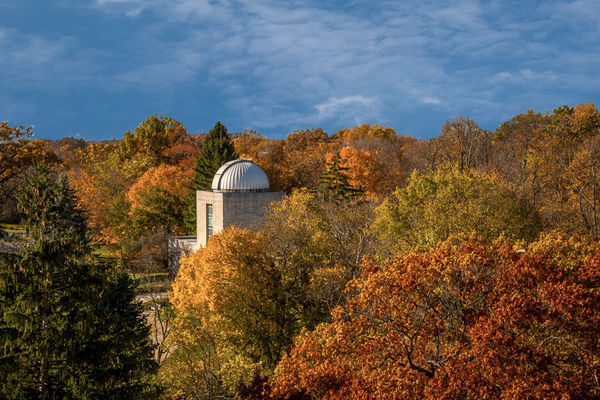
This was my first attempt at replacing a sky in PS. It was a very light blue with no clouds at all. Any suggestions on improving that part of the image. It actually came out better than I expected for my first time, but I am certain it could be better.
Second, as I am still fairly new to Lightroom, where all other processing was done, does anyone have suggestions for how this might have been processed better? I tried to get some vibrance without over saturating the image. Did I push it too far, or do you see any other areas I should try to improve?
Thanks!
Nov 23, 2017 06:04:19 #

Ben, I find the sky in this image very pleasing and didn't recognize the sky had been changed. But, at 800-pixels, it doesn't open large enough to fill my computer screen on the download so I can't see the details of where the trees meet the sky. Regarding LR, I tend to focus on the HSL section in the Develop module when working with skies. You can see all three sliders individually. It does depend on the conditions / blueness of the sky, but a typical change might be to raise the luminance of the blue (brighter), followed by reducing the saturation of the blue, followed by adjusting the hue of the blue. The sliders jump in +/- increments of 5 on their scale when done automatically by LR. This can be too much for the hue adjustment where I need to manually dial in a lesser or greater value.
In execution, you open the HSL panel in the Develop module, say starting with Luminance and first click the small circle above and to the left of the individual color sliders. Your mouse will change and become that small circle / target. You then click on the color to be adjusted within your image. Zoom in to the display of the specifics of the image if you need to reach a color specifically. In your image I might click that blue area with less cloud about 10 o'clock of the observatory tower on the left side of the image. After clicking, you use your UP arrow on your keyboard to adjust the slider to the right increasing the luminance. Or, use your DOWN arrow to lower the luminance. This is where the + / - 5 increment jump occurs.
This clicking method is good in LR as LR will adjust related colors at the same time, say automatically picking up aqua and / or purple as you adjust blue. When you're done, come back and click that small circle in the HSL area to change your cursor back. Using my L>S>H approach, I just change (click) the subpanel title without changing the cursor setting to work with each of the settings / sliders individually until done with the entire processing.
As said initially, your sky in this image looks completely natural. Maybe you should visit the original image and see if L>S>H edits could have addressed the original image rather than the larger effort of a sky replacement? Using the approach above, it's usually the Hue that is the hardest to "perfect". I can get the brightness and saturation adjusted easily enough with LR, but I'm typically left will a sky that is unnaturally Cyan (too aqua) or Purple (too red). Manually adjusting the hue in increments of +/- 3 to the Blue and sometimes Purple is needed to correct the blue of the sky to something natural. Making plus ( + ) changes to the Blue will add Red back into a too cyan (aqua) sky and making minus ( - ) changes to blue will remove red from a too purpleish sky.
Nov 23, 2017 08:59:26 #
A little secret is to use a "brush", with the sky's blue selected, to burn in the light areas where the trees meet the sky. It will darken the sky but the trees will hardly be affected at all. Otherwise, great job!!
Nov 23, 2017 11:19:30 #
You've got slight fringing where the trees meet the sky. In Lightroom, try adjusting the blue channel to minimize. One of the great things about Landscape Pro, there is a sky fringe slider to do this .
Nov 23, 2017 11:59:52 #
CHG_CANON wrote:
Ben, I find the sky in this image very pleasing an... (show quote)
CHG, thank you for taking the time to write such an informative post. I really appreciate you!
Nov 23, 2017 12:00:32 #
SonyA580 wrote:
A little secret is to use a "brush", with the sky's blue selected, to burn in the light areas where the trees meet the sky. It will darken the sky but the trees will hardly be affected at all. Otherwise, great job!!
Thanks for that good tip, Sony.
Nov 23, 2017 12:01:59 #
rgrenaderphoto wrote:
You've got slight fringing where the trees meet the sky. In Lightroom, try adjusting the blue channel to minimize. One of the great things about Landscape Pro, there is a sky fringe slider to do this .
Thank you. I was playing with the trial version last night and got a great result, but the trial version does not allow you to save the image. However, it convinced me to buy the software.
Nov 23, 2017 14:26:25 #

Hi rab-eye, I’m an avid ‘bland and featureless sky’ replacer as well, with the thought that all my photos are taken to be played with as much as I want, to heck with the opinions of the ooc purists. So I’ve learned a few things over the years, two of which are that you have to be selective with the photo you start with, and skylines that have soft edges like trees and branches are extremely difficult to pass of as looking real. In your image, even before I read your post, I saw that the sky had been replaced, simply because of the hard line in places between sky and trees. My second comment comes from the painter in me, if you go outside right now, and look towards the horizon, you’ll likely notice that the sky is lighter in color along the horizon than it is if you look straight up. The sky you chose as the replacement has the same color or value from top to bottom, and that’s very unusual in real life.
So, boiling my comments down to their essences, pick your photo carefully without so much fine detail between old photo and new sky, at least until you get a little more practice under your sky-replacing belt, and secondly, select your new sky to be lighter along the horizon so it looks more natural.
So, boiling my comments down to their essences, pick your photo carefully without so much fine detail between old photo and new sky, at least until you get a little more practice under your sky-replacing belt, and secondly, select your new sky to be lighter along the horizon so it looks more natural.
Nov 23, 2017 14:35:10 #
jonsommer wrote:
Hi rab-eye, I’m an avid ‘bland and featureless sky... (show quote)
Great advice, Jon. Thank you so much!
Nov 24, 2017 08:24:02 #

Rab-Eye wrote:
This was my first attempt at replacing a sky in PS... (show quote)
Ben, a serious effort and a terrific result. No need to apologize. One thing about skies--they tend to desaturate close to the gound--they fade slightly, less intense blue. I can see the problem, but I can't offer a coherent set of steps to improve it!
Nov 24, 2017 09:28:57 #
rmm0605 wrote:
Ben, a serious effort and a terrific result. No need to apologize. One thing about skies--they tend to desaturate close to the gound--they fade slightly, less intense blue. I can see the problem, but I can't offer a coherent set of steps to improve it!
Thank you, RMM.
Nov 24, 2017 11:16:18 #

Rab-Eye wrote:
This was my first attempt at replacing a sky in PS... (show quote)
Ben this shot looks really nice. I know just the basics in Photoshop so I am not much help at all.
Happy Thanksgiving.
Nov 24, 2017 23:58:32 #
Jules Karney wrote:
Ben this shot looks really nice. I know just the basics in Photoshop so I am not much help at all.
Happy Thanksgiving.
Happy Thanksgiving.
Thanks, Jules. I've managed to improve on this version, but just between us, I did not get more skillful. I got Landscape Pro. At least for this, it's much easier to achieve a natural look with Landscape than with Photoshop.
Nov 25, 2017 00:03:21 #
I think the sky is fine as far as vibrancy, hue and all that. Moreover, that is up to you and your tastes. Moreover again, depending on our monitors, hue and saturation could look a bit different, so you can get lots of different opinions I think.
As far as the fringing around the edges of the trees, there are a lot of ways to work on that, some have been mentioned, but there are many. (Youtube is your friend)
You said you used photo shop, and I assume you used layer mask to mask out the original sky? If not that's the correct way to remove and replace backgrounds/skys and so on.
To get rid of fringing, first, use the zoom tool (Z) to select a small area around the edge where fringing is noticable. Blow it up BIG, so you can easily see it. Next, you can delete the fringing by painting black *in the mask*. Also, you can click in the picture in the layers window (NOT the MASK) then, use the stamp tool (S) set to around 20-50% opacity, and paint around the edges. Also, you can select the burn tool, low opacity (exposure) again, and paint around the edges. Usually set the Range to highlights.. This is very easy to do, and you don't need to worry about painting into the sky because that part of the picture is invisible due to the mask. Also, when painting on the picture, I usually make a duplicate of the layer and mask (Ctrl J) , then turn one off. That way it's simple to get back to where you started if you really screw up.
Nov 25, 2017 00:08:43 #
BigDaddy wrote:
I think the sky is fine as far as vibrancy, hue an... (show quote)
That's helpful, Big Daddy. Thank you.
If you want to reply, then register here. Registration is free and your account is created instantly, so you can post right away.