Cloudy day landscape
May 8, 2017 16:03:22 #
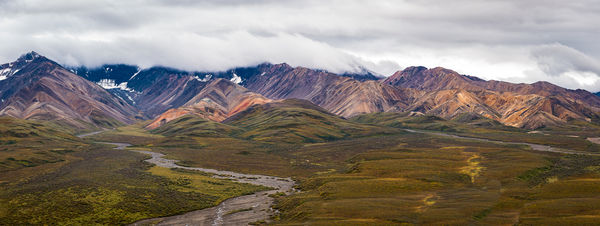
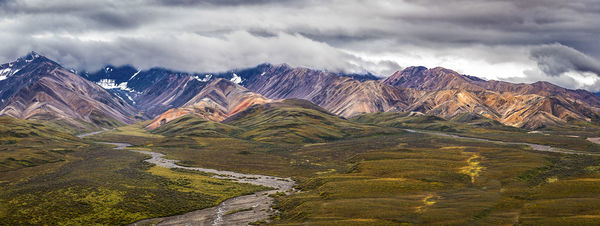
This is a stitched photo of Polychrome Pass in Denali National Park. (Wonder how it got it's name?) It was a cloudy day so I had to work with what I was given. I've adjusted the white balance to remove the blue cast from the clouds.
Feel free to make suggestions or try you hand at improving it.
Feel free to make suggestions or try you hand at improving it.
May 8, 2017 17:34:57 #
May 8, 2017 19:31:13 #
May 9, 2017 08:19:49 #
The shot looks perfect to me. If your colors are off only you know the problem. Well done.
May 9, 2017 08:34:11 #
rborud
Loc: Minnesota
GregWCIL wrote:
This is a stitched photo of Polychrome Pass in Denali National Park. (Wonder how it got it's name?) It was a cloudy day so I had to work with what I was given. I've adjusted the white balance to remove the blue cast from the clouds.
Feel free to make suggestions or try you hand at improving it.
Feel free to make suggestions or try you hand at improving it.
Greg
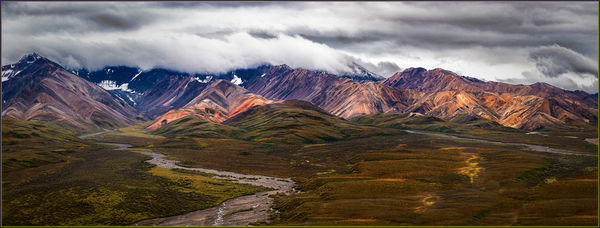
Does this do anything for you?
RBorud
May 9, 2017 08:42:42 #
May 9, 2017 10:10:48 #

May 9, 2017 10:33:30 #
rborud wrote:
Greg
Does this do anything for you?
RBorud
Does this do anything for you?
RBorud
WOW, yes that is really dramatic. Could you share the details of how you accomplished that? I pretty much just use Lightroom - I have Photoshop but not so good with it.
May 9, 2017 13:08:34 #
rborud
Loc: Minnesota
GregWCIL wrote:
WOW, yes that is really dramatic. Could you share the details of how you accomplished that? I pretty much just use Lightroom - I have Photoshop but not so good with it.
Greg
I did this in Corel . Generated a duplicate layer, Then concentrated on the upper layer adjusted levels to increase the dynamic and moved the center control slightly to the right, until I was pleased and also doing this only looking at the mountains. Turned off the upper layer and did the same to procedure to the lower layer and only looking at the clouds, and adjusting level until it pleased me. turned on the upper layer and erased the clouds from that layer, using a very soft brush so it would blend, so I was seeing the clouds from the lower and the mountains from the upper. then merged the layers. I duplicated the new image again and added a very low level radial gradient to the upper layer. After merging the layers again I took a lightening brush and very lightly brushed sunlit areas streams and any thing that I wanted to feel was more forward. Then did the same with a darkening brush. I did not to this to everything just selective areas, to shape the visuality. Added a tiny border and off to you. I think many just want to push one button and get what they want, but I do think a bit of work is better. It may seem complicated but with practice it took me longer to type this than do it. But believe me I am a lousy secretary. Let me know if I can do anything else. RBorud
May 9, 2017 14:10:19 #
rborud wrote:
Greg br I did this in Corel . Generated a duplica... (show quote)
Thank you very much for taking the time to explain your method. When I first responded I was looking at it on my phone. Now on my computer your magic looks even more stunning. Before, my image was just kind of monotone with no real subject. Your version makes the mountains the focal point and the brighter stream running through the dark foreground leads one's eye right into the subject.
I have a friend who has Corel, another with Photoshop. I will see if they can try your methodology. I'll have to mail a thumb drive to my Corel buddy because the pano is about 17000 pixels wide. In JPEG the file is 88mb and a TIFF from it is 602mb!
May 9, 2017 16:19:52 #
rborud
Loc: Minnesota
GregWCIL wrote:
Thank you very much for taking the time to explain... (show quote)
Greg
You do not have to send your friend a thumb derive, if your file is bigger than the gmail size of 24mb it will send it to google drive and you can sent any size you want.
RBorud
May 22, 2017 10:55:14 #
rborud
Loc: Minnesota
GregWCIL wrote:
Thank you very much for taking the time to explain... (show quote)
Greg
Curiosity behoves me to ask if your friends where able and/or willing to help get your print made.
RBoeud
May 22, 2017 13:10:05 #
rborud wrote:
Greg
Curiosity behoves me to ask if your friends where able and/or willing to help get your print made.
RBoeud
Curiosity behoves me to ask if your friends where able and/or willing to help get your print made.
RBoeud
Unfortunately my farming vocation has interfered with my photography avocation. However, your message serves as a reminder to keep it on my to-do list. In fact, it is still a pleasure to revisit your edit and download it to see how dramatic it is. I also have discovered a local fine-art printing shop and the owner wants me to bring in a .tiff file and see what he can do on his software which is calibrated to his printer. I plan to take your rendition along on my laptop to see how close we can get.
Thanks again, and I will let you know our results.
Greg
Edit to add: BTW, this stitched image is 16,760 pixels wide and the TIFF version is 602 mb so it will take a pretty good computer to work on it but it could print 84 inches wide x 31 inches tall at 200dpi.
May 23, 2017 20:18:20 #
GregWCIL wrote:
This is a stitched photo of Polychrome Pass in Denali National Park. (Wonder how it got it's name?) It was a cloudy day so I had to work with what I was given. I've adjusted the white balance to remove the blue cast from the clouds.
Feel free to make suggestions or try you hand at improving it.
Feel free to make suggestions or try you hand at improving it.
Thought I would try my hand at this
May 23, 2017 20:30:12 #

If you want to reply, then register here. Registration is free and your account is created instantly, so you can post right away.