Multiple Flast Techniques for Wedding Photographers- Part 6
Mar 15, 2017 13:53:02 #

Multiple Lighting Techniques for Wedding Photographers- Part 6
Bounce Lighting, Light Modifiers, Diffusers and Other Gadgets.
Bounce flash techniques are nothing new, in fact, the method is so old it actually predates flashbulbs- it goes back to FLASH POWDER- early PYROTECHNICS! The original flash GUN as a “T” shaped device consisting of a troth, a handle and a flint actuating mechanism. The troth was filled with flash powder, a kind of incendiary/explosive mixture, likened to gun powder, mixed with metallic fragments. The camera's shutter was opened, a spark from the flint would ignite the flash powder and a flash of light would the occur, enough light to adequately expose the film or plate in the camera. I'm sure we have all seen those comedic old-time movies with the flash firing in a smokey explosion, blackening everyone's face and clothing- funny stuff. Fact was, however, that the flash powder was dangerous and real accidents were know to happen- not funny at all. The only saving grace was in that the troth was so designed that the explosive force and the flames went upward, not out toward the subjects, so unless too much flash powder was used to get more light, the system was relatively safe. I don't think that many newspaper photographers of that era were particularly worried about aesthetics- the just wasted to generate enough light to take indoor shots. Looking at some of theses old images in books and museums, I noticed how natural some of theses flash powder shots appeared- one would thing they would be harsh but there was surprisingly even lighting- decent coverage- kinda soft!. That's because the upward direction of the light hit the ceiling and bounced back, thereby lighting the entire room and the folks in the pictures. Perhaps, maybe,, who knows?- that may have been the inadvertent birth of bounce lighting. Must have been lots of blackened ceilings!
Oh- When I want to get out of doing FREE wedding photography for stingy friends and relatives, I would ask them to tell the church officials and the catering hall folks that their photographer is kinda “old school” and uses flash powder!- and they need to secure written permission! If anyone is interested, just Google “Flash Powder”, there are recipes- so you can make your own!
All kidding aside, as soon as quick release flash brackets and clamps and coiled synch. cords were invented, many press and wedding photographers began to aim the flash units upward and sideways- not directly at their subjects. The idea, of course, is to simulate natural sky light or large studio lighting gear that emits soft natural and directional light. Even most standard “Speedlights” have bounce features, whereby their light path can be redirected- but EXACTLY where and how we redirect the light is where fine flash technique enters the story. So- bounce flash is simply reflecting the light from a larger surface for a softer, more natural and even effect. I suppose one can say that we are diffusing or spreading the light as well- so let's stick with theses concepts or definitions for now.
Now lets examine the basic concept of DIFFUSION. That where we place some kind of material such as translucent cloth, plastic or spun glass in front of the light source to soften or spread the light. The material can be as simple as a white handkerchief, specialized plastic materials such as Roscoe® sheeting, specifically designed for photographic applications, “Sign-White Plexiglas” which spreads light more than regular Plexiglas, cloth scrims, bubble wrap and a host of other stuff can be employed as diffusers. Most diffusers absorb some of the light so they also act as a form of neutral density.
Then there are what I call “LIGHT SHAPERS” , things like snoots, barn doors, gobos (short for go-between), head screens, simple black cards, grids- just about anything that basically funnels light or blocks light from striking certain elements in a composition.
Not often mentioned, in the realm of light modification, are OPTICAL DEVICES, such as lenses or condensers in spotlights and Fresnel lenses in Fresnel type spotlights.
Obviously, there are REFLECTORS, the internal or detachable reflectors in our flash units and other kinds of lighting gear and EXTERNAL reflectors such as the flat and disc shaped ones that we make or buy- there are dozens if not hundreds of different styles and types. Walls and ceiling are also external reflectors as are parabolic umbrellas of many descriptions.
The reason I am explaining and categorizing all of theses things is to establish a basic and theoretical understanding of light modification. Interestingly enough, all light modification methods and tools are simply based on one or more of the aforementioned components, usually a reflective surface and a diffuse and perhaps a light sharper and sometimes a lens or other optical device. Once you get the basics down pat and keep them in mind you can improvise many lighting designs, on the spot, with little expense. You will also know, which light modifiers are good investments and which are almost useless.
Here is almost as much advertising hype in the marketing of lighting gear and modifiers as the is in marketing cameras and lenses. I hope by this time most wedding shooters realize that the difference between “Nikon and Canon” is simply a matter of personal preference and that in the hands of a savvy shooter any decent camera can be used to craft magnificent images and oftentimes with the simplest of lighting gear and accessories. To me, it is laughable that on various online photo forums, there were ongoing “flame wars” having to do with different brands of lighting modifiers. Costing hundreds of dollars, that looked more like pieces of Tupperware! What's even funnier, is that much of that stuff, simply sitting atop a camera-mounted Speedlight, is not very effective either.
A fried of mine, who was a prominent photo retailer in my city, once intimated to me that just about anything that you can stick in front of a light, sells like crazy and generates lots of profit.. If you doubt that, just check out Gary Fong's website- where the average cost of a Speedlight “kit” is around $300.
I have nothing against the use of good light modifiers, even the ones that you just attach to your on-camera Speedlght. My beef, if I have any at all, is with overstated adverting claims that lead to misconceptions on the part of uninitiated photographers. One manufacturer claims that you will achieve “portrait” lighting by simply adding their device to your Speedlight. Although the device will probably soften or diffuse the light to some extent, but not using the Speedlight off camera, the lighting would still remain FLAT, not at all portrait-like. The degree of softness that is achieved is dependent, in part. To the SIZE of the light source in relation to the size of the subject and the DISTANCE between the light source and the subject. The business end of a Speedlight, that is, the flash tube, the reflector, and plastic lens in front of the housing is perhaps- say 4 inches. One of those typical dome-like modifiers may simulate a slightly broader source- maybe another inch or two- still pretty small- very small when it is compared to a studio unit with a 12 or 16 inch parabolic reflector, a “beauty light” or a a medium to large sized umbrella or soft-box.
The DISTANCE between the light source and the subject , besides influencing the intensity or volume of light, significantly influences the quality (hardness/softness) of any light source.
So...If we consider the relative SIZE of the light source and the working DISTANCE in any given scenario, we can begin to better analyze the effectiveness and application of any light modifier or ANY bounce method. Also let's factor in that all light modifiers employ one or more of the aforementioned components, those are, internal or external REFLECTORS, some form of DIFFUSION material or scrim, and/or some kind of light SHAPER or GOBO- you might find the odd optical system or lens in a few of them. We should also examine the relationship in both configuration and proximity of the primary light source (the actual lamp or flash tube) to the reflective surface and the distance of any lamp head or flash head from any reflector or diffusion material. The nature of the reflective surface or reflective material also counts in, for example, the differences in reflective efficiency when we compare a matte white surface, to a aluminized or metallic surface and then to a highly polished or mirror-like surface.
Let's look a a few situations. If we were to place a typical dome type light modifier on a speedlight and simulate a 6 inch light panel. We place a ping-pong ball about 6 inches from the light. The light source is in close to and is larger that the subject. The resulting lighting will be noticeably soft. If we move the same light a few feet away, the lighting will be significantly harder. When we are making a typical ¾ length portrait of a bride with this same modified Speedlight mounted on the camera we are usually about 6 to 8 feet from the subject and the bride is many times a larger subject than that ping-pong ball . This might seem like a strange comparison- a bridal portrait to a ping-pong ball but the object of the experiment is to illustrate that at the average camera/subject distances we work at in wedding photography, many of theses small clip-on modifiers have little or no softening effect on the lighting quality. When me move even further away for a full length portrait, the aisle shots, groups and candid on the dance floor, at those distances the little Speedlight setup might as well be unmodified, because there will be no significant degree of softening.
OK- The little Speedlight are indeed surprisingly well engineered and do supply enough light over a decent angle of coverage, given the size and compactness. Don't, however, confuse coverage with softness or QUALITY of light. My own style and marketing concept was always and still is based in a more unique and outstanding “look”, more like what is more commonplace in fashion, production cinematography and upscale portrait photography. This is why I kinda knock myself out in order to achieve more style, elegance, mood, romance, excitement, intimacy, OK- pizzazz (for lack of a better word) in my lighting techniques. To do this, I found I had to stray from this current so-called “Strobist” and Speedlight schools of though and go back to older-school and bulkier equipment. I need larger light sources, bigger modifiers, and in some instances, where time, logistics and space allow, I even drag around some studio-type gear.
I have been criticized by some other wedding shooters when the see some of my hand held rigs. The say laughingly “who wants to run around all day with a light that is larger than the camera”? What can I say, ME! Some quip that it looks “STUPID”! Again, what can I say? First of all, I am there to do my best possible work- NOT to to make a FASHION STATEMENT or show off stylish equipment.
Nonetheless, my crew and I are always attired in dark business suits or tuxedos, depending on the style of the affair. The jackets have a small elegant studio logo embroidered on the pocket. No bluejeans (unless the bride and groom and all their guests are dressed that way), no T-shirts, no sports attire- no baseball caps! Most of our gear is BLACK. We want to blend in a go unnoticed as much as possible. As long as I have the strength to deal with the heavier gear, I will continue using it- we have NEVER had a complaint of intrusiveness from, any client, church official, catering staff or guest. We work fast and efficiently. Even my home-made DIY contraptions are designed to be compact, not particularly noticeable or awkward and are not likely to fall apart in the midst of the job.
If you are not into trucking around heaver gear or your shooting style is incompatible with big lights or modifiers, there are alternatives. If you understand the basics concepts of multiple lighting, you can “miniaturize” things and still achieve good results. I have to admit, that some of my older gear ain't for the folks who can't handle heavy stuff. If one is not used to it, it may slow one down. One of the young ladies I have trained, tried out some of my gear and remarked that it was like carting around a Volkswagen on her back- and she ain't frail! She now works with Speedlights and is turning out great stuff. We looked in to a nice little modifier system by MAG MOD, Check them out on the Internet- Nice stuff! Very “NEW SCHOOL” but well designed and rugged construction. Sign up for their mailing list. The have some cool demos and little tutorials and interviews with photographers.
Basically, all light modifies involve some for of BOUNCE or INDIRECT LIGHTING. The PRIMARY light source is the Speedlight, flash head, flash tube, bare flash tube, or any other type of lamp or bulb- continuous of flash. This series of articles deals mostly with flash equipment- Speedlights and portable or studio type electronic flash units. Simply stated, we aim the primary light source at a larger reflective surface which then becomes the SECONDARY and therefore MODIFIED light source. There are dozens if not hundreds of different reflective materials that are used in per-manufactured modifiers, as many different designed and configurations and in many cases the secondary light is further modified by DIFFUSION materials (called scrims) and the possible SHAPED and further modified by some light absorbent material that is part of the modifiers housing or attached to the front of the modifier such as BARN DOORS or some kind of GOBO. The oldest form of BOUNCE LIGHTING, it's most rudimentary form, is to simply direct the primary light source at nearby walls and ceilings when they become a very broad secondary source.
More about BOUNCE lighting in the next section. Stand by for part 7
Ed
Mar 15, 2017 16:12:22 #
Mar 15, 2017 17:19:15 #
Hey Jim! Thanks for your question! Right on.
As I mentioned in some of my previous posts, my main computer system is down- really badly down. The operating system needs to be updated. Now it looks like the existing hardware, the motherboard and more is totally outdated and it is time completely new system. So...all my image storage is tied up and I can't scan anything in to the system. The computer I am typing on now is just set up for word processing and Email and I am processing my client's work at an outside lab. I am running the odd image here through my i-phone and creating my diagrams (the ones I posted thus far in the other parts of this series) on that Android system,- real Mickey Mouse for now.
So...As soon as I have everything back in working order, I will post images to go along with the text. Meanwhile, if you have any specific questions or things you want me to illustrate, just let me know and I'll try to copy something on my phone and post it. In the meantime, I hope the text is of some help.
Thanks again for you interest and your feedback will be appreciated.
Ed
Mar 18, 2017 14:51:51 #
Thanks again,
I also would like to add that those small light modifiers don't only not help much at a distance, but you also lose a stop or 2 of power, so your flash works harder to compensate. That kills batteries faster, and shortens the life of the bulb and or flash itself.
I found that if your using one of the newer flashes that struggle with over heating, removing the "Tupperware " makes a huge difference.
Remember, one stop is twice the light, so your flash works considerably harder when a modifier is eating all your light.
Mar 19, 2017 10:34:14 #
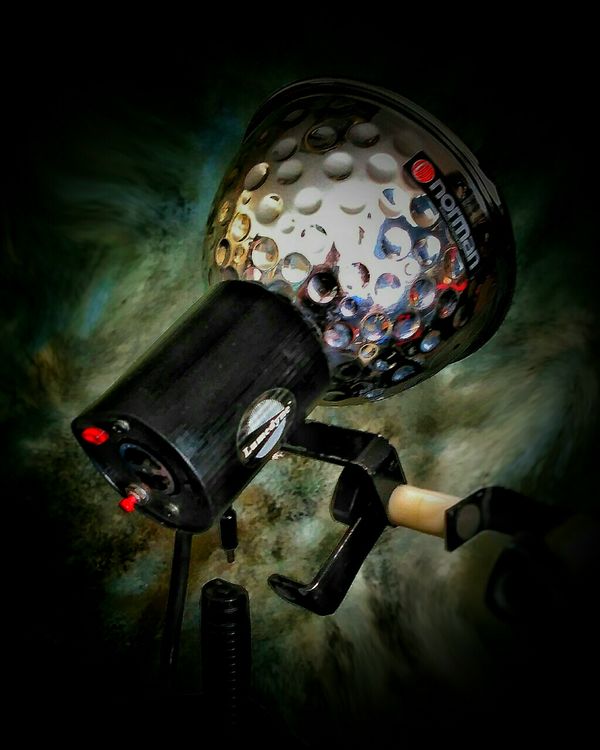
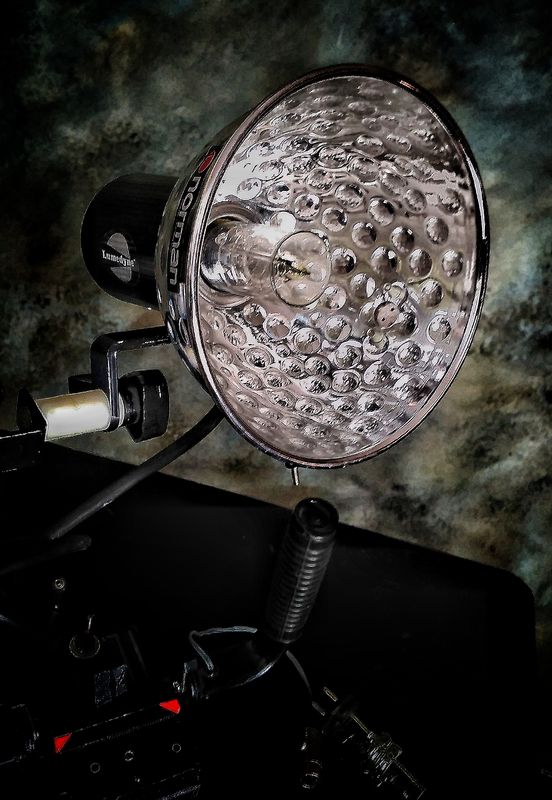
Yes! That' a why I am a big fan of "old school" flash gear. I maintain most of the flash units that I purchased 30 yeas ago. A good deal of it is currently still being manufactured.
Here's a shot of a parabolic lamp head. The interchangeable flash tube is open-ended to provide ventilation and the helical coil construction of the tube dissipates heat even at 400 watt/seconds. These lamp heads also accommodate a modeling lamp which comes in handy for accurate portrait lighting on the fly.
The external power supply will yield 500 full power flashes before recharging is required and there is no heat generated from the battery pack.
During a wedding, I routinely switch batteries half way through the gig so the units never run down unexpectedly.
I have plenty of light for any kind of bounce situation or modifier type.
Only problem...sore shoulders at the end of the day.
If you want to reply, then register here. Registration is free and your account is created instantly, so you can post right away.