Multiple Lighting Techniques for Wedding Photographers- Part 5
Mar 9, 2017 17:24:34 #

Multiple Lighting Techniques for Wedding Photography-
When it comes to teaching multiple lightning at weddings and many other specialized or new photographic methodologies there are three old sayings that come to mind: “There is more that one way to skin a cat”, “If it ain't broke, don't fix it” and “You can't teach an old dog new tricks”. Well, I don't believe in either of those philosophies when it comes to wedding photography.. First of all, who the heck wants to skin a cat? The S.P.C.A . takes a dim view of things like that and they will come after you. I believe that good progressive and creative photographers/business folks, are always looking out for new ways to improve their work and their sales and profit potential, even if they are “old dogs” like ME! Offering a superior, visually impactful and outstanding concept is obviously a good strategy in that we are SELLING a visually orientated concepts, service and product. Visual art is our “merchandise”! There is nothing “broken” or particularly bad about shooting with one light, using primarily, available light or any number of mixed lighting approaches. It's just that when flash lighting is called for, it's good to have a reliable method of attaining above average results.
A far as “cat skinning” is concerned, there are many ways to incorporate multiple lighting techniques in your wedding routines, not only what I am teaching here. Like all techniques, it's always good to have basis of time-honored and practical starting points to begin with and eventually create your own individualized style and set of procedures. Although consistent routines will assure consistent quality, the system is very flexible and enables many artistic and creative variations.
The following lighting diagrams and accompanying information are rudimentary starting points that you can learn, apply to your own work and then refine to your own tastes, working methods, and requirements. Three is nothing new about the application of multiple lighting in the portrait studio- the names and positions of the lights are basically the same but the trick is, to be able to integrate theses techniques ON THE FLY.
Money wise, simply stated, you gotta charge more for a better product and service because it is wort more, in terms of perceived value. Potential clients will pay more if they perceive your imagery and service as BETTER- it has to stand out above the others. You are also justified in charging more, simply because it costs you more in terms of additional equipment, equipment maintenance and most importantly, more labor costs for your assistant(s). I reiterate this financial stuff at this point because, among other factors, it is difficult or next to impossible to practice this kind of lightning method, singlehandedly, without an assistant- you will run yourself ragged Having a bit of a STAFF at a wedding is not an outrageous idea, nor is it intrusive. Everyone who serves at weddings, usually has some form of assistance. The caterer has a big crew, the church officials have altar boys and girls and wedding coordinators, oftentimes DJs work in pairs, of course there are live bands with multiple musicians, decorators and florists usually have some help, so why should the PHOTOGRAPHER have to run around like a “one armed wallpaper hanger”or a “chicken without a head” and have no backup people?
In the portrait studio we utilize a MAIN LIGHT (off camera) to create form, depth and dimension. The direction, height, from from where this light emanates and the angle at which it is placed determines its aesthetic effect. The function of the FILL LIGHT, is to illuminate the shadows and thereby providing control over contrast (lighting ratio) and dynamic range. Supplementary lights are the HAIR LIGHT with continues the glow of the main light into the hair- a glamorizing factor, the BACKGROUND LIGHT which illuminates the background- preserving detail in the background and helping to provide more dimension by adding TONAL OR COLOR MASS and finally ACCENT LIGHT or KICKERS which are used to highlight certain aspect of facial structure, glamorize and impart a theatrical or festive look to the image. In bridal portraiture, sometimes a VEIL LIGHT is used to give a gentle angelic glow the the bride's veil. Supplementary light also supply more separation between the subject(s) and the background.
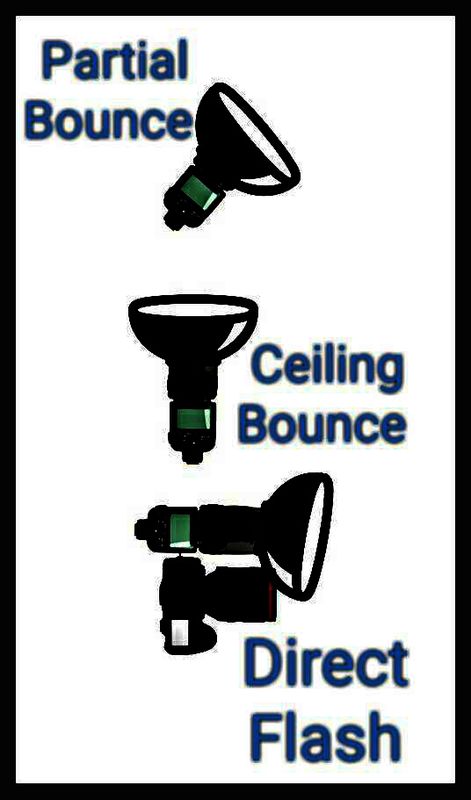
Obviously, we know that in the throws of covering a wedding, we can not precisely control 4 or more lights as we do in a studio or static location shoot. The fact is, however, with a minimal 2 light system, many of the aforementioned effects can be simulated through savvy improvisational techniques. The positions of the FRONTAL MAIN and the on-camera fill lights are, for the most part, what is going to determine the effect. When the 2nd light is used as a KICKER (at approximately 135° in conjunction with a single on-camera light, FEATHERING the kicker can serve a dual purpose. “FEATHERING” means to utilize the edges or periphery of the beam of light rather than the center. By allowing part of the beam to strike the subject(s) and part of the beam to illuminate the background, you will get the advantages of an accent light and a background light. If the kicker is high enough, you will also simulate the effect of a hair light. This lighting form can be quickly applied by your assistant in a wide variety of situations. When shooting into larger crowds from an elevated vantage point such as a stepladder, active groups doing folk or traditional ethnic dancing , I will FEATHER my ON-CAMERA FILL LIGHT slightly upward so as to skim the people in the foreground- this avoids overexposure of the foreground and emphasizes the effect of f camera lighting on the principal subject(s) in the composition. This modified position of the fill light is sometimes called PARTIAL BOUNCE. If the ceiling is white an low enough, some of the light will be reflected back to the subject. area If the ceiling is very high, dark or non-existent, such as in an outdoor situation, the periphery of the beam will still furnish some fill illumination without overexposing the near foreground.
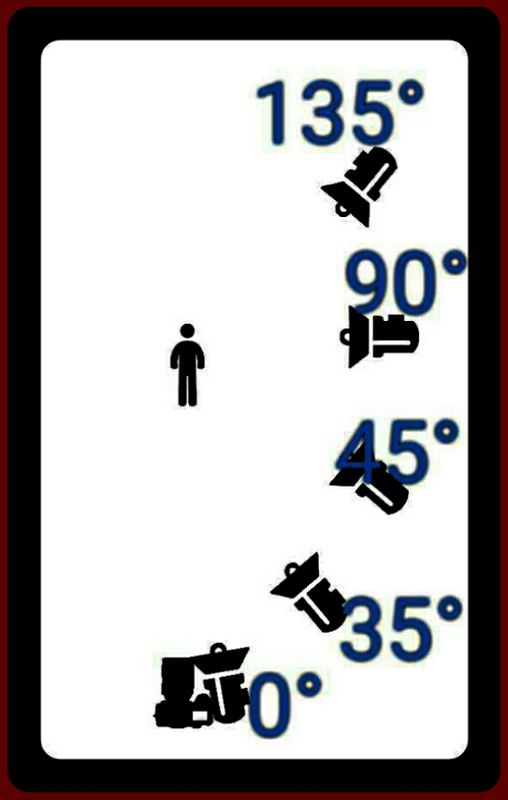
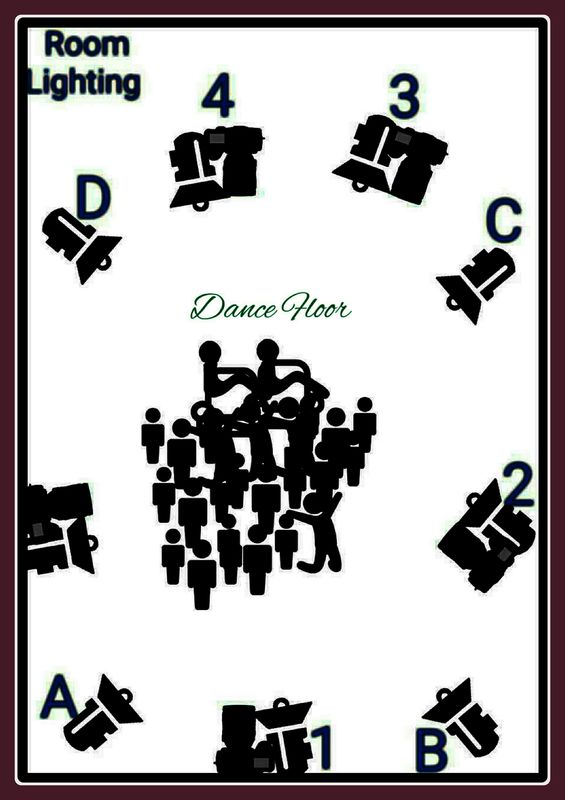
Another approach to multiple lighting is ROOM LIGHTING. The is where the off camera light or lights are strategically placed on the perimeter of the room. The diagrams that will follow, will illustrate the various possible lighting positions. The lighting effect that will be achieved in any given scenario will depend on the camera position as it relates to the various lights. In Fig.1, the diagram illustrates a typical dance floor situation. With the camera in the #1 position, light position “B” would provide a 35° MAIN light, alternatively,, light position “C” at 135° acts as a KICKER Moving the camera to Position #3, light “C” is at 35° and light “B” becomes the KICKER. In a ROOM LIGHTING setup all of the lights stay in place so wherever I take the camera within that room area, I will have some form of portrait-like directional lighting, the room will be well illuminated with nop “cave” or “black hole” effects. If the background is cluttered or distracting, I can shut down the lights that would ordinarily light up the background. The Pocket Wizard transmitter on my camera has switches which enable me to choose which light will trigger. In a crowd of people on a a given shot, some subjects will receive a BUTTERFLY lighting, other will have a SPLIT or 90° lighting, the high position of all the lights will provide some HAIR lighting and folks that a seen in 2/3 face of PROFILE will get a nice KICKER or RIM lighting. Essentially,
like LIGHTING IN THE MOVIES.
The same diagram indicates the various camera/light positions for a 2 light MOBILE system- the assistant is trained to observe my movements and provide one of the lighting forms as illustrated in the diagram. The light or lights have to be at such a distance where the do not enter the the cameras field of view and and will not cause lens flare. Even with a room light set up in place, I still have an assistant with a mobile light. Sometimes I have to leave the main room and shoot in an anti-room, lobby or somewhere else, out of the range of the room lights- so I always have good lighting wherever I end up shooting.
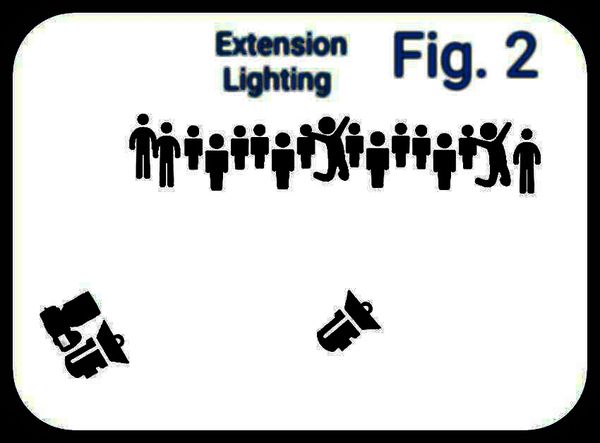
Fig. 2 illustrates how your off-camera light is used to EXTEND or CONTINUE the range of the on-camera light, This works well of dais (head) table shots, ling receiving lines, guest serving themselves at a buffet table and many other
cases where the inverse square law sets in and there is an undesirable fall of of light. The same light from that EXTENSION position can be turned around toward the subjects and provide a nice 45° or RIM light on some of the subjects. This technique works extremely well with the BOUQUET or GARTER TOSS, if those events occur.
Back lighting from moderately high positions will act as VEIL LIGHT and impart a soft glow on the brides veil. Directional lightning will bring up amazing detail and texture in wedding cakes, gowns, details hots of hands, rings, artifacts in churches, table settings- just about anything else that you can think of that is wedding coverage related.
EXPOSURE TECHNIQUES: Precision and consistent control over exposure is a critical aspect of wedding photography. Important once-in-a-lifetime “must have” shots can be ruined by extremely over or underexposed files. Many of theses irreplaceable shots can be missed if the photographer has to fumble with his equipment and spend too much time in making exposure calculations and arriving at settings. Exposures should be even, under a wide variety of conditions, otherwise, production flow will be seriously affected if every file requires massive individual correction. Poorly exposed frames will never in the same quality, in the final results, as properly exposed ones, regardless of the degree of post processing applications.
When using a single on-camera light, exposure issues are not especially difficult. You can employ a dedicated automatic flash program, use the guide number footage method and set you exposures manually. You can also opt for a auto-flash feature that is built into your flash unit. Introducing a second or more light(s) into the system may present some challenges. Back in the day of color negative film, the enormous latitude in those materials facilitated less difficulty in attaining ideal exposures in that you exposed for the on-camera light, the off camera light was closer to the subjects, or set at a stop or two higher power and then the negative was PRINTED DOWN for detail in the highlights. This gives you total control over the contrast or LIGHTING RATIO of the final print. This method, however, does not apply to color transparency or reversal film because those materials materials have significantly less latitude and especially do not tolerate any level of overexposure. The method then, is to expose for the highlights and fill in the shadows in order to stay within the dynamic range of the film. When I made the transition into digital photography, I simply exposed as if I was shooting Kodachrome and never had an issue with exposure consistency, contrast or post processing work flow. Modern, state-of-the-art sensors seem to exhibit more exposure latitude but I am still careful no to burn out my highlights in that badly blown out highlights simply go gray when excessive burning in is applied. Vacant shadows, lacking in detail, do not print well either because excessively dodged areas tend to show up and reveal themselves and you can't retain any detail that is not there in the first place, Dodging and burning are to just tweak areas for a bit more detail. Complex techniques such as HDR, multiple layers, and shadow masking are time consuming and tedious and are not practical and expedient, where dozens or even hundreds of images need to be processed.
Continued on next reply box...
When it comes to teaching multiple lightning at weddings and many other specialized or new photographic methodologies there are three old sayings that come to mind: “There is more that one way to skin a cat”, “If it ain't broke, don't fix it” and “You can't teach an old dog new tricks”. Well, I don't believe in either of those philosophies when it comes to wedding photography.. First of all, who the heck wants to skin a cat? The S.P.C.A . takes a dim view of things like that and they will come after you. I believe that good progressive and creative photographers/business folks, are always looking out for new ways to improve their work and their sales and profit potential, even if they are “old dogs” like ME! Offering a superior, visually impactful and outstanding concept is obviously a good strategy in that we are SELLING a visually orientated concepts, service and product. Visual art is our “merchandise”! There is nothing “broken” or particularly bad about shooting with one light, using primarily, available light or any number of mixed lighting approaches. It's just that when flash lighting is called for, it's good to have a reliable method of attaining above average results.
A far as “cat skinning” is concerned, there are many ways to incorporate multiple lighting techniques in your wedding routines, not only what I am teaching here. Like all techniques, it's always good to have basis of time-honored and practical starting points to begin with and eventually create your own individualized style and set of procedures. Although consistent routines will assure consistent quality, the system is very flexible and enables many artistic and creative variations.
The following lighting diagrams and accompanying information are rudimentary starting points that you can learn, apply to your own work and then refine to your own tastes, working methods, and requirements. Three is nothing new about the application of multiple lighting in the portrait studio- the names and positions of the lights are basically the same but the trick is, to be able to integrate theses techniques ON THE FLY.
Money wise, simply stated, you gotta charge more for a better product and service because it is wort more, in terms of perceived value. Potential clients will pay more if they perceive your imagery and service as BETTER- it has to stand out above the others. You are also justified in charging more, simply because it costs you more in terms of additional equipment, equipment maintenance and most importantly, more labor costs for your assistant(s). I reiterate this financial stuff at this point because, among other factors, it is difficult or next to impossible to practice this kind of lightning method, singlehandedly, without an assistant- you will run yourself ragged Having a bit of a STAFF at a wedding is not an outrageous idea, nor is it intrusive. Everyone who serves at weddings, usually has some form of assistance. The caterer has a big crew, the church officials have altar boys and girls and wedding coordinators, oftentimes DJs work in pairs, of course there are live bands with multiple musicians, decorators and florists usually have some help, so why should the PHOTOGRAPHER have to run around like a “one armed wallpaper hanger”or a “chicken without a head” and have no backup people?
In the portrait studio we utilize a MAIN LIGHT (off camera) to create form, depth and dimension. The direction, height, from from where this light emanates and the angle at which it is placed determines its aesthetic effect. The function of the FILL LIGHT, is to illuminate the shadows and thereby providing control over contrast (lighting ratio) and dynamic range. Supplementary lights are the HAIR LIGHT with continues the glow of the main light into the hair- a glamorizing factor, the BACKGROUND LIGHT which illuminates the background- preserving detail in the background and helping to provide more dimension by adding TONAL OR COLOR MASS and finally ACCENT LIGHT or KICKERS which are used to highlight certain aspect of facial structure, glamorize and impart a theatrical or festive look to the image. In bridal portraiture, sometimes a VEIL LIGHT is used to give a gentle angelic glow the the bride's veil. Supplementary light also supply more separation between the subject(s) and the background.
Obviously, we know that in the throws of covering a wedding, we can not precisely control 4 or more lights as we do in a studio or static location shoot. The fact is, however, with a minimal 2 light system, many of the aforementioned effects can be simulated through savvy improvisational techniques. The positions of the FRONTAL MAIN and the on-camera fill lights are, for the most part, what is going to determine the effect. When the 2nd light is used as a KICKER (at approximately 135° in conjunction with a single on-camera light, FEATHERING the kicker can serve a dual purpose. “FEATHERING” means to utilize the edges or periphery of the beam of light rather than the center. By allowing part of the beam to strike the subject(s) and part of the beam to illuminate the background, you will get the advantages of an accent light and a background light. If the kicker is high enough, you will also simulate the effect of a hair light. This lighting form can be quickly applied by your assistant in a wide variety of situations. When shooting into larger crowds from an elevated vantage point such as a stepladder, active groups doing folk or traditional ethnic dancing , I will FEATHER my ON-CAMERA FILL LIGHT slightly upward so as to skim the people in the foreground- this avoids overexposure of the foreground and emphasizes the effect of f camera lighting on the principal subject(s) in the composition. This modified position of the fill light is sometimes called PARTIAL BOUNCE. If the ceiling is white an low enough, some of the light will be reflected back to the subject. area If the ceiling is very high, dark or non-existent, such as in an outdoor situation, the periphery of the beam will still furnish some fill illumination without overexposing the near foreground.
Another approach to multiple lighting is ROOM LIGHTING. The is where the off camera light or lights are strategically placed on the perimeter of the room. The diagrams that will follow, will illustrate the various possible lighting positions. The lighting effect that will be achieved in any given scenario will depend on the camera position as it relates to the various lights. In Fig.1, the diagram illustrates a typical dance floor situation. With the camera in the #1 position, light position “B” would provide a 35° MAIN light, alternatively,, light position “C” at 135° acts as a KICKER Moving the camera to Position #3, light “C” is at 35° and light “B” becomes the KICKER. In a ROOM LIGHTING setup all of the lights stay in place so wherever I take the camera within that room area, I will have some form of portrait-like directional lighting, the room will be well illuminated with nop “cave” or “black hole” effects. If the background is cluttered or distracting, I can shut down the lights that would ordinarily light up the background. The Pocket Wizard transmitter on my camera has switches which enable me to choose which light will trigger. In a crowd of people on a a given shot, some subjects will receive a BUTTERFLY lighting, other will have a SPLIT or 90° lighting, the high position of all the lights will provide some HAIR lighting and folks that a seen in 2/3 face of PROFILE will get a nice KICKER or RIM lighting. Essentially,
like LIGHTING IN THE MOVIES.
The same diagram indicates the various camera/light positions for a 2 light MOBILE system- the assistant is trained to observe my movements and provide one of the lighting forms as illustrated in the diagram. The light or lights have to be at such a distance where the do not enter the the cameras field of view and and will not cause lens flare. Even with a room light set up in place, I still have an assistant with a mobile light. Sometimes I have to leave the main room and shoot in an anti-room, lobby or somewhere else, out of the range of the room lights- so I always have good lighting wherever I end up shooting.
Fig. 2 illustrates how your off-camera light is used to EXTEND or CONTINUE the range of the on-camera light, This works well of dais (head) table shots, ling receiving lines, guest serving themselves at a buffet table and many other
cases where the inverse square law sets in and there is an undesirable fall of of light. The same light from that EXTENSION position can be turned around toward the subjects and provide a nice 45° or RIM light on some of the subjects. This technique works extremely well with the BOUQUET or GARTER TOSS, if those events occur.
Back lighting from moderately high positions will act as VEIL LIGHT and impart a soft glow on the brides veil. Directional lightning will bring up amazing detail and texture in wedding cakes, gowns, details hots of hands, rings, artifacts in churches, table settings- just about anything else that you can think of that is wedding coverage related.
EXPOSURE TECHNIQUES: Precision and consistent control over exposure is a critical aspect of wedding photography. Important once-in-a-lifetime “must have” shots can be ruined by extremely over or underexposed files. Many of theses irreplaceable shots can be missed if the photographer has to fumble with his equipment and spend too much time in making exposure calculations and arriving at settings. Exposures should be even, under a wide variety of conditions, otherwise, production flow will be seriously affected if every file requires massive individual correction. Poorly exposed frames will never in the same quality, in the final results, as properly exposed ones, regardless of the degree of post processing applications.
When using a single on-camera light, exposure issues are not especially difficult. You can employ a dedicated automatic flash program, use the guide number footage method and set you exposures manually. You can also opt for a auto-flash feature that is built into your flash unit. Introducing a second or more light(s) into the system may present some challenges. Back in the day of color negative film, the enormous latitude in those materials facilitated less difficulty in attaining ideal exposures in that you exposed for the on-camera light, the off camera light was closer to the subjects, or set at a stop or two higher power and then the negative was PRINTED DOWN for detail in the highlights. This gives you total control over the contrast or LIGHTING RATIO of the final print. This method, however, does not apply to color transparency or reversal film because those materials materials have significantly less latitude and especially do not tolerate any level of overexposure. The method then, is to expose for the highlights and fill in the shadows in order to stay within the dynamic range of the film. When I made the transition into digital photography, I simply exposed as if I was shooting Kodachrome and never had an issue with exposure consistency, contrast or post processing work flow. Modern, state-of-the-art sensors seem to exhibit more exposure latitude but I am still careful no to burn out my highlights in that badly blown out highlights simply go gray when excessive burning in is applied. Vacant shadows, lacking in detail, do not print well either because excessively dodged areas tend to show up and reveal themselves and you can't retain any detail that is not there in the first place, Dodging and burning are to just tweak areas for a bit more detail. Complex techniques such as HDR, multiple layers, and shadow masking are time consuming and tedious and are not practical and expedient, where dozens or even hundreds of images need to be processed.
Continued on next reply box...
Mar 9, 2017 17:36:27 #
...Continued...
Part 5 a
Thus far, we discussed about lots of problematic issues, pitfalls and bugs so ..here's some good news. In a typical ROOM LIGHTING setup, once the exposure is determined by meter readings, the camera's internal exposure system and a little bit of “chimping” to verify things, you will be able to work an entire room at the same f/stop. You can control the contrast, my means of the lighting ratio, by making simple and quick adjustments to your on-camera's light output. I use a simple formula utilizing my flash units AUTOMATIC feature- not TTL. I establish the room lighting at say f/11 and set my on-camera light at f/8. The aperture is set at f/11. If I opt for a medium-key lighting, I can keep my camera light at f/11 or f/8 or if I want a low-key look, I can reduce my camera light's output to f/f/5.6 OR I can pop off the reflector which will quickly reduce it effective output by around 2 stops. Sometimes, I just place my hand in front of the reflector and let some light out through my fingers. In a smaller room, I can light in a full or partial bounce position in order to reduce its effective output. To arrive at a working aperture that provides sufficient depth of field and yet is not too small to coordinate with the slower shutter speeds that are required for “shutter dragging” or allowing in more ambient light, you can adjust your ISO settings accordingly. O prefer to use fairly low ISO settings when working with flash which also enables the use of wider apertures when I want less depth of field for selective focus or better “bokeh”. Although excessive “noise” is no longer a major issues with today's full frame cameras, I still prefer lower ISO setting to maximize quality and enlargement potential. Where I am restricted to low levels of existing light and flash in not permitted, I don't mind pumping up the ISO setting as high as 6400. Even where flash is permitted, sometimes an available light rendition is more effective, moody, dramatic or appropriate for the occasion. You may still find a few rough spots here and there like the odd case of lens flare, your equipment getting in the way of your own shots but is short order you will be able to debug you method and customize things to your own working methods.
If you opt for fully programmed TTL operation, the is no blanket reason why you system will not work in any multiple lighting scenario. The trick to faultless operation is in fully understanding HOW you system works, more specifically, WHAT it is doing or will do in any given situation, by thoroughly testing out your system in “dry runs”, with a few folks in an empty hall, function room or church. Once you get a chance to put in some practice time and get the “hang” of things, you will be able to set up your lights quickly and easily in a variety of different locations, layouts and situations. The bugs to watch out for in fully automatic systems have to do with “subject failure” and aperture selection. If your camera gathers it exposure readings form the wrong position in the frame, exposure can become highly erroneous- center weighted systems or settings are best in most cases. If the camera to choose your aperture it my provide too much or too little depth of field for the effect you want to achieve- an aperture-priority setting may be best. If you are already regularly using at least one additional light at your wedding assignments, you can add in the additional lights on an incremental basis, thereby expanding your system slowly but surely.
OK gang-my computer is still in the repair shop so I prepared the following diagrams on my I-phone. If I can't edit them all in here, in this post, I will post them as a reply- so look out for them. Hopefully, all of the diagrams are self explanatory as to lighting possibilities and starting points. Once my computer is fixed and the scanner is functional, I will post more actual images to go in with the diagrams.
I think I am developing Carpal Tunnel Syndrome, so I am gonna take a rest for a few days. Again folks, excuse the lousy typing and grammar, English is my second language- “Brooklyn” is my first.
Regards, Ed
Diagrams will follow in next reply box.
Mar 9, 2017 18:20:17 #
LIGHTING DIAGRAMS.
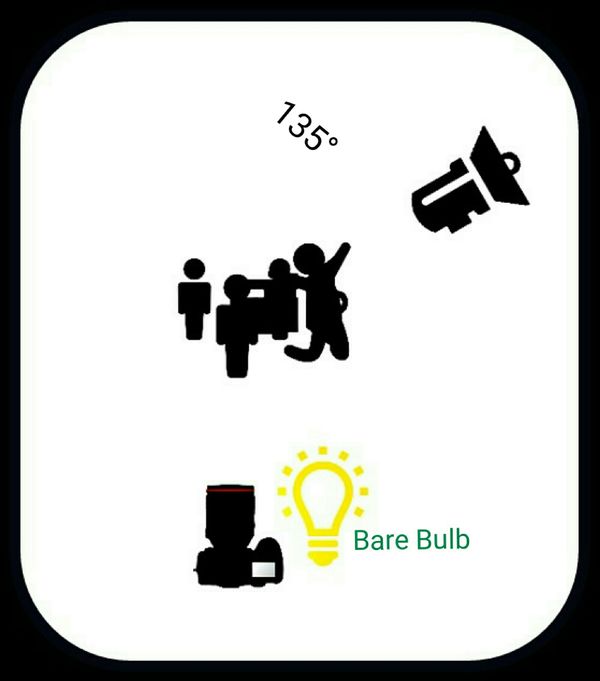
Various positions and alternatives. The BARE BULB + BOUNCE works well in close quarters with white walls
NEXT EDITION- Light Modifiers.
Various positions and alternatives. The BARE BULB + BOUNCE works well in close quarters with white walls
NEXT EDITION- Light Modifiers.


Mar 9, 2017 19:47:33 #
Great article. I'm even glad that you mentioned chimping.
I still don't do it enough. Those of us who cut our teeth with film sometimes get cocky. I've seen many posts poking fun at those who do. Of course, don't look at the lcd after every shot making the monkey noise, ooh ooh ooh.
Chimping has saved me a few times, because the meter was fooled, or something else happened. I just sometimes forget to check the lcd every so often. I admit, forgetting has lost me a few photos that I REALLY thought were going to be magical.
Anyway, I, for one, read your posts with a fine tooth comb.
Thanks
Mar 9, 2017 23:48:39 #
Hey! Thanks for the feedback and the encouragement, BK!
There is nothing wrong with "chimping" or any other measure that we take to ensure high quality results before we leave the job! As I always say, I am a big fan of Murphy's law and everything that we can to to head off trouble is a good policy to adopt.
Too many photographers are running around with egos the size of The Grand Canyon and that attitude usually leads to problems. I remember on of my teachers said that the main difference between a professional and a amateur photographer is that the prow knows exactly what's on the film even before he or she releases the shutter. My first boos, who was older and wiser said the he agreed, except for the thousands of screw-ups that can occur in the interim, before the customer has their pictures in their hands. So... long before the days of digital photography were were taught certain drills that had to be carried out at every wedding.
In the days when we used 4x5 press cameras with rangefinders and optical or wire sports finders, we did not view the image through the lens. We checked the bellows continuously to make sure a sheet of film did not pop out of a holder and block the light path. When shooting formals out of doors we had to make sure we never placed our cameras on the ground while reloading to avoid an insect form getting into the camera- things like that were known to happen. We checked for synchronization many times during the shoot. We had M/X synch. switches screwed in place to avoid accidental switching. We carried spare EVERYTHING!
Over the years, I did quite a bit of commercial photography. We went through Polaroids like hotcakes. Even in the 8x10 format we ran multiple Polaroids on every shot at about 10 bucks a crack- still cheaper than messing up and having to rebuild a set that took all day to construct, rehire expensive models, disappoint art directors and God-forbid, miss an entire deadline. We would bracket our exposures and even with all theses precautions, we still had to pray that somebody in the darkroom or the color lab did not create a disaster.
There was always some wise-guy who bragged that he can always "do it in one shot". Those are the folks who always get into trouble.
Ain't nonthi' wrong with chimping. I have my own variation of the procedure- I don't make "monkey noises"! When I see an image that I like, I smile, congratulate my crew and the client for doing a great job- i like to encourage everyone. If I don't like the shot- I well- FIX IT! If I am alone in the commercial studio and get frustrated with myself for doing something dumb, first I swear and the I FIX IT. If I am in the company of others I just smile and say, "this time, lets...whatever and get on with things- it's important to go with the flow and not hesitate. Obviously, I don't chimp every shot at weddings. A brief quality control check of each sequence takes only a few seconds in between the action. If anythings goes wrong, I would rather re-stage a shot than go away without an important image. Luckily enough, it doesn't happen very often but if I jokingly say "excuse me, can you please repeat that "kiss" or whatever, for the press, clients will soon forget that, however, they won't forget if you miss an important part of their event.
I hope some of the stuff we discuss around here helps some of the newcomers to the business with some good solid old-school teachings. Perhaps some of the old dogs, like me, will get rekindle some enthusiasm for the job. When I first started out and I was the rookie kid, after late wedding receptions, there were coffee shops where lots of the photographers would hang out and unwind- exchange tricks and tips and tell "war stories". I learned more about the ropes while guzzling coffee, chewing on hard bagels and listening to the senior shooters, more so, than sitting in any classroom or cracking any book. Nowadays, this kind of situation is no longer is commonplace. Perhaps some of the forums can help.
I also learned some useful philosophies for my own elders. Old sayings like "a stitch in times, saves nine" and "a an ounce of prevention is worth more that a pound of cure"...especially if there is no cure for a difficult problem. I gotta think that those sayings were written for wedding photographers.
Problem is, there is too much "combat" and trolling going down on most forums- even in some of the other departments around here. I had a very big "following" on other forums but I have no patience for childishness and continual in-fighting. So... theses days, I like to hang around in here.
Thanks again for your kind comments and I hope more folks will pitch in.
Ed
Mar 10, 2017 02:18:56 #

E.L.. Shapiro wrote:
Hey! Thanks for the feedback and the encouragement, BK! ....Ed
consider yourself encouraged.... and thanks for the effort that goes into your posts.
Mar 10, 2017 09:08:32 #
E.L.. Shapiro wrote:
I like to hang around in here.
Ed
Ed
That means a lot. I've tried really hard, and even had a few PM battles and one phone call with a couple of trolls in this section early on. Never found a way to actually block them, but I deleted posts that I thought were "trollish", when they contacted me to complain, I laid it out for them.
Got called every name in the book by one troll that likes to hang out in the other sections, but he hasn't been back, so I felt it was well worth it.
I really want this to be a place where we can be honest (as long as it isn't mean spirited,) and maybe even help some budding photographers to avoid the pitfalls we went through.
I didn't start with the 4x5 press cameras, but do remember using the poloroid backs to make sure we had everything exactly right.
I probably don't take nearly enough advantage of the technology. I still don't trust Auto, or even iTTL (Nikon), I prefer to meter and know what I'm going to get, not let an engeneer in Japan tell me what he thinks the exposure should be in a certain environment. That being said, I do know a few local photographers, who shoot in Auto or Program all the time, and they do pretty dang good work. Their real talent is in their photographic eye, and creativity. If it works for them, I don't put it down. I think I end up with shots that they only wish they could do, but they also come up with shots that I only wish were mine....
Seriously, I enjoy learning at the feet of a master. Thanks so much for being a part of our little corner of UHH.
bk
Mar 11, 2017 14:58:01 #
Thanks for sharing & taking the time and effort to put all this down, I've had to read it twice so far to try to absorb as much as I can. Now it's time to do a couple tests, and see if I can get some good results.
(I seem to learn more doing it wrong, and having to figure out fixes).
Really good article, thanks again!
(I seem to learn more doing it wrong, and having to figure out fixes).
Really good article, thanks again!
Mar 11, 2017 15:09:13 #
BK! Right on!
I entirely understand what the "trolling" issues are all about- I can surely sympathize. I used to be a moderator on two major photo-forums. My intent was to foster photographic education, encourage the newer folks, talk shop, swap ideas, learn, and frankly, have a little fun! Turned out, sadly enough, that I ended up as "the police" or worse, like a "bouncer" in a tough saloon, breaking up bar fights! I wanted to be a MODERATOR not a REFEREE. Seems that some folks do and say things, online, that they would never act out in person. Well- most people are nice but there are just enough rotten apples out there to create headaches. I never liked to get into politics online- especially in the current political climate. I do feel, however, that some of the craziness that is currently going on, where our so-called leaders are bullying each other in quips and tweets, veiled slurs and personal attacks, sets a poor example and kinda gives the trolls a "license" to operate. There is nothing wrong with a good debate, friendly arguments or differences in opinion as long as there is decorum, courtesy and folks simply conduct themselves like adult ladies and gentlemen. In our industry, an attitude of professionalism and kindness is becoming a rarity. Perhaps, we, in the wedding business, better understand the value of diplomacy in our daily work. Being able to empathize with people, understand different cultures, garner cooperation and generally being a people-person are BIG parts of our job.
I think that automation can be a help or a hindrance in many aspects of photography- it all depends on how one approaches things. There is nothing wrong with keeping up with the latest technology unless it takes over one's life and begins to replace common sense, judgment and respect for craftsmanship. Over the years, I have done quite a bit of teaching and training. I have given many seminars and workshops, taught a few college-level courses and lately, have been engaged in training younger folks to take over the wedding part of my business. As a 73 year old "geezer", my remaining days as a wedding shooter are numbered. I have no plans to retire from photography and I wanna "die with my boots on", but not at someone's wedding- I prefer to do that in the surroundings of my air conditioned studio!
I'm not here to brag about my teaching experience but I bring this up because that is where I mostly see the challenges of too much automation and newfangled stuff! OK- I gotta teach the "kids" all about f/stops, shutter speeds, optics, lighting, focus and all the rest- that's relatively easy! BUT- first I gotta convince many of them that they don't need an "APP" to wake up in the morning, to go to the bathroom, get some breakfast and go to work- y'all know-regular stuff! I also have to explain that there is not APP or automatic camera feature or program can replace artistry, talent, know-how, experience and craftsmanship and that all those attributes and acquired skills require development, learning, study, hard work and practice!
I suppose it's a natural tendency, in younger folks, students and newcomers to the business, that they want to run before the can walk so I stress the importance of firstly and patiently learning the basics behind the technology so that they do not become completely dependent on it. Understanding of basic camera's basic settings is essential for comprehensive artistic control over all aesthetic elements because some of that function is beyond the capabilities of automatic settings. I stress that understanding each of the camera's basic controls assists us in selecting the best automatic features when we want to bring the into play. It is prerequisite to be able to manipulate and customize all of theses settings to our own individual working methods, styles and tastes and most importantly, to be fully able to operate the equipment in manual mode, in the event of malfunction of any of the automatic components. As you alluded to, camera's auto features can be easily fooled!
I certainly don't believe in doing things the hard way just for the sake of dong things the hard way or wanting to live in the past. Some of the new technologies are truly remarkable but I was never a big fan of cruse control- I like to drive my car and not have it drive me! I think that auto-pilot is truly amazing but I feel more comfortable, as a passenger, with a real pilot (or 2 of them) on the flight deck! Perhaps, in photography, it's good to be a bit of a CONTROL freak!
Right now, I'm working on Part 6- All kinds of stuff about light modifiers.
Regards, Ed
Mar 11, 2017 19:00:19 #
@ Berm Buster and the rest of the gang!
Thanks for the feedback- it is very helpful. I certainly agree that trial and error is still the best way to prove and perfect any theory. Text, diagrams and pictures are good learning facilities but once you get you hands on things, start moving around lights and then monitoring and critiquing your own results, that's when the learning process begins to move forward at a faster pace.
I realize there is lots of text and I wish I had more time for tighter editing. My technical writing ain't the greatest. I am working at a slight disadvantage in that I am used to teaching, live, in a classroom or workshop setting with all the lights, gear and audio-visual stuff on board. Then, of course, with my own trainees, we go out on the jobs and it all comes together. The sessions we used to do after a weekend of heavy shooting yielded many great questions and answers based on how things went down- what went right, what could have been better and what we did to handle unexpected events and occurrences.
What I might suggest for the time being, is that if you or anyone else have any questions or need clarification on any of my points, why not post them and I'll do my best to provide answers. I try to avoid too much techno-babble but some of my text might require some interpretation or unscrambling. You can even attach images or diagrams if you want to suggest other ideas. I'd love to see more traffic going on here in this section.
My main computer and scanner are down and in for some serious repair or possible replacement. I'm using a little old Dell computer that was just being used in the office for word processing. I'm doing the diagrams up on my i-phone.... Mickey Mouse for sure. Once I get my IT desk back in shape, I'll post more images. Temporally, I am processing my client's work at an outside facility- kind of a drag.
Rock 'n' Roll. guys and gals, Ed
Mar 13, 2017 15:04:28 #
Hi Ed, techno babble & wordy are ok with me!
I have a question, that may be related to my lighting.... Some of my shots seem to shoot right thru clothing. I've had women wearing like a dark knit top, after I take a shot, you can easily make out their bra and straps...even though it's not noticeable with your eyes.And then I've had simple wedding dresses, kinda sheer fabric, that after the shot you can see all the layers beneath.. but with the eye, just look white. Any Ideas?
My go-to lighting set up where this shows up most, I usually have an assistant holding a Flash/shoot thru umbrella on a pole.usually within 6' - 45* up and over from camera. This is my key, then on camera flash as fill, usually with 12" diffusion panel. Indoors or out I've had this happen.
After reading your post, I'm going to try switching to on camera flash as key, and voice activated light stand as fill. I'll just have to pay attention to my distance from subject more closely.
Hopefully this makes sense - thanks for any suggestions.
Kent
Mar 14, 2017 09:03:31 #
Kent, I am not Ed, but my guess would be that your on camera fill light is "filling too much"
The key light offset and above would help show details in the fabric, and give some depth. The one on your camera is in line with the lens, and is shooting straight into the fabric, which will cause your problem.
Try dialing back the power of your fill. If that doesn't work, you may need to get it up higher, and /or a little more off axis.
I will look forward to what Ed thinks as well.
bk
Mar 14, 2017 09:56:03 #

bkyser wrote:
Kent, I am not Ed, but my guess would be that your... (show quote)
That makes sense. I have not come across that problem although I use a lot of on camera fill, primarily just to mix in a small percentage to ambient. On a somewhat related note I am now using the Photix Oden system to fire remote speed lights while being able to adjust power settings from my camera. It is great, but it seems my on camera flash fill days are over. The transmitter takes over the hot shoe.
Kent, as a think about Bob's remarks I will say that I have used the lite scoop as an on camera soft light bounce and it does get your light up higher as well.
Mar 14, 2017 12:25:55 #
BK & Jay,
Thanks guys, I'll keep that in mind next time. I always have a lite scoop or flash bender on my on camera flash. But even though I'm mindful of my remote flash-distance. Once I meter and set my fill, I don't really care where I move too. Which - like you said , may very well be the problem.
What reminded me of this, was I had a relative ask me to edit some wedding photos she took. The bride was pretty heavy, and had a simple (Maybe something she put together) dress on, that you could see right thru. She was afraid she was going to make the bride cry if she showed these picture too her.( Of course another problem, she shot bride from fairly close, with a 28-35 lens- probly brought her from 250lbs-400lbs).
Thats what reminded me that I've had this happen a few times too.
My relative shot with a Nikon (removalable) flash (sorry-I'm not a Nikon person, don't know the model). On TTL only, and no modifier. So your suggestions again- could very well be true.
Thanks for taking the time & for the suggestions!
Kent
Mar 14, 2017 23:02:25 #
Hi Gang!
Well- I guess if one lives long enough and stays in the business long enough, there will always be something new to learn, figure out or some problem that one has never heard of. This is one I have never run across. Usually if the fabric in question is sheer, you can see see through it with the naked eye and in flash lighted photographs. The degree of how much of the light penetrates the fabric and reflected back toward the camera will depend on the angle of the lights and the degree of translucence or opacity of the material.
Funny thing is, I have encountered the opposite problem. I was shooting lingerie job for a ladies-wear catalog and some of the sheer nightgowns did not look sheer enough in some of the resulting images. I found that in certain fabrics, if too much FLAT lighting strikes the material from right on the camera/subject axis, more light tends to bounce back than punch through. If enough light does not penetrate the fabric, it will not bounce back through in sufficient volume to revel detail in undergarments and the subject's skin. We solved the issue by reducing the power of fill light and raising it to a higher elevation. Y'all have the reverse of my problem, so the cure may be in the position and power of the fill light.
The manufacturer told us that certain fabrics react to light that way because of the way they are woven in knitted. If the material has an iridescent tone, the threads reflect light in different paths.
So, I think y'all came to the right conclusion, that is, experimenting and trying to reduce and increase the fill illumination and altering its angle of incidence- moving around the lights and relative power settings until the correct effect is achieved.
I would think that this problem has nothing to do with camera's make or type, the focal length of the lens, the zoom settings or the camera/subject distance.
Photographing textiles can sometimes be challenging because of many aspects of their manufacture. UV brighteners in many white fabrics can cause cyan/blue tints in wedding gowns veils that are not visible to the naked eye- used to be a big problem with film. Sometimes certain synthetic fabrics show up in photographs with moray patterns. Other times, there are incompatibilities between the dies in fabrics and the dies in film stocks- but that's a leftover from the film days.
Hope this helps a bit!
Ed
If you want to reply, then register here. Registration is free and your account is created instantly, so you can post right away.