Multiple Lighting Techniques for Wedding Photographers- Part 2
Feb 26, 2017 10:41:40 #

Part 2. Finite flash technique for wedding photographers and other stuff. Lot of other stuff!
Part 1 of this article covers the mounting and usage of the on-camera light in a multiple lighting system. Now it is time to examine the usage of the second light and perhaps other additional lights in a more sophisticated system. For those photographers who are familiar with fine portraiture, commercial or interior photography will fully understand the usage and reasons of multiple or off-camera light sources. For those who are new to the field or are not well versed or experienced in advanced lighting and flash techniques, some basic theory and concepts should be discussed, so here goes:
With the advent and advancement of digital photography, faster lenses, full frame bodies with virtually noiseless performance, even at high ISO settings, it is possible to achieve realistic, natural and high-quality imagery under a wide variety of available lighting conditions without a great deal of supplementary lighting or just a wink of flash fill. There are many occasions, however, where the the volume, quality and/or the direction of the existing light is insufficient for practical hand held exposures, aesthetically pleasing effects, and simply capturing each and ever must-have shot in a wedding coverage. Dark and grainy images can be interesting and moody for certain ceremony shots and dramatic interpretative scenes and portraits but theses kinds of images can also seem murky or muddy and aesthetically unpleasing.
Let's take, for example, the shots of the procession- the bride and her escorts walking down the aisle in a typical older church. With the available light coming from lighting fixtures that are directly overhead, the light washes down the subject's faces causing unflattering shadows and lack of detail in the eyes (know as “raccoon eyes”). The highlight detail in the bride's veil can be washed out and because of over-exposure and the lighting on her flowers and gown can be uneven. The volume of light my be insufficient for small enough apertures to provide enough depth of field and/or a fast enough shutter speed to capture the subject's movement without motion blur. There are many situations such as this example that can face the photographer in a wedding coverage, so we reluctantly, pop on the “speedlight” in order to get shots that we need. With a more savvy and finite use of flash, however, theses images needn't be flat, washed out, lacking in texture and detail and unnatural.
Some photographers may ask “why bother” what with a system that requires more investment in equipment, handling all of this additional gear on the job, making all the necessary calculations that may slow up the routine and of course, the need for additional labor costs for assistants. Some photographers my wonder if the client can really appreciate and tell the difference in the work and pay the additional costs. My experience and answer to these questions can be summed up in one word, “professionalism”.
Let's for a moment, approach this from a business and marketing point of view. Nowadays, so many wedding photographers are complaining about amateurism in the wedding photography field. There is hardly a wedding photography forum or conversation at a meetup or professional association meeting where I don't read or hear mention of “a guy or gal with camera” with low-ball pricing “invading” the marketplace. I, for one, don't mind some healthy and hard competition among good working professionals- it keeps us on our game and is beneficial for the consumers. If we are to stand out, as professionals, above the run-of- the-mill and mediocre shooters, we have to offer an outstanding product with tangible and visually perceptible benefits. It's unfair to BLAME the “uneducated” consumers if we don't educate them and show and explain why our work is better. Nor every bride or groom is an aficionado of fine photography. There is little use in getting into technical explanations with most potential customers. Some folks have an understanding of visual art and aesthetics and others need more information. The majority of the potential clients who are impressed with my work and become my customers, seldom compliment my “lighting” or “composition” per se. They may the may remark, “theses pictures are like 3-D”, they have “sparkle”, “I love the details in the gowns, “they are nicely centered”, or they “look like the lighting in the movies”. They may describe some of my images as romantic, moody, shadowy, and most satisfyingly for me, many say “the people look great- kinda like movie stars”! The may ask “are theses models or is this a real wedding- I LOVE THAT! All of this is good enough for me- I don't correct their nomenclature or terminology. Fact is, folks want to look at their best in their wedding pictures and portraits and will favorably react to impressive and emotionally charged imagery. There are all important customer benefits that are oftentimes overlooked if the photographer is “too deep into the forest to see the trees” and is overly preoccupied with gear and bad competition. Why should any rational consumer spend more money on anything if they can't justify the additional expense in terms of benefits. Why should they NOT get Uncle Oscar with his new shiny DSLR to photograph their wedding if we ain't doing heck of a better job?
Great lighting, seeing light, utilizing light and “sculpting and painting” with light are important components of better photography.
OK, we have all hear of or know about so-called off camera lighting bet lets examine this more in depth. The talent and application of SEEING and interpreting light in art is nothing new. Chiaroscuro is an oil painting technique, developed during the Renaissance, that uses strong tonal contrasts between light and dark, to model three-dimensional forms, often to dramatic effect. The underlying principle is that the solidity of form is best achieved by the light falling against it. Artists known for developing this technique include Leonardo de Vinci, Caravaggio and Rembrandt.
OK- so that is the encyclopedic explanation, but how does this apply to practical professional photographic applications let alone, the hectic field of wedding photography. Once mastered, the application of fine lighting and flash technique can be routinely carried even under the throws of a wedding coverage- believe it or not!
A little more theory: A photographic print or a screen image is a two-dimensional medium. In order to create the ILLUSION of a third dimension, depth and realism, we incorporate light and shadow. If we draw a circle on a sheet of paper and shade in one side of it, the circle takes on the appearance of a ball. If we were to photograph a round object like an apple or a pumpkin with flat lighting, that is, light coming on the same axis as the camera to the subject, the object may appear rather flat, more like a disc or a hockey puck. As soon as we move the light source off that axis and shadow begins to appear in the subject, the roundness of the object is better perceived. When we move the light source latterly, horizontally, vertically and close and further form the subject the effect changes as to how we perceive the shape of the object, or subject, the contrast between the highlights and shadows the transition from light into shadow. So we begin to visually understand how we can control the aesthetics of a subject in terms of contrast, softness, hardness, shape and dimension. This may seem too simple or rudimentary but it is the essence of off-camera lighting and is a good exercise to try out and keep in mind.
OK..gang...enough theory, technobabble and business talk for today. In my next “addition” we will get into the practical nuts and bolts of my flash system and how to pull this kind of thing without too many complications, suffering a hernia or lower back pain from dragging around too much heavy gear and getting some outstanding results artistically and financially.
For those who hate long posts, don't read any of this- you'll get a headache and eyestrain. If nobody likes this, just tell me to go away. My family tells me that all the time...I'm tough and don't get insulted- I'm used to it! We always need to be kind and compassionate toward our clients. We need to be NICE in order to secure cooperation ad good results. Nobody wants to spend their hard earned money with someone who they don't like! Basic- but true! Wedding shooters have to be patient and have a thick skin! As my grandmother use to say “you gotta be made of iron”!
For those who are following this...later-gator! To be continued soon!
Best regards, Ed
Feb 27, 2017 14:20:04 #

Thanks for the latest addition Ed. Not going to lie, I don't like long posts but yours are worth reading. I am very interested in your next nuts and bolts addition. I have tried many lighting options during the ceremony and the wedding party procession is one of the trickiest since they are moving. Many cases they are moving in and out of light coming from various sources. I think I have a good method, but very interested in your system.
Feb 27, 2017 14:58:39 #
Thanks for input, Jay! The next edition is in the works. I have an easy and foolproof method for aisle shots and all kinds of action situations. I will explain this in part 3.
I was gonna put this article in the tutorial section but I thought it would get lost there and the wedding folks would miss it. I know it's too long but there is a load if information to get into.
REGARDS, Ed
I was gonna put this article in the tutorial section but I thought it would get lost there and the wedding folks would miss it. I know it's too long but there is a load if information to get into.
REGARDS, Ed
Feb 27, 2017 15:01:55 #

Ed,
I really appreciate your posts. I wish you were a few hundred miles down the highway here - I'd love to second shoot for you a few times.
Looking forward to your next post.
Cheers
I really appreciate your posts. I wish you were a few hundred miles down the highway here - I'd love to second shoot for you a few times.
Looking forward to your next post.
Cheers
Feb 27, 2017 17:07:18 #
Agreed, I've been doing this a long time, and I still enjoy reading detailed info from other people. Old dogs can always learn new tricks, or just read something like this, and remember so much of what we've forgotten.
There is one thing that might drive some people nuts, and that is the fact that if the dance floor is actually dark, I want it to have the "cave effect" but if the room is brightly lit, I want it to look as it did. I've had a few people comment that my dance floor photos are dark, but I have seen photos that were taken at weddings I've attended, where it was really dark, but the photographer gave them grainy, daylight photos. I only mention it, because sometimes, I read about the "cave effect" when the dance floor is dark except for the DJ lighting, I personally think that's what I should capture. Your opinion in that situation? Just wondering.
I'm waiting with baited breath about your aisle technique.
Feb 28, 2017 18:01:21 #
I am still working on the bulk of the next edition of this article series so here, in advance, is the drill on my "aisle" method which can be applied to many similar shooting situations in churches, ballrooms and haluls.
So, let's look at some of the problems that can be encountered- these shots are simple enough but things can get tricky. As I stated many times before, I am a true believer in Murphy's Law and if anything does go wrong, as to equipment issues, it's gonna happen right in the middle of a procession or church service at the most inopportune times. The basic and common situation in churches, synagogues and large reception venues that you have an moving subject in the middle of a large and and oftentimes dimply lighted room. Even with the latest sophisticated equipment with auto-focus and TTL automatic flash and ambient light exposure control, there are a number of things that can still go wrong or become problematic.
The biggest gremlin here is what is technically known as SUBJECT FAILURE. Even with center-weighted spot readings and Lord knows every kinda matrix exposure system, there is always the possibility that the camera will take its light reading from the dark background area and overexpose the dickens out of the subject totally beyond the dynamic range of the system. A similar functional error can befall an auto-focus mechanism as well- even the fastest newfangled servo systems. I am sure every one of us has experience the AF function going nuts and suddenly flying way out of focus especially in dark surroundings and/or with moving subjects. I believe the engineers call that DRIFT. I call it, well lots bad words under my breath! My theory is that the more complex the system becomes the more there is cahnce for equipment failure and breakdown. I'm a firm believer in K.I.S!
The method I use, in order to totally negate and prevent all of theses pesky issues, are two time-honored honored old school technique called scale focusing and manual exposure settings. Focusing wise, it has to do with hyper-focal distances and depth of field. Rather that getting too involved the optics, physics and mathematics, I like to keep it simple so here's the drill:
Most of theses shots are full length views of folks walking up or down an aisle, entering a reception hall, or doing their âÂÂfirst danceâ in the middle of a large venue, and many other similar scenarios. With a NORMAL lens or NORMAL ZOOM FOCAL LENGTH SETTING, and a nice VERTICAL composition with a comfortable area of space around the subjects, with adults of average height, this shot is made at camera/subject distance of approximately 12 FEET.
Here's how the flash system factors into this method: I set up my multiple flash system to give me a per-determined exposure of f/8 at that distance. I shut off the AF, put the camera in MANUAL mode, pre-select the aperture at f/8. I use a 50mm normal lens or zoom setting and I set the focus, BY MEANS OF THE FOCUSING SCALE, at 12 FEET.
The DEPTH OF FIELD at theses settings will give you a very acceptable degree of sharpness from abut 9 to 50 feet. The 1/1000 sec. flash duration freezes the subject movement. My images are always tack-sharp and free of blur! This level of depth of field gives us the latitude needed in photographing moving subject either head on or at a 45 degree position the the trajectory of the subject's motion. Selective focus, 'âÂÂbokehâ out of focus backgrounds are great for many styles of portraiture and romantic moods, however, in this type of candid imagery, some more definite detail in background and other surroundings lend more ambiance and story-telling elements to you images. Whether you are working in a majestic church, a posh ballroom, a moody club or jazz venue or a sparse VFW hall, you will have total control of the background detail and ambiance of each shot. If you do this right in each file, as you shoot, you will need very little or no manipulation in post production editing and the speed your work flow will increase exponentially.
Now- let' tackle the âÂÂblack backgroundâ issue: I usually keep the ISO setting fairly low- about 100 or 200. This means at f/8, I can still pick up a decent amount of ambient light in the background if I set the shutter at 1/30 sec. or there about- I can even hand hold the rig at 1/15 if need be. If the ISO setting is to high, the flash lighting will require smaller apertures and it will be impossible to pick up a discernible level of background ambiance at hand-holdable shutter speeds. My off camera light (2nd unit) is at around 35 degrees (to the camera/subject axis) and high and that helps open up the background as well. An alternative position for that 2nd light can be about 135 degrees and feathered off slightly toward the background area. Some light strikes the back of the subjects and nicely illuminates the bride's veil while some of the light beam opens up the background. Even if the background is about 1 or 2 stops darker that the subjects, if the slower shutter speed picks up some of the stained glass windows, candelabra or chandeliers, the feeling of a âÂÂblack holeâ is minimized. Sometimes, however, if the background is distracting, not to pretty, cluttered or does not look exactly like âÂÂThe Ritzâ a darker subdued background may be beneficial. Mastering this technique gives you the control over the lighting and detail in the background.
We have all worked in great cathedrals or some church interiors that have seen better days, opulent ballrooms and kinda drab legion halls. Many of us have spent countless hours in the darkroom and at our computer desks, wrestling with problematic negatives and files. This method, when properly applied, wild yield very even and consistent files that are easy to process.
Flash exposure management.. As I previously mentioned, I use my flash equipment and cameras in MANUAL MODE. After years of experience, I have learned to accurately judge distances and and the appropriate flash exposure almost instinctively. I may take the off ambient light reading wit a hand held meter or use the meter just to insure that the flash output is working properly. I am not a genius or some kinda superman- it's just practice, practice and more practice! For those that prefer a TTL automatic exposure system, this method can be altered to accommodate your individual working routines and your specific programmed system and mode.
Another alternative exposure system that I like to utilize is also rather old school as well, but it works nicely. I have some older model Lumadyne flash units that have a very accurate AUTO FLASH feature. This way, I can pre-select the f/stop that I want to work with and the auto-flash system determines the power output. The auto flash sensor in my off camera light determines the flash exposure- it is the main light. I can adjust the mood, via the ratio, by decreasing the output of the on-camera light, which acts as the fill light. The only exception to this rule is when I am using the 2nd light as a KICKER, that is, a 135 degrees to the camera/subject axis, In this configuration, the o-camera light it the main light and although it is a bit flat, the highlights created by that KICKER gives the image a great deal of dimension and relief- the brides veil will glow and the edgy highlights add quite the touch of âÂÂsparkleâ to the mood. Those lighting will make your images âÂÂjump right off the pageâÂÂ!
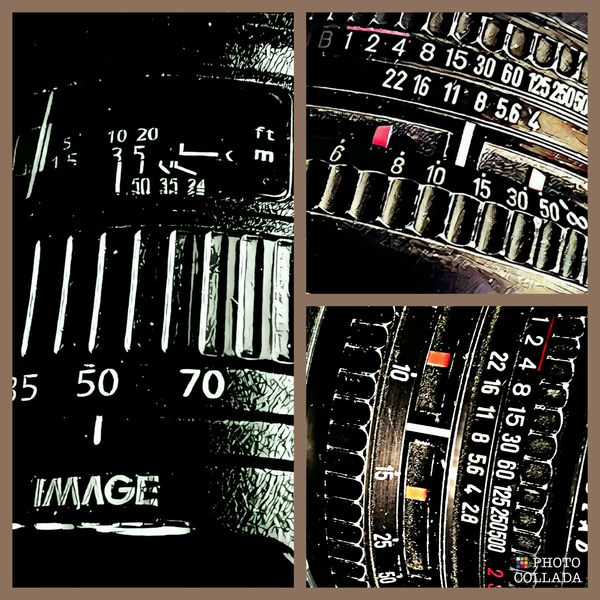
A word about depth of field scales and focusing scales. With all of the latest auto-everything digital cameras focusing scale indicators are very small or non existent. Depth of field scales are seldom engraved in the lens barrels anymore. I have attached some images of some of my beaten up old lenses to illustrate the depth of file approximations at the working f/stops I am suggesting.
The reason I a, recommend the use of a NORMAL lens or zoom focal length setting for theses kind of shots has to do with reasonable working distances and perspective. For a full frame sensor the normal focal length is 50mm or there about. For a small sensor body, 35mm is the normal recommendation. Perspective wise, I have seen hundreds of full lengths views of subjects that are FORESHORTENED, that s made to look shorter due to distortion caused by shooting down at the subjects. To avoid that, the camera should be position at the subjects' waist level in a full length formal, group or candid shots Wide angle lenses and zoom focal length settings tend to exacerbate this distortion. In extremely tight or cramped circumstances, you can use a slight wider setting but you have to be especially careful to keep the camera level and at the proper height.
For aisle shots, I usually take a position about 1/3 up from the the front of the church where I can crouch down to get the lower elevation of the camera and not obstruct anyone's view of the procession. My assistant, with the 2nd light is positioned in one of the pews so he or she can proved me with a 35-45 degree lighting. As each member of the bridal part come down the aisle, the assistant's light will follow through as they move so if I miss the shot, get a bad expression or closed eyes, I can repeat the shot using the 2nd light as a side/back or kicker light- as I described above. Sometimes, I walk backward toward the front of the church and pick the shot up at a 45 degree position to the aisle. Alternatively, I can preset to focus scale to 15 feet â shoot horizontally and get a wider shot of the bride and her escort coming toward the altar and pick up the parents or other members if the bridal part in the front pews.
Multiple lighting will add a significant level of additional quality to your images. Your flash images will blend better with those you make with natural light, you will seek incredible highlight detail in wedding gowns and in dark formal attire as well. All of you impromptu candid shots will have a portrait-like quality.
Of course, I always secure permission and cooperation from the couple, the families and the church officials when it comes to flash usage. I have obtained this cooperation, even in churches that oftentimes frown upon flash usage. It's a matter of showing respect and consideration for church policies and regulations and not showing up like we own the place or like a bull in a china-shop. I can cover most ceremonies by available light nowadays but the procession can be difficult. I have never been reduced permission to use flash for the procession and the recession or the âÂÂkissâ once the body of the ceremony is completed. Most of the local clergy know us for many years and know that we get things done swiftly, quietly, professionally and unobtrusively, without any fuss or bother. My assistants know my every move and can anticipate each shot before I do them so there is no shouting instructions across the venue or any kinda arm waving or gesturing. We have a few subtle hand signals.
I have 2 dead computers here that are in the shop for new operating systems and other repairs so I am having some difficulty in posting images and diagrams. I am using my i-phone! I'll post more images later on in the article. My IT guy is in the hospital. Murphy's Law strikes again!
I hope this helps to answer a few questions. This method may seem kinda obtuse to some of y'all but it could serve as a starting point for your own system and your own equipment preferences. Nothing in photography is carved in stone but an exchange of ideas, suggestions and tips make life interesting. Theses days, if you can't come up with a better mousetrap- the rats will take over the word!
For those who never got into this kinda lighting, it may me a good idea to ask permission to experiment in a local church on an off day, with a couple of friends and try a few things out. One you get the system down pat, you don't need to worry about inconsistencies in lighting and exposure and you can concentrate on getting the action you wanna capture and the very best expressions.
Talk to y'all soon, Ed 
So, let's look at some of the problems that can be encountered- these shots are simple enough but things can get tricky. As I stated many times before, I am a true believer in Murphy's Law and if anything does go wrong, as to equipment issues, it's gonna happen right in the middle of a procession or church service at the most inopportune times. The basic and common situation in churches, synagogues and large reception venues that you have an moving subject in the middle of a large and and oftentimes dimply lighted room. Even with the latest sophisticated equipment with auto-focus and TTL automatic flash and ambient light exposure control, there are a number of things that can still go wrong or become problematic.
The biggest gremlin here is what is technically known as SUBJECT FAILURE. Even with center-weighted spot readings and Lord knows every kinda matrix exposure system, there is always the possibility that the camera will take its light reading from the dark background area and overexpose the dickens out of the subject totally beyond the dynamic range of the system. A similar functional error can befall an auto-focus mechanism as well- even the fastest newfangled servo systems. I am sure every one of us has experience the AF function going nuts and suddenly flying way out of focus especially in dark surroundings and/or with moving subjects. I believe the engineers call that DRIFT. I call it, well lots bad words under my breath! My theory is that the more complex the system becomes the more there is cahnce for equipment failure and breakdown. I'm a firm believer in K.I.S!
The method I use, in order to totally negate and prevent all of theses pesky issues, are two time-honored honored old school technique called scale focusing and manual exposure settings. Focusing wise, it has to do with hyper-focal distances and depth of field. Rather that getting too involved the optics, physics and mathematics, I like to keep it simple so here's the drill:
Most of theses shots are full length views of folks walking up or down an aisle, entering a reception hall, or doing their âÂÂfirst danceâ in the middle of a large venue, and many other similar scenarios. With a NORMAL lens or NORMAL ZOOM FOCAL LENGTH SETTING, and a nice VERTICAL composition with a comfortable area of space around the subjects, with adults of average height, this shot is made at camera/subject distance of approximately 12 FEET.
Here's how the flash system factors into this method: I set up my multiple flash system to give me a per-determined exposure of f/8 at that distance. I shut off the AF, put the camera in MANUAL mode, pre-select the aperture at f/8. I use a 50mm normal lens or zoom setting and I set the focus, BY MEANS OF THE FOCUSING SCALE, at 12 FEET.
The DEPTH OF FIELD at theses settings will give you a very acceptable degree of sharpness from abut 9 to 50 feet. The 1/1000 sec. flash duration freezes the subject movement. My images are always tack-sharp and free of blur! This level of depth of field gives us the latitude needed in photographing moving subject either head on or at a 45 degree position the the trajectory of the subject's motion. Selective focus, 'âÂÂbokehâ out of focus backgrounds are great for many styles of portraiture and romantic moods, however, in this type of candid imagery, some more definite detail in background and other surroundings lend more ambiance and story-telling elements to you images. Whether you are working in a majestic church, a posh ballroom, a moody club or jazz venue or a sparse VFW hall, you will have total control of the background detail and ambiance of each shot. If you do this right in each file, as you shoot, you will need very little or no manipulation in post production editing and the speed your work flow will increase exponentially.
Now- let' tackle the âÂÂblack backgroundâ issue: I usually keep the ISO setting fairly low- about 100 or 200. This means at f/8, I can still pick up a decent amount of ambient light in the background if I set the shutter at 1/30 sec. or there about- I can even hand hold the rig at 1/15 if need be. If the ISO setting is to high, the flash lighting will require smaller apertures and it will be impossible to pick up a discernible level of background ambiance at hand-holdable shutter speeds. My off camera light (2nd unit) is at around 35 degrees (to the camera/subject axis) and high and that helps open up the background as well. An alternative position for that 2nd light can be about 135 degrees and feathered off slightly toward the background area. Some light strikes the back of the subjects and nicely illuminates the bride's veil while some of the light beam opens up the background. Even if the background is about 1 or 2 stops darker that the subjects, if the slower shutter speed picks up some of the stained glass windows, candelabra or chandeliers, the feeling of a âÂÂblack holeâ is minimized. Sometimes, however, if the background is distracting, not to pretty, cluttered or does not look exactly like âÂÂThe Ritzâ a darker subdued background may be beneficial. Mastering this technique gives you the control over the lighting and detail in the background.
We have all worked in great cathedrals or some church interiors that have seen better days, opulent ballrooms and kinda drab legion halls. Many of us have spent countless hours in the darkroom and at our computer desks, wrestling with problematic negatives and files. This method, when properly applied, wild yield very even and consistent files that are easy to process.
Flash exposure management.. As I previously mentioned, I use my flash equipment and cameras in MANUAL MODE. After years of experience, I have learned to accurately judge distances and and the appropriate flash exposure almost instinctively. I may take the off ambient light reading wit a hand held meter or use the meter just to insure that the flash output is working properly. I am not a genius or some kinda superman- it's just practice, practice and more practice! For those that prefer a TTL automatic exposure system, this method can be altered to accommodate your individual working routines and your specific programmed system and mode.
Another alternative exposure system that I like to utilize is also rather old school as well, but it works nicely. I have some older model Lumadyne flash units that have a very accurate AUTO FLASH feature. This way, I can pre-select the f/stop that I want to work with and the auto-flash system determines the power output. The auto flash sensor in my off camera light determines the flash exposure- it is the main light. I can adjust the mood, via the ratio, by decreasing the output of the on-camera light, which acts as the fill light. The only exception to this rule is when I am using the 2nd light as a KICKER, that is, a 135 degrees to the camera/subject axis, In this configuration, the o-camera light it the main light and although it is a bit flat, the highlights created by that KICKER gives the image a great deal of dimension and relief- the brides veil will glow and the edgy highlights add quite the touch of âÂÂsparkleâ to the mood. Those lighting will make your images âÂÂjump right off the pageâÂÂ!
A word about depth of field scales and focusing scales. With all of the latest auto-everything digital cameras focusing scale indicators are very small or non existent. Depth of field scales are seldom engraved in the lens barrels anymore. I have attached some images of some of my beaten up old lenses to illustrate the depth of file approximations at the working f/stops I am suggesting.
The reason I a, recommend the use of a NORMAL lens or zoom focal length setting for theses kind of shots has to do with reasonable working distances and perspective. For a full frame sensor the normal focal length is 50mm or there about. For a small sensor body, 35mm is the normal recommendation. Perspective wise, I have seen hundreds of full lengths views of subjects that are FORESHORTENED, that s made to look shorter due to distortion caused by shooting down at the subjects. To avoid that, the camera should be position at the subjects' waist level in a full length formal, group or candid shots Wide angle lenses and zoom focal length settings tend to exacerbate this distortion. In extremely tight or cramped circumstances, you can use a slight wider setting but you have to be especially careful to keep the camera level and at the proper height.
For aisle shots, I usually take a position about 1/3 up from the the front of the church where I can crouch down to get the lower elevation of the camera and not obstruct anyone's view of the procession. My assistant, with the 2nd light is positioned in one of the pews so he or she can proved me with a 35-45 degree lighting. As each member of the bridal part come down the aisle, the assistant's light will follow through as they move so if I miss the shot, get a bad expression or closed eyes, I can repeat the shot using the 2nd light as a side/back or kicker light- as I described above. Sometimes, I walk backward toward the front of the church and pick the shot up at a 45 degree position to the aisle. Alternatively, I can preset to focus scale to 15 feet â shoot horizontally and get a wider shot of the bride and her escort coming toward the altar and pick up the parents or other members if the bridal part in the front pews.
Multiple lighting will add a significant level of additional quality to your images. Your flash images will blend better with those you make with natural light, you will seek incredible highlight detail in wedding gowns and in dark formal attire as well. All of you impromptu candid shots will have a portrait-like quality.
Of course, I always secure permission and cooperation from the couple, the families and the church officials when it comes to flash usage. I have obtained this cooperation, even in churches that oftentimes frown upon flash usage. It's a matter of showing respect and consideration for church policies and regulations and not showing up like we own the place or like a bull in a china-shop. I can cover most ceremonies by available light nowadays but the procession can be difficult. I have never been reduced permission to use flash for the procession and the recession or the âÂÂkissâ once the body of the ceremony is completed. Most of the local clergy know us for many years and know that we get things done swiftly, quietly, professionally and unobtrusively, without any fuss or bother. My assistants know my every move and can anticipate each shot before I do them so there is no shouting instructions across the venue or any kinda arm waving or gesturing. We have a few subtle hand signals.
I have 2 dead computers here that are in the shop for new operating systems and other repairs so I am having some difficulty in posting images and diagrams. I am using my i-phone! I'll post more images later on in the article. My IT guy is in the hospital. Murphy's Law strikes again!
I hope this helps to answer a few questions. This method may seem kinda obtuse to some of y'all but it could serve as a starting point for your own system and your own equipment preferences. Nothing in photography is carved in stone but an exchange of ideas, suggestions and tips make life interesting. Theses days, if you can't come up with a better mousetrap- the rats will take over the word!
For those who never got into this kinda lighting, it may me a good idea to ask permission to experiment in a local church on an off day, with a couple of friends and try a few things out. One you get the system down pat, you don't need to worry about inconsistencies in lighting and exposure and you can concentrate on getting the action you wanna capture and the very best expressions.
Talk to y'all soon, Ed
Feb 28, 2017 20:11:08 #
There might be an issue with my keyboard. Some strange symbols appeared over some of the words in my last post. I made a report and asked a moderator to allow me to edit and clean it up. Sorry for the confusion. Ed
Mar 2, 2017 16:12:33 #
E.L.. Shapiro wrote:
There might be an issue with my keyboard. Some strange symbols appeared over some of the words in my last post. I made a report and asked a moderator to allow me to edit and clean it up. Sorry for the confusion. Ed
Hey, Ed. I'm the moderator of this section, and I don't think there is a way to let you edit a post that is older than 1/2 hour. If you pm me the article as you want it, I can go in and make changes. I think the problem is with copying and pasting, and certain fonts that don't play well with the system that uhh uses.
Mar 2, 2017 19:22:56 #
Ed, I don't think the weird symbols are a big problem. However, I used to work for a well lets say multi-cultural company and am used to filling in the blanks when unrecognizable words and symbols appear.
Thank you for some good insight into lighting the aisle. I am wondering if in your next edition you could provide some clarity with a diagram, even if written on a napkin and you take a picture. Some questions I have include where and how the lights are positioned? Are they on light stands or held by assistants? Modifiers? I have considered using speed lights or strobes, but very concerned about keeping them out of the way of attendees at the wedding. One idea I have been kicking around is using speed lights or a strobe nestled against a white wall firing into the wall which would illuminate with bounced light. It would not need an assistant or be in the way. The downside is less directional light.
Thank you for some good insight into lighting the aisle. I am wondering if in your next edition you could provide some clarity with a diagram, even if written on a napkin and you take a picture. Some questions I have include where and how the lights are positioned? Are they on light stands or held by assistants? Modifiers? I have considered using speed lights or strobes, but very concerned about keeping them out of the way of attendees at the wedding. One idea I have been kicking around is using speed lights or a strobe nestled against a white wall firing into the wall which would illuminate with bounced light. It would not need an assistant or be in the way. The downside is less directional light.
Mar 2, 2017 19:33:23 #
jaysnave wrote:
... One idea I have been kicking around is using speed lights or a strobe nestled against a white wall firing into the wall which would illuminate with bounced light. It would not need an assistant or be in the way....
I've used a couple speedlights in that manner at some receptions to raise the ambient light level
and found a general improvement in candid shots.
Mar 2, 2017 23:03:42 #
JAY! Good News!
I have a graphics app for lighting diagrams so I have some in the works.
It's a bit tedious and slow going so it will take me a day or so for the next article. This is gonna be fun. I'll give you the information on the logistics and placement of the lights and the assistant drill.
BK...I gonna write about those battery powered studio units.
STAND BY FOLKS
Mar 3, 2017 08:44:34 #
If you want to reply, then register here. Registration is free and your account is created instantly, so you can post right away.