Finite flash technique for wedding photographers- an article!
Feb 23, 2017 14:16:51 #

PART 1.
Gotta tell y'all, NOWADAYS FLASH HAS AN UNDESERVED BAD RAP! Many photographers go on about how on-camera flash yields flat lighting, lacks realism,drowns out natural lighting and is just plain BLAH, for lack of a better word. To a certain extent, without finite flash techniques, all of this is true. The inverse square law is a very problematic issue in flash photography. Proper flash exposures are based on the distance between the light source and the subject. Simply stated, when the subject is correctly exposed by an on-camera flash unit, the foreground is usually overexposed and the background becomes noticeably underexposed. Foreground elements can be seriously washed out and backgrounds become unnaturally dark- some photographer call this the black hole effect. Oh, I forget to mention that on-camera flash can bring on the dreaded “red eye”effect!
Most of us know about the use of light modifiers, Lord knows, there are hundreds of them in just about every permutation, configuration, size and shape that their inventors, manufacturers and suppliers can come up with. Some of theses modifiers are simple enough and somewhat effective while others are rather cumbersome contraptions that may work well in a studio environment but hardly the kinda thing one can run around with in the throws of a fast-paced wedding coverage. Of course, there are various bounce-flash methods but those may not be too effective in a dark church with a vaulted ceiling or at an outdoor reception at night. Bouncing light off of white walls and ceilings is a time- proven method for more natural results with flash, however, colored walls and ceiling surfaces can cause non-correctable color shifts and casts. We need a method and system that can refine the usage of DIRECT UNMODIFIED FLASH.
Available and existing light approaches can make for some very authentic and dramatic photographs but there are times when there just ain't enough light for practical hand-held exposures at ISO settings that are not- to noisy. Sometimes grainy and kinda dimly-lighted images in a church are moody and interesting but oftentimes, however, they can seem murky and may yield very unflattering lighting, even grotesque lighting in faces. So...we reluctantly pop on the flash in the name of getting the shots that are required, flat or not! BLAH! So...when we just gotta use flash, the right techniques will help us create outstanding images even under difficult or rushed conditions.
Let me take out some time for a short biographical (historical) paragraph or two.
My first wedding related job as a photographic apprentice/assistant after graduating from studio janitor, darkroom cleaner, maker of passport pictures and all around gofer and slave, was the position of “SCHLEPER”- rimes with leper! That's a Yiddish (Jewish) word for one who lifts and drags heavy stuff around- sort of an underpaid stevedore without a trade union- kind of a human pack animal, usually with minimal intelligence or ambition! OK- the thing was, back in the day, wedding photographers used 4x5 press cameras, toted around heavy cases full of 4x5 film holders, some fairly chunky and bulky lighting gear and what with the need for spare backup equipment, there was quite a load of stuff to move around- thus the need for a helper. I was the lowest guy on the old totem-pole but the learning opportunities for a 14 year old over sized kid was fantastic. Hey- got to wear a cool suit.
The next rank toward becoming a full-fledged shooter was LIGHT MAN and therein lies my long and intimate association with finite electronic flash techniques.
A little more history. Back in the day, professional wedding photography was mostly in the domain of the established PORTRAIT studios. High-quality studios quickly adapted their portrait techniques to what was then called candid wedding photography. Flat flash lighting was not particularly acceptable or favored by most portraitists but that was the mainstream method for wedding shooters, a carry over from news or press photography. In the late 1950s, many wedding photographers were still using expendable flash lamps but my first boss was one of the first photographers in town to convert to electronic flash. We were the ONLY studio that used MULTIPLE electronic flash units for ALL of our location wedding work. At first, a solo shooter would work with a second light which was mounted on a light stand and used this setup for the formal and group shots and a few of the candids where the light stand could be placed easily enough and out of the way. Soon afterward, an assistant was employed to man the second light, mounted on a mono-pod and hand held, so that all the shots could benefit from multiple, portrait-like lighting effects.
So...as an assistant (LIGHT MAN) I had to learn the basic rudiments of portrait lighting and be able to to apply them quickly and efficiently and provide a variety of lighting effects to any number of situations as the photographer covered the wedding. Early on, the second or “extension light” was hard wired to the main power pack, tethered by a 15 foot long cable so the second light was usually placed high and somewhere between 30 and 45 degrees off camera. The second light was the main light and the fill light was mounted on the camera. This simple system would provide more modeling, open up dark backgrounds and render more texture and highlight detail in bridal gowns, flowers and wedding cakes. With the innovation of photo-electric (slave) cells, the second light, with its own power supply, could be employed independently in any position and the lighting technique became more sophisticated and versatile.
On the spur of the moment, I had to get in position to provide a 25 to 30 degree main light, a 90 degree side light, a 135 degree kicker, a second bounce light in tight spaces, or a “room light” to open up dark backgrounds or cover a long receiving line or head table. The challenge was that we were “shooting blind” , that is, there was no modeling lights in theses portable flash units so I needed to estimate the distances and positions, make sure I was out of the camera's field of view, make sure that my off camera light was not creating lens flare when I was back lighting.I had to watch the photographer's every move and anticipate all the action. What great way to learn to become a shooter! After a year, I became a second shooter at big assignments and at age 16, I was out shooting on my own- with my own assistant. I never shot a wedding with a single light on the camera! Of course, I also employ many available and natural light methods, use portable studio lighting and work out of doors with reflectors, but when flash is employed, it is always applied with one of my multiple lighting setups.
Let's analyze my system in order to maximize its full artistic, technical and aesthetic potential. I am not using totally conventional equipment in that I have made a number of modifications and have restructured some “old school” gear and methods.
Firstly, let's examine the on- camera light. Although I have a few dedicated “Speedlights” mainly for emergency use, I prefer and always use my Lumadyne flash units for weddings. Theses flash heads have user-replaceable flash tubes and interchangeable parabolic (round) and moderately larger reflectors- that is a major advantageous feature! This flash-tube and reflector configuration yields softer and more even lighting, enables feathering techniques, provides better coverage for wide angle focal lengths, and can be easily removed for bare-bulb operation. The lamp heads themselves are light weight, however, they are not self contained- the power is supplied by a battery/capacitor pack on a shoulder strap. This may somewhat cumbersome but there are many advantages.
Conventional Speedlights usually have a power output between 50 and 100 watt-seconds. In order to maximize their effective light value and minimize their size and weight, they usually employ a small linear flash tube backed up by a highly polished metallic or mirror-Mylar reflector. This is essentially a rather harsh concentrated light source that is somewhat diffused by a plastic lens or panel. The parabolic reflectors are usually made of brushed aluminum or stippled metal material and yield a softer quality of light at the expense of some loss of effective power. Since the power pack can provide an output up to 400 watt-seconds, I can obtain a soft, yet very powerful light source. This is very handy for lighting large areas like dark churches and big ballrooms and provide that additional power needed for bounce and modified lighting techniques where more depth of field is required. My units can be powered down to as little as 5 watt-seconds for “wink-light” usage in low fill light techniques or where selective focus and “bokeh” effects are desired.
Speedlights or any light, for that matter, when mounted on the cameras accessory or hot shoe can be problematic in a number of ways. When used as a direct and single light source it is very flat, can cause distracting shadows from the subject on nearby walls, and even cause the dreaded “red eye” affect. The inverse-square law tells us that the light from our on-camera flash falls off exponentially as the distance behind the subject increases. This can cause unnaturally dark backgrounds, especially in large rooms. Since I am using my on-camera light, primarily as a fill source, I am not overly concerned with the flatness, however, in certain situations the on-camera light fulfills an alternative role as the primary source, that is, when the off- camera light is use as a “kicker”.
To avoid many of the pitfalls and disadvantages of hot shoe flash positioning, I always employ an adjustable bracket that enables the positioning of he flash head about 12 inches directly above the lens. The bracket has a flip component that provides this positioning for horizontal and vertical compositions. A synchronization cord connects the flash head and my radio trigger transmitter to the camera's synchronization (PC) contact. Since I use my flash equipment in manual or auto mode(not necessarily TTL) all I need is a standard connection cord. If you need full TTL enablement, there are adapter cords that provide contact and data transmission between the flash unit and the camera. This type of flash/camera mounting configuration has the a number of advantages. When used as a fill light, the lighting effect will be flat enough provide even fill illumination for the main light without having its own shadow pattern which can conflict with the modeling effect of the main light. If, however, the on-camera light is used as the main light on its own or in a camera light+kicker or background light situation, the slightly higher and over the camera position will provide a bit more modeling that a shoe mounted flash unit.
“Red eye” is caused by a coaxial (to the lens) or near coaxial light source that enters the subject's eyes and illuminates the blood vessels in the retina. The higher position of he flash head, negates this effect and the accompanying need for retouching to correct this aesthetically unpleasing result. Some of theses bracket can be momentarily adjusted for an even higher elevation which can be used to avoid flash-back reflections in eyeglasses. In certain cases, this additional elevation can be employed to slightly minimize the falloff of light behind the subject as per the aforementioned inverse square law effect.
Theses flash brackets come in many makes, types and configurations they are nothing new. They began to appear on the market in the mid-1960s on a custom made basis. Later on, they went into regular manufacture and are still made my companies like Strob-Frame and Jones. The technique itself is an old and time-honored method. Press cameras and medium format camera with standard “L” brackets were equipped with quick release devices and coiled flash cords. The photographer would hold the camera in one hand and the flash in the other hand in order to enable different flash positions. This could be physically difficult and cumbersome and required quite a bit of practice. In fast paced shooting situations, accidental misalignment or off-angle positioning of the flash head could cause seriously uneven illumination- a fixed/adjustable bracket prevents this possibility. This method also eliminates the distracting shadows shadows on nearby walls and other backgrounds that result from ordinary “L” brackets and hot shoe mounting.
The bracket should also be fitted with a tilting feature that can provide various bounce and vertical feathering positioning.
The removable reflector allows bare bulb operation which can has many advantages and increases the potential flexibility of our lighting system. . A bare flash tube, in a vertical orientation has multiple functions. I certain situation, this can provide versatile omni-directional/bounce light source for many aplications. When the on-camera flash is used as a fill source, variations its its power can be utilized to control LIGHTING RATIOS which, in turn, gives us control over the mood of our images. Higher ratios can add dramatic low-key portrait-like effects to our candid images. The basic concept is to expose for the main light and fill the shadows with the on-camera light to a degree that yields the effect that we want to create. As the quantity of fill light is decreased , the contrast between highlights and shadows increases and the effect becomes more dramatic. Decreasing the fill light output can be accomplished, incrementally, by reducing the power to ½, ¼ or 1/8 of the effective power of the main light. If your flash equipment does not provide for theses settings, you can reduce the fill light's output by removing the reflector, bouncing the light off the ceiling feathering off the light vertically, or adding diffusion or neutral density to the flash head. I'll get into the math of lighting ratios later in the article. Believe it or not, theses methods can be applied in split-second situations without difficulty, once the routines are mastered.
Now...I gotta get back to work so let's take a time out! I will continue the article ASAP and we will get into the placement and handling on the second and other lights in the system.
Oh- sorry if there are typos and grammatical errors. I type 85 WPM but I am a lousy secretary and I hardly edit. My spelling is atrocious and my grammar is abominable. I talk faster that I think and I type faster that I talk. I don't know how I got through college? Oh...and I'm, OLD.
Till then, kindest regards, Ed
Feb 23, 2017 14:41:51 #
do your chores on your own time; we the people are waiting for part II
and if we don't get it soon there will be a protest march
and if we don't get it soon there will be a protest march
Feb 23, 2017 19:37:48 #
Great! If any of y'all come to march up here in Canada, don't forget your thermal underwaer...it's still pretty chilly. ...and don't forget to stop in for a good hot meal.
Part 2 is in the works. MEANWHILE- any questions or suggestions? Glad to answer.
Part 2 is in the works. MEANWHILE- any questions or suggestions? Glad to answer.
Feb 24, 2017 18:48:08 #
rfmaude41
Loc: Lancaster, Texas (DFW area)
Gee, when I started out (in the fifty's) there were no portable flash units, at least not electronic. We used #6 / #26 flash bulbs (sometimes even #110's) in a 7" reflector, handle mount flash unit. Yep, we all used 4X5's, and occasionally I'd use my Linhof 2X3, if shooting in color. Shows how much the times have changed, eh ?
The first speedlight I ever had was a 200WS / 400WS Ultrablitz unit with two heads. Was really "wonderful" to carry around at 25+ lbs.
The first speedlight I ever had was a 200WS / 400WS Ultrablitz unit with two heads. Was really "wonderful" to carry around at 25+ lbs.
Feb 24, 2017 21:11:12 #
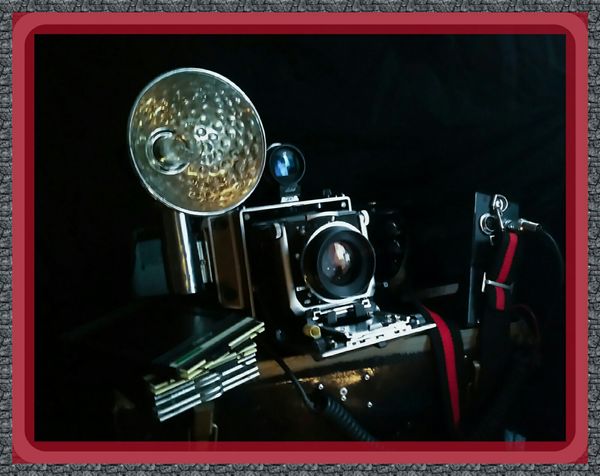
Hey Rf., THANKS for the memories! Still have my Linhoff 4x5...check out the the attached image. I use it for commercial work with a digital back but I held on to the film holders.
I remember the Press 50, 25, and #5s as well. The 50s could light up a coal mine. My first strobe was an Ascorlight 200 W/S. I still have one shoulder lower than the other from hauling around that power pack. The Linhoff was no feather weight either. I developed forearms like Popeye the Sailor Man from shooting weddings with that rig.
Nowadays some photographers complain about the weight of a DSLR and want to go mirrorless. Times have changed, indeed ð!
Regards, Ed
If you want to reply, then register here. Registration is free and your account is created instantly, so you can post right away.