Viewfinder says exposure is correct but....
Aug 30, 2016 11:25:47 #
eyebidder wrote:
Hello all,
New to this forum. Using a D7000, set to Manual, ISO 200, AF-A, WB Auto 6500K flor. lights. Whenever I post process I always have to lighten the photo even though the camera says exposure is correct. Anyone have any suggestions?
thank you!
New to this forum. Using a D7000, set to Manual, ISO 200, AF-A, WB Auto 6500K flor. lights. Whenever I post process I always have to lighten the photo even though the camera says exposure is correct. Anyone have any suggestions?
thank you!
It is most helpful if you post an uncorrected image; even better if you post a before and after set.
Aug 30, 2016 11:40:29 #
wj cody wrote:
i rarely rely on in-camera meters, and always use a hand held meter (gossen, pentax, sekonic) for making exposures with floods or strobe lights. i have always believed in-camera meters are limited and configured to the average in any exposure. hand held meters, incident and reflective, will always provide much better results. i've been using this method, in studio, for decades and have found this to be essential.
good luck with your images.
good luck with your images.
========================
Yes! Very true....
Being that I came out of chemical photography - and still make use of some of the film cameras that I have bought in the past, I still like the use of the hand-held Light Meters.
When on locations (Landscapes) and the light is "difficult" (i.e. = bright sky and dark shadows ) ... I will "Spot Meter" the Shadows (let us assume "Zone 2" and the recordable highlights at "Zone 8" ) to get the best of everything in the image. With H.D.R. I always do this and place "Zone 2" as the Under exposed one of the three shutter captures - and the Over exposed one on "Zone 8" ... I do not have to really be concerned with the Middle exposure as I know that IT will be somewhere within the range that I want.
Yes - Indeed - A Handheld Incident meter is the thing to use with "studio lighting".
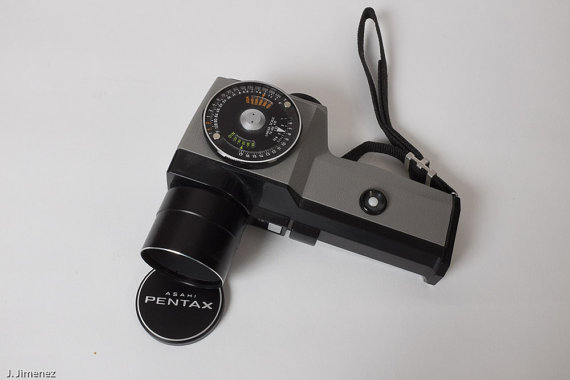
Shown Below is a spot meter that I make use of.
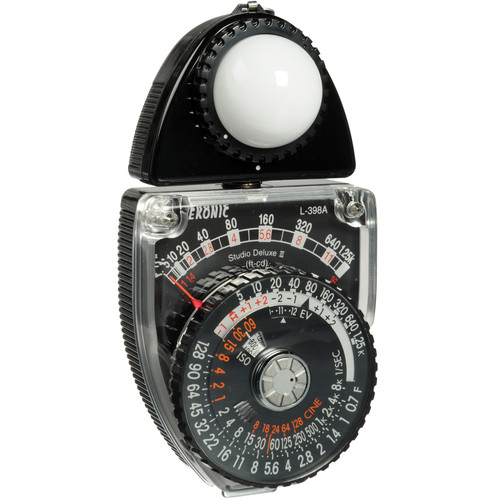
And an Incident meter.....
Aug 30, 2016 11:58:35 #
one of two things.
You are not setting exposure compensation for images that you determine require compensation from the camera's readings (it's your responsibilty to make judgements about when a scene requires adjustment from the norm-the norm being scenes that are average to the camera standards.)
For instance if you shoot a scene of a snow field, or across a large body of water on a sunny day, you need to know when and how many increments of f stop you should increase or decrease the exposure. AHA!!! and you thought your fancy camera did everything for you.
Nothing could be further from the truth. The camera can not make judgements about compensating for scenes that only your eye can see the difference on. It's very likely you must study Exposure Compensation. It's just one of the NON automatic functions on all camera's. You must be the judge in certain situations.
Until you fully understand that it is the job of the meter to render near pure whites and near pure blacks as neutral grey, this will not make sense. So when you are on the slopes and shooting pictures of snowy ski runs, you will get home and find all your "white" slopes are washed out and dingy grey. The meter did it's job. It was your responsibility to note that there was a full viewfinder of white and the camera made it grey. In this instance to pull the meter back to rendering white, you have to open the exposure by 1.5 to 2 stops, so the snow will be white.
Same thing happens at the boat races, all that water reflection shining into your meter, caused dull, dingy water and sky. Again, you must open the exposure up.
Now the same holds true for shooting into a scene that is predominantly dark. The meter will, without your compensating judgement, make the dark (blacks) areas, neutral grey. You didn't compensate, by stopping exposure down a stop or two. What the hell is wrong with you!!!
Now let me say, exposure compensation is not logical, until you understand meter function. Meter function if the scene is out of the ordinary cannot be automated. You must compensate.
Study exposure compensation.
I have a little mnemonic I practice which seems illogical but works for me:
Scene predominantly bright as snow/lake
Open 1-2 stops
Scene predominantly dark as shooting into forest from outside
Close 1-2 stops
Now, there is one other thing I have found on digital. Some certain models of camera's and even some specific cameras need to be judged for metering against other camera's. I have owned a few digital camera's where I have had to crank in a third of a stop over or under to compensate for the camera meter being slightly incorrect.
Check your camera's metering settings against a know good camera or a known good hand held meter. You know... one of those $700 Sekonics handled by someone who knows what they are doing.
Meters and certain camera's are not without fault, but again Exposure Compensation can be your friend. Set it to a corrected setting based on your research and shoot the camera corrected at all times.
Don't forget that certain scene conditions will always require you to make a judgement, and input your judgements into each image.
YOU LITERALLY cannot spend enough money on camera's and lenses to make your images professional. You still have to understand certain things about the craft to do that.
That's why there are still professionals who are making all their images with archaic, non automatic, usually film camera's.
Few people have bought digital camera's and automatically become professional because of the automation. The automation simply made the things they already knew about photography, or learned about photography, easier to accomplish more quickly.
Aug 30, 2016 12:02:18 #
amfoto1
Loc: San Jose, Calif. USA
eyebidder wrote:
Hello all,
New to this forum. Using a D7000, set to Manual, ISO 200, AF-A, WB Auto 6500K flor. lights. Whenever I post process I always have to lighten the photo even though the camera says exposure is correct. Anyone have any suggestions?
thank you!
New to this forum. Using a D7000, set to Manual, ISO 200, AF-A, WB Auto 6500K flor. lights. Whenever I post process I always have to lighten the photo even though the camera says exposure is correct. Anyone have any suggestions?
thank you!
Yes, I have a suggestion.... buy the book "Understanding Exposure" by Bryan Peterson.
I see three possibilities...
1. The camera's metering system "thinks" the whole world is "average gray". If dominant parts of your images are brighter than average gray (either 18% or 15% "gray", depending upon who you talk to), the camera is "fooled" into making or recommending an underexposure, resulting in too dark images. If using one of the auto exposure modes (aperture priority, shutter priority, program or manual+auto ISO), it's up to the photographer to recognize the problem and correct for it with Exposure Compensation. If using manual exposure, as you are, then it's just a matter of biasing your settings toward somewhat more exposure (same thing as Exposure Compensation, but E.C. actually only works on auto exposure modes). To get more accurate exposures, there are several things you can do: Get a "gray card" or target and measure light off that with the camera's meter. The card/target has to be positioned correctly and the measurement done carefully. Personally I use Lastolite EZ Balance targets, which are flexible and fold up smaller for easier storage (esp. compared to a standard rigid 8x10" or larger gray card). One side is pure white, the other 15 or 18% gray for exposure readings. Either side can be used to set Custom White Balances, too. I also use 5x7 inch "Warm Cards".... which include both plain white and average gray targets, too.... but a set of those also comes with special targets to set slightly warm or cool-biased images using Custom WB, as well as corrections for common fluorescent and some other lighting types.
There also are handheld incident light meters that can be used to measure the light falling onto the subject, rather than what's being reflected off it. Because of this, different subject/scene tonalities no longer influence the metering and the readings and recommended settings are far more accurate. Many incident meters also can serve as highly accurate flash meters (especially useful when working with studio strobes and setting ratios between them for main, fill and other types of lights. (Note: Bryan Peterson doesn't mention incident meters in his book.... At least not in the edition I read. Perhaps this is because his book focuses on using the camera's internal metering system and... in a sense... if you have an incident meter and know how to use it, you might not need his book! Actually I think it's beneficial to be able to meter accurately both ways, so I bought, read and studied his book... even though I also have three or four incident meters!)
You also can learn to make these adjustments pretty well "by eye". Or... one of the nicest features of digital... you can take a test shot, then check the histogram. If you don't know how to read that display, learn it! The histogram is a VERY useful tool. (Note: DO NOT trust the playback image itself to be very accurate... The screen on the back of the camera is not and can't be very accurately calibrated. it's heavily influenced by ambient light conditions... which can be almost anything).
2. You mention using fluorescent lights. If those are the more expensive, stabilized type especially for photography there should be no exposure problem caused by the lights. But if they are standard household type bulbs and fixtures, those cycle on and off at a rapid rate... 120 times per second in the U.S., 100 times per second in some other parts of the world. This causes problems with accurate exposures with many cameras. The shutter might fire at any point of the cycle, causing wildly different exposures. Due to the rapid fluctuations, the camera cannot typically time the instant of exposure even when using an auto exposure mode. This also makes for significant color shifts. There really is no general solution for this, except to buy and use the stabilized types of bulbs (might require different fixtures, too... I dunno), or to take lots and lots of extra shots because you know quite a few will be under or over-exposed. Some recent Canon cameras now have a "Flicker Free" mode, too. This is especially for fluorescent and similar lighting and works by sensing the fluctuations then timing the shutter release to match the peak of light output. It works pretty well (and there's no perceptible delay in shutter release). But I don't know if Nikon and others offer similar on any of their cameras. It's a pretty good bet that the several year old D7000 wouldn't have it, since it's only been on a few Canon DSLRs introduced the last year or two.
3. Finally, if your images look correct on-screen (and their histogram appears correct), but prints or images posted online are consistently coming out too dark, is your computer monitor calibrated? Most computer monitors are way too bright, out of the box. For photographic uses the brightness must be turned down. Otherwise you'll be fooled into adjusting your images too dark. Calibration is most easily done with a device such as the Pantone Huey, Datacolor Spyder, XRite ColorMunki or similar. This is a combination of software and hardware in the form of a sensor the "reads" brightness and color test patches off your computer screen. It not only helps you set the brightness level, it also "corrects" color imbalances. Those are another typical problem. If you print much, a calibration device and software will essentially pay for itself over time, with savings of ink and paper. Calibration has to be re-done periodically (I do it every 2 months), because computer monitors gradually change as they age. For example, when it was new I had to adjust the brightness on my monitor to around 20%. Now that it's five or six years old, I have it set around 50%. It's changed that much with use. I'm sure the color rendering has gradually shifted, too... though it's not as easy to compare with how it did previously.
Hope this helps!
EDIT: I also have that Pentax spot meter (as well as one or two others). I used them a lot when I was shooting film and using the Zone System. I'd use the 1 degree reflective meter to determine what exposure and film processing would render different tonalities in the image the way I wanted them. It's highly precise, but be aware that it's still a reflective meter, so will be influenced by the tonality of whatever you point it at.
It so happens I also have that Sekonic 298 incident meter. It's built like a tank! Mine is about 30 years old and still highly accurate... and sometimes I really like the analog readout! Great too, because there's no battery required! HOWEVER, it is not able to measure flash, the way many other incident meters can. Flash/incident meters I've used over the years include Minolta III, Minolta V.... newer versions of which are now made and sold by Kenko. I currently use a Sekonic L358... a more modern meter with ranges that better match with modern DSLRs... it has a digital readout and can be set to as fine as 1/10 stop, and can optionally be fitted with a radio module to control and test fire studio lighting wirelessly (I know for sure with RadioPopper and Pocket Wizard receivers... maybe some others, I dunno). It's a discontinued model now.... the L308 is similar without radio module feature... and there are more expensive Sekonic models available now, with built-in (not optional or user interchangeable) radio controllers for a wider range of lights and receivers.
Aug 30, 2016 12:03:42 #
wj cody
Loc: springfield illinois
James R wrote:
======================== br br Yes! Very true...... (show quote)
i use the same model pentax spot meter. i like it due to its analogue readings, rather than the newer pentax digital spot meters.
your sekonic is really nice. i've not found one of that vintage in working condition. when i do, i will get it, as it is a great meter.
all the best with your photography!
cody
Aug 30, 2016 12:19:53 #

eyebidder wrote:
Hello all,
New to this forum. Using a D7000, set to Manual, ISO 200, AF-A, WB Auto 6500K flor. lights. Whenever I post process I always have to lighten the photo even though the camera says exposure is correct. Anyone have any suggestions?
thank you!
New to this forum. Using a D7000, set to Manual, ISO 200, AF-A, WB Auto 6500K flor. lights. Whenever I post process I always have to lighten the photo even though the camera says exposure is correct. Anyone have any suggestions?
thank you!
Meter an 18% Gray Card (Delta-1 makes them), which you can order from B&H or Adorama, etc. for less than $10. Place it in the same place as your subject, and be careful not to meter "glare" from the card.
The Gray Card also works wonders for setting a Custom White Balance. With correct exposure and Custom White Balance achieved at the camera, certain kinds of subject matter can be photographed in JPEG and the files can be used immediately, NO editing required.
Are your fluorescent lights made specifically for photography? You need a CRI (color rendering index) of 91 or better for best results. Alzo Digital is a good source. So is fjwestcott.com.
Aug 30, 2016 12:49:24 #
The meter in all DSLRs and SLRs is a REFLECTED light meter, and will adjust all things to an 18% gray, which happens to be the color of a gray card. Shooting a white sheet in the sun will turn that white sheet grey. If you meter the gray card, you would be emulating an incident meter, and find your exposure is more accurate. In a pinch, grass is nearly 18% gray, and might do. If you invest in an incident meter, things might turn around for you instantly, given you learn how to do metering. Then, you can get fancy, an add a COLOR METER to your arsenal and begin to worry about color and white balance.
Aug 30, 2016 16:09:21 #
wj cody
Loc: springfield illinois
burkphoto wrote:
Meter an 18% Gray Card (Delta-1 makes them), which... (show quote)
yeah, don't you just love the pulsing of fluorescents? always a lot of fun, historically to deal with.
Aug 30, 2016 16:23:23 #
burkphoto wrote:
Meter an 18% Gray Card (Delta-1 makes them), which... (show quote)
Most camera meters are calibrated to the ANSI standard, which is about 12% gray. Metering to an 18% gray card will produce 1/2 stop under-exposure. The 18% gray cards were used for print calibration; they are an equal mix of black and white. True white balance cards will be calibrated at 12% gray. You can use either, just be aware of the difference.
Aug 30, 2016 16:25:34 #
wj cody wrote:
yeah, don't you just love the pulsing of fluorescents? always a lot of fun, historically to deal with.
The ones made specifically for photography don't pulse. I've used them since 2007 with excellent results.
Aug 30, 2016 17:01:12 #

Check your camera exposure against what a meter says, also check your WB.
Aug 30, 2016 20:25:40 #
boberic wrote:
As many have said, it may have something to with t... (show quote)
All human beings don't have 18% skin. Human skin comes in a variety of tones.
Aug 30, 2016 21:57:06 #
JohnSwanda wrote:
All human beings don't have 18% skin. Human skin comes in a variety of tones.

So true. As a former manager of the color correction department of a pro lab, I can tell you every subject is different. NO skin tone can be used as EITHER an exposure or white balance reference. You need a proper target.
Aug 31, 2016 05:47:04 #
wj cody
Loc: springfield illinois
burkphoto wrote:
The ones made specifically for photography don't pulse. I've used them since 2007 with excellent results.
that is true - i was speaking of the standard bulbs usually found on location.
Aug 31, 2016 07:30:30 #
wj cody wrote:
that is true - i was speaking of the standard bulbs usually found on location.
Yeah. Gotta love those 4-tube, T-12, Cool White, 277-Volt troffers that are so commonly found in schools and businesses. The worst! Color cycles constantly between normal and dark yellow, or normal and light blue, depending on your custom white balance point...
If you want to reply, then register here. Registration is free and your account is created instantly, so you can post right away.