How to hook up a Calumet Print washer please!
May 12, 2012 19:58:42 #

Today I picked up a used 20x24 Calumet Print washer. Calumet no longer sells these. I just spent several hours looking for the way to hook it up.
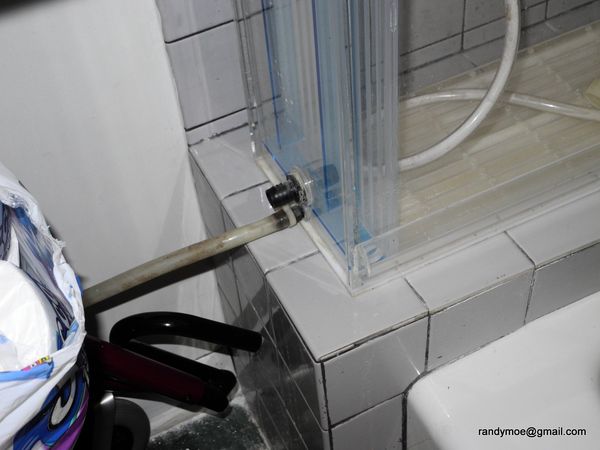
It has 3 hoses. Obviously the top 1/2" hose is the fill.
The bottom has a 1/2" fitting and just above that is a 3/4" fitting.
I think the very bottom is to fully drain. The larger 3/4" fitting above that must be the operational water out.
I can plug or valve the drain hose, but what is suggested for the the operational drain. It is very large compared to the inlet.
Does it need a valve, or restrictor, or do I raise the output hose as high as the running water surface to keep the thing full?
I cannot locate any instructions or images of a hookup.
Remember I am the guy who could not fit a camera strap on a RB. (the camera was defective...)
I am trying to get it right the first time as this thing holds many gallons and could make a big mess.
Thanks.
May 13, 2012 05:44:35 #
rayford2
Loc: New Bethlehem, PA
http://www.largeformatphotography.info/forum/showthread.php?83096-How-do-you-properly-use-the-Calumet-print-washer
Here's a piece of information that was on the internet concerning the 20x24 washer.
Apparently that 3/4 connection is a recirculating drain that feeds back into the top (fill) connection. To do this you'll probably need a pump that delivers the proper flow back into the inlet, perhaps with a valve on the pump outlet to control the water. There may be a filter installed before the inlet of the pump, perhaps the reason for 3/4 fitting.
That being said, I would guess that the bottom drain would have to be partially open so that the water is partially renewed preventing adverse contamination. Your inlet water would have to replace the drained water at the same rate to keep the level constant.
If Calumet can't furnish you any specs this may be a trial and error thingy for you.
That's just an educated(?) guess though.
...Good luck, let us know how things turned out for you.
May 13, 2012 11:21:27 #
May 13, 2012 12:20:28 #
May 13, 2012 12:27:11 #
Hi Ray,
I will call them during the week.
Thanks.
I will call them during the week.
Thanks.
rayford2 wrote:
Try calling them at (800)-CALUMET.
May 13, 2012 12:35:44 #
Yes I can, here they are.
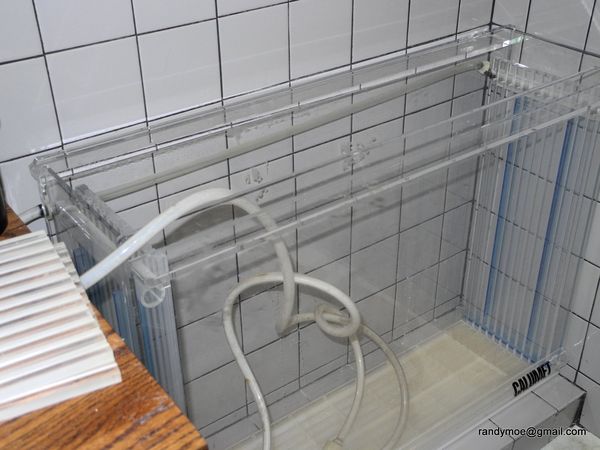
I have not put the dividers in until I decide on the final resting place. Obviously this is the end of my bathtub.
I can put 3 20x24 trays in the room if i use every space.
A bigger darkroom is in the works.
Notice the 3 pipes?
I have not put the dividers in until I decide on the final resting place. Obviously this is the end of my bathtub.
I can put 3 20x24 trays in the room if i use every space.
A bigger darkroom is in the works.
Notice the 3 pipes?
twowindsbear wrote:
Can you post a pic of your new 'toy?'

May 13, 2012 12:48:31 #
I think the bottom connection is the input
the next is the output
and the top is the overflow
The device is a box within a box, right? The water goes into the inner box, flows over the prints to wash them then into the outer box & out into the drain. If that drain should become clogged or blocked, then the excess water flows out of the overflow connection.
May 13, 2012 13:13:49 #
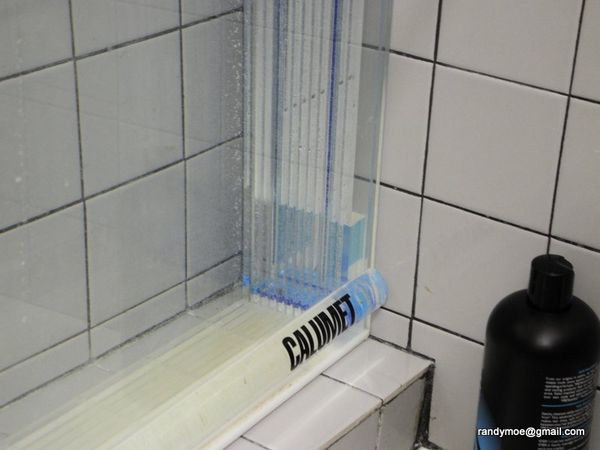
That can't be. It is impossible to see in the photos. The upper hose has a screw on connector and it feeds little holes in the channels that run down the inside.
Hopefully these pictures are better,
Hopefully these pictures are better,
twowindsbear wrote:
I think the bottom connection is the input
the next is the output
and the top is the overflow
The device is a box within a box, right? The water goes into the inner box, flows over the prints to wash them then into the outer box & out into the drain. If that drain should become clogged or blocked, then the excess water flows out of the overflow connection.
the next is the output
and the top is the overflow
The device is a box within a box, right? The water goes into the inner box, flows over the prints to wash them then into the outer box & out into the drain. If that drain should become clogged or blocked, then the excess water flows out of the overflow connection.


May 13, 2012 13:53:44 #
randymoe wrote:
That can't be. It is impossible to see in the phot... (show quote)
Maybe that top connection is for an air pump?
I seem to recall seeing this in a Calumet catalog ages & ages ago.
May 13, 2012 14:39:31 #
I think we need someone who has used one.
Thanks for all your help!
Thanks for all your help!
twowindsbear wrote:
quote=randymoe That can't be. It is impossible to... (show quote)
May 13, 2012 14:52:15 #

If I recall correctly, fixer is heavier than water, so the bottom-most tube is to drain the fixer first. The weight of the lighter water will force the fixer out first.
May 13, 2012 15:30:14 #
I just last night read by some expert who maintains the fixer is heavier than water theory is false and yes all these washers were made to remove the 'false heavy fixer' from the bottom.
I guess even Alistair Inglis has seen the light.
I still need a plan...
Thanks for the comment!
I guess even Alistair Inglis has seen the light.
I still need a plan...
Thanks for the comment!
Mpeter45 wrote:
If I recall correctly, fixer is heavier than water, so the bottom-most tube is to drain the fixer first. The weight of the lighter water will force the fixer out first.
May 13, 2012 16:48:58 #

I believe that the Calumet print washer is a copy of the Kostiner Archival print washer. I used to sell Kostiner washers. There are no pumps involved. Water would enter from the bottom and cascade down the sides when full. That is why there is a cover on top to prevent the prints from floating to the top.
You may want to check out these sites:
http://www.summitek.com/cascade.html
http://camerashopnbuy.com/kostiner-20x24-archival-print-washer/
Good luck it's a great washer.
You may want to check out these sites:
http://www.summitek.com/cascade.html
http://camerashopnbuy.com/kostiner-20x24-archival-print-washer/
Good luck it's a great washer.
May 13, 2012 18:52:20 #
Finally some good links.
Thanks!
I like the Cascade flow design.
This one is different.
It does have two covers I did not show and if you notice I have not put the dividers in yet. They need to be cleaned.
I just returned from home Depot with enough hose to try all combinations.
I will post results and pictures at least by tomorrow.
Thanks everyone!
ahanonymous wrote:
I believe that the Calumet print washer is a copy ... (show quote)
May 15, 2012 01:30:07 #
If anyone is still following, I hooked it up tonight. Figured it out myself.
Works real nice with no leaks. That good!
The water is added by the 3/8 tube to the upper manifolds that feed the slots were the prints are washed.
The bottom hose is a full drain and to keep the unit full you simply keep this drain hose above tank level until you want to drain.
The largest upper lower hose is the running drain. You simply feed this into a lower than tank level drain.
When the tank is full the water cascades over and out of the print wash area and then drains down a separate chamber to be drained constantly as the tank maintains full level.
This system is genius as it cannot fail.
The supply hose is 3/8 and can be pressurized to a quick flow.
The running drain is 3/4 hose and can easily drain any water supplied by the feed hose.
The entire unit can use as much or as little water as you want. The user is in full control!


If you want to reply, then register here. Registration is free and your account is created instantly, so you can post right away.