New from PA.
May 6, 2012 16:23:35 #
Hi everyone. I have been following UHH for several months and finally thought it was time to join. What a great forum this is!
I am a retired RN and for the past 6 yr. have been delving more and more into photography and learning as much as I can. My husband and I have traveled to all 50 states. I take the photos; he drives. I have a canon 50D; 24-105L and a 70-200L canon lens. Please feel free to c&c my photos as I believe this is one of the best ways to improve and learn.
:-D Dee
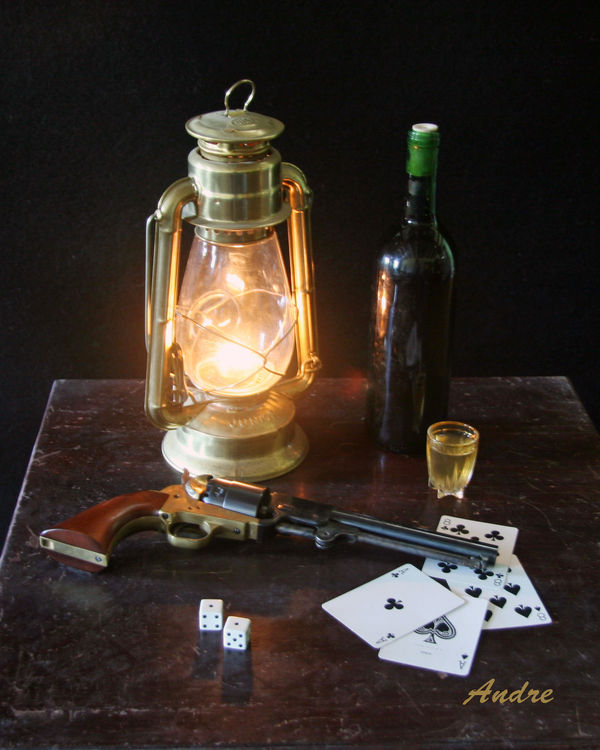
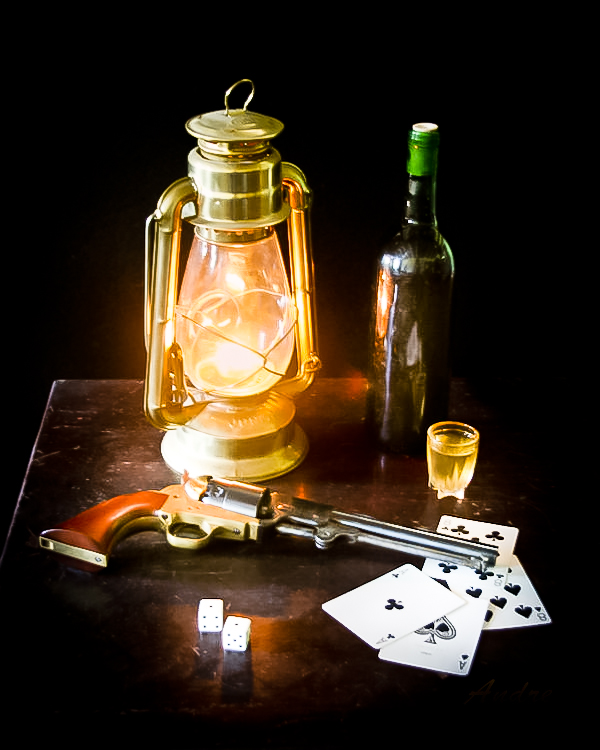
Aces and Eights
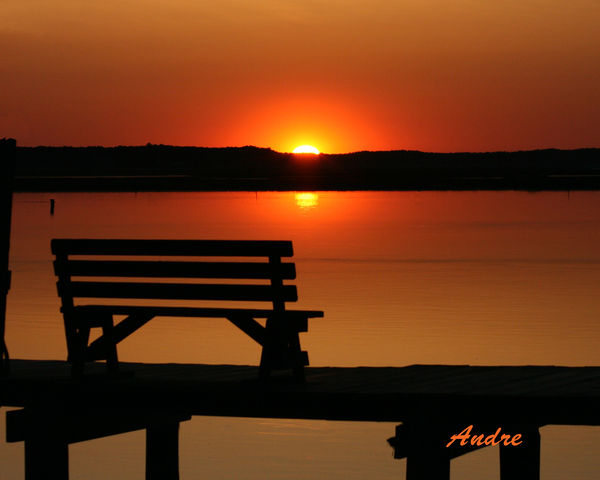
Sunrise at the shore
May 6, 2012 16:50:04 #
donrent
Loc: Punta Gorda , Fl
Very , very professional... Excellant ! I can see that you have many more to post....
May 6, 2012 17:52:30 #

May 6, 2012 17:54:24 #

Welcome!
Overall the first shot is very solid but it suffers a bit from a lack of "dodging and burning" to direct my eye.
the second shot is nice, I like it...the sky isn't overexposed and the composition is good.
Nice job!
Overall the first shot is very solid but it suffers a bit from a lack of "dodging and burning" to direct my eye.
the second shot is nice, I like it...the sky isn't overexposed and the composition is good.
Nice job!
May 6, 2012 17:56:13 #
May 6, 2012 17:56:34 #
May 6, 2012 18:02:21 #
DeeAndre wrote:
Thank you so much,Dee
Do you know what dodging and burning is?
May 6, 2012 18:02:40 #
Thank you. I am not sure what dodging and burning means. Would you explain that term a little more. Again comments are really appreciated. Dee
May 6, 2012 18:06:06 #
DeeAndre wrote:
Thank you. I am not sure what dodging and burning means. Would you explain that term a little more. Again comments are really appreciated. Dee
No problem. :)
It's a darkroom term from the old film days. These days it refers to darkening or lightening parts of the image to accentuate parts of your image or to draw the eye away from other parts of the image. It's done all of the time and it makes for much more dramatic images.
Would you like me to show you an example using your gun/bottle image?
May 6, 2012 19:51:55 #
May 6, 2012 20:06:49 #
DeeAndre wrote:
yes, Thanks for taking the time to do this.
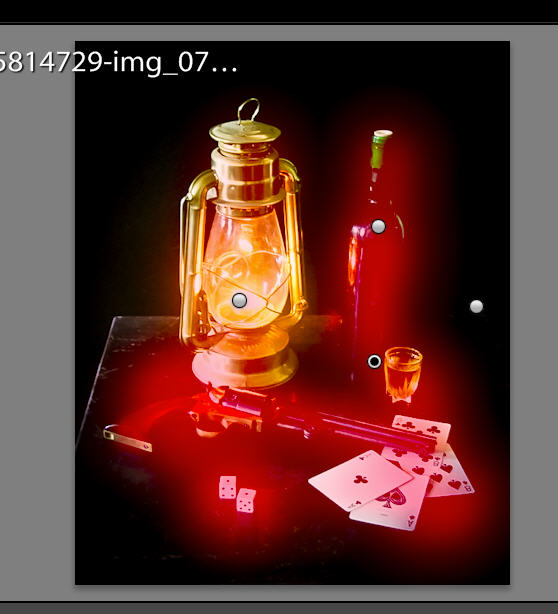
Ok...here is what I have.
The first shot is where I painted the exposure+ or the exposure- (the dodging and burning)...lighter and darker. You can see the red parts; that's where the exposure+ is on the objects. By the silver dots you can see that I painted this shot in several places.
The second shot is a comparison on my screen of the two so you can clearly see the difference.
In the third shot it's my final full size dodged and burned shot. To me it's more dramatic to see some parts more clearly and some not very well. (because it's a JPG it didn't come out as well as it could; starting from a raw file would have helped a lot but you get the idea.)
Red indicates burned area on objects.
A comparison of the original and the modified shot
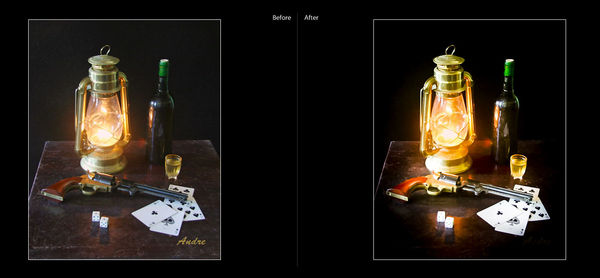
The final result of the dodging and burning
May 6, 2012 21:52:43 #
WOW, that really makes the picture pop. Thanks for showing me a new technique.
Their is always so much to learn in photography; I think this is why I enjoy it so much.
Their is always so much to learn in photography; I think this is why I enjoy it so much.
May 7, 2012 08:32:25 #
Welcome to the "HOG".I still like the original best. Burning and dodging were overdone to me. Maybe needs somewhere in the middke.
May 7, 2012 10:07:04 #
DeeAndre wrote:
Hi everyone. I have been following UHH for several months and finally thought it was time to join. What a great forum this is!
I am a retired RN and for the past 6 yr. have been delving more and more into photography and learning as much as I can. My husband and I have traveled to all 50 states. I take the photos; he drives. I have a canon 50D; 24-105L and a 70-200L canon lens. Please feel free to c&c my photos as I believe this is one of the best ways to improve and learn.
:-D Dee
I am a retired RN and for the past 6 yr. have been delving more and more into photography and learning as much as I can. My husband and I have traveled to all 50 states. I take the photos; he drives. I have a canon 50D; 24-105L and a 70-200L canon lens. Please feel free to c&c my photos as I believe this is one of the best ways to improve and learn.
:-D Dee
:mrgreen: Welcome - #1 Very good still life, tells story of old west as a whole - I feel you have several picture within, just as a book has chapters. With several light (white) areas lamp,dice cards, the eye has no stopping point. Explore possibilities. Dodging and burning could increase impact and reduce whites.
#2 try cropping out bottom sunlight reflection.
Both are contest quality.
May 7, 2012 12:20:52 #

I like the original photo. Pehaps a little more lighting on the bottle might help.
If you want to reply, then register here. Registration is free and your account is created instantly, so you can post right away.