Where did my sky go???
May 7, 2012 12:28:11 #

Frank T wrote:
It's not that you did anything wrong, it's just the nature of photography. You exposed correctly for the people and that in turn overexposed the sky, burning it out. What you can try is to expose for the sky and then use flash to light the people so they're exposed correctly. Remember when you're setting exposure most cameras normally sync at 1/250 but many have settings that you can use for high speed sync; so check your manual.
Frank T wrote:
Remember when you're setting exposure most cameras normally sync at 1/250 but many have settings that you can use for high speed sync; so check your manual.
My camera (Sony A330) has different flash sync settings, but I read about them in the manual, but still don't understand why having the flash during different times in the exposure process makes a difference in the picture. Isn't it teh same amount of illumination regardless of when it flashes?
May 7, 2012 12:34:33 #

Frank T wrote:
It's not that you did anything wrong, it's just the nature of photography. You exposed correctly for the people and that in turn overexposed the sky, burning it out. What you can try is to expose for the sky and then use flash to light the people so they're exposed correctly. Remember when you're setting exposure most cameras normally sync at 1/250 but many have settings that you can use for high speed sync; so check your manual.
Or expose for the sky and put a large white reflector card in front of them to act as a fill light.
May 7, 2012 12:36:20 #

Fill flash is fine. Just remember if you are to close, the fill is harsh. They make opaque filters for flash units to soften the light.
May 7, 2012 13:27:50 #
ArtSeaMom wrote:
I had the same problem and finally reached the conclusions offered. I have started a file of skies in Photoshop ...
I've had problem too, although learning more about filters etc... but I've heard about having ''skies'' to use in photoshop. I have Photoshop but don't know the procedure other than to crop the subject out of the original and place it copied in another with the fake sky, or, just adding fake color to the sky. So my question is how do you create and use a collection of backgrounds and put them in a photo?
May 7, 2012 16:12:25 #

CocoaRoger wrote:
quote=ArtSeaMom I had the same problem and finall... (show quote)
In photoshop utilizing a PC, here's the steps I use:
1. Open up the image you want to add the sky to
2. Utilize the MAJIC WAND tool on the sky
3. Open the sky image you want to add from your archives
4. You now have two photos open with the sky photo in front
4. From the SELECT menu on the task bar, SELECT ALL
5. On your key board press CONTROL and C
6. Put curser on original photo and bring this photo to the front
7. From the Edit menu on the task bar, select PASTE INTO
The selected sky should now appear in place of the blown out sky of your original photo. You will most likely have to utilize the MOVE tool from the tool bar on the added sky to position clouds, etc. on the photo. The above can be accomplished utilizing layers but this is the procedure I am used to and pretty easy to do. Depending on the photo, one may have to do some cloning and further adjustments after saving the manipulated photo.
Scott Kelby describes this procedure in one of his books, "The photoshop Book For Digital Photographers", that I highly recommend.
May 7, 2012 16:18:38 #

Most all the answers suggested will work. Using PSE, since there are no clouds in the picture, you could add blue to the sky using paint bucket. Also PSE has a tool for adding a blue sky to the photo. In the future perhaps using HDR (High Dynamic Range)could help. Many cameras now will shoot 3 to 5 exposures in rapid sequence and can be merged via software. The final image can be tweaked in PSE or any good photo software.
May 7, 2012 21:34:51 #

Oh my gosh! That looks wonderful. I'm just learning Elements but will defiantly work on this.
Thank you all so much for the help and great information! I learn something everyday on these forums.
Thank you all so much for the help and great information! I learn something everyday on these forums.
May 7, 2012 21:43:44 #

I had the same problem but in reverse where the white background turned black and read that it was the way I set the shutter speed.
May 7, 2012 21:55:46 #
JudyM wrote:
IF your camera will 'auto-bracket' - set the range for + 2eV and make your exposure setting on the faces. You can discard the one that is totally blown out and combine the two others using an HDR process. I'm not sure if there is one in Elements 10 or not - but there are some free HDR programs out there (search UHH or use google) OR drop a few bucks on Photomatix Pro.I would appreciate any help on this subject.....I took 130 pictures of this couple. They all turned out pretty good EXCEPT the ones with the sky in the background. Judy
IF you judiciously apply the HDR combining process you should get a pleasing result. In bright daylight like that - the exposures should be fast enough that framing and motion issues should not be a problem.
.
Also - - if the capability exists on your camera - shoot JPG + RAW. That way - if needed - you can recompose the best shots for contrast and exposure BEFORE going to HDR with the recreated JPGs.
May 7, 2012 21:58:26 #
AK Dreamer wrote:
7. From the Edit menu on the task bar, select PASTE INTO
Scott Kelby describes this procedure in one of his books, "The photoshop Book For Digital Photographers", that I highly recommend.
7. From the Edit menu on the task bar, select PASTE INTO
Scott Kelby describes this procedure in one of his books, "The photoshop Book For Digital Photographers", that I highly recommend.
Although similar to what I did the "Paste Into" is new to me. I'll give that a try.
A little "refine selection" on the Section menu can help too...perhaps a little contraction and feathering. Need to experiment on that.
The method Kloskowski describes in the latest Elements mag is a bit more complicated in order to get the new stuff to flow around the hair (or tree branches in the example he uses). The basic idea is to turn a layer black and white to make the selection more precise around the small stuff.
May 8, 2012 12:39:10 #
rambler
Loc: Masssachusetts
Want an instant sky for free? Scroll down to the photo at the bottom of the page:
not for Macs, however.
http://www.dougitdesign.com/downloads_pg3.html
not for Macs, however.
http://www.dougitdesign.com/downloads_pg3.html
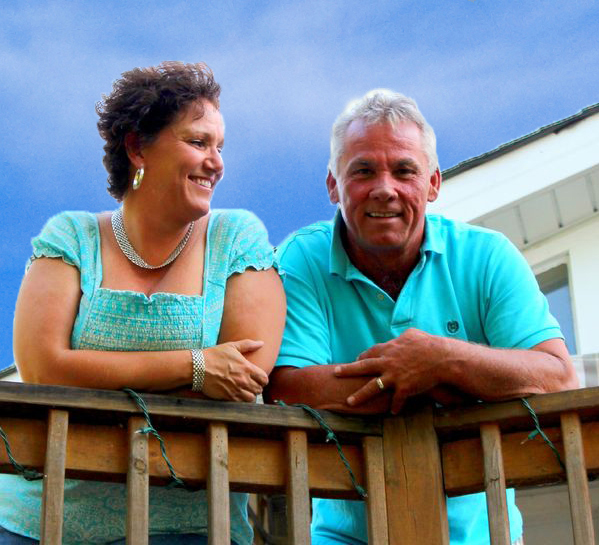
May 9, 2012 00:04:57 #

JudyM wrote:
I would appreciate any help on this subject.....I ... (show quote)
I just shot a bunch of images and had the same thing happen to me. I've been trying a lot of different things to put sky in the images just to learn different ways. With yours, it was just easier to copy your main image and paste it into an existing sky image, then crop, then a tiny bit of the clone stamp tool...this is how it turned out...
May 9, 2012 07:25:47 #
May 9, 2012 10:46:17 #
achammar wrote:
With yours, it was just easier to copy your main image and paste it into an existing sky image, then crop, then a tiny bit of the clone stamp tool...this is how it turned out...
Very nice job on the woman's hair. Not so much on the man's hair. Might that be because her hair has more contrast and thus selected better?
If you want to reply, then register here. Registration is free and your account is created instantly, so you can post right away.