ND Filter -- instructions for beginners
Apr 16, 2016 20:03:25 #

I have purchased an ND4 (2 step) filter primarily to bring color brightness back to what otherwise would be washed-out images on wide angle when facing the sun. The filter arrives on Monday, so I have not yet been able to experiment with it. I have also reviewed dozens of youtubes and articles on ND Filters and while they are informative, they don't address the basic BASICS.
I admit right up front that I am a dummy when it comes to instinctively knowing how to go through the set-up from beginning to end and I cannot find that kind of instruction.
I know it is important to have a low ISO setting. I know using the filter will also create a decrease in the f-stop setting by 2 stops. And as I am not after a blurring effect, I should stay with a fast shutter speed.
Check my setup steps here and correct me where necessary.
I believe I should first start off without filter in Auto and do an Auto focus and take note of my f-stop and shutter speed. I assume here that ISO will be around 100.
Before taking the picture, I should switch to A priority and also set focus to manual on the lens. I should also return the f-stop to whatever was shown when I was in Auto. (The filter will darken it to the equivalent of 2 stops.)
I guess that is one of my first questions? Do I do any manual adjustment to the f-stop setting or do I simply rely on the filter to do the job?
Is there anything else I need to do at that point? I am assuming that Live View will be pretty much useless. The Viewfinder not much better. I think it will be hard to assess just how effective the filter was until I download to a computer for analysis.
After I am comfortable with ND filter use for this purpose, I intend to buy a couple of more filters with higher values to begin to learn how to blur images.
Thank you for your help and your patience with a novice.
Apr 16, 2016 20:31:42 #
I blur many of my waterfalls without using a ND filter. I think that depends a LOT on the camera you are using.
here is an article for using ND filters
http://www.cambridgeincolour.com/tutorials/neutral-density-filters.htm
here is an article for using ND filters
http://www.cambridgeincolour.com/tutorials/neutral-density-filters.htm
Apr 16, 2016 20:39:06 #
DerBiermeister wrote:
I have purchased an ND4 (2 step) filter primarily ... (show quote)
Somehow, I am thinking that you are not going to get what you want, an ND Filter's purpose is to slow the shutter speed so you can shoot in bright light and achieve slow shutter speed exposures.
BUT - since you are adding a 2 stop ND filter you are blocking 4 times the light from getting into the camera, so to get a proper exposure you need to adjust something, or a combination of things to get those 2 stops back into the exposure.... You have a choice of shutter speed, aperture or ISO - any one or combination can be used to get the 2 stops back so the image exposes properly.
By leaving your shutter at 1/1000 then you will need to either increase ISO from 100 to 400 or your f-stop from f/8 to f/4.0, or a combination of both, ISO of 200 and f-stop of f/5.6
You sure you are not wanting a circular polarizer for what you want?
Apr 16, 2016 20:44:31 #
mwsilvers
Loc: Central New Jersey
DerBiermeister wrote:
I have purchased an ND4 (2 step) filter primarily ... (show quote)
I don't think you're going to achieve your stated goal with an ND filter.
Apr 16, 2016 20:46:28 #

If your photos are washed out, they are overexposed, and just need less exposure. I suppose an ND filter is one way to do that, but you can do it without it by the proper combination of shutter speed and aperture. An ND filter is usually used to lower the amount of light entering the lens so that slow shutter speeds can be used to blur motion, or wide apertures can be used in bright light to achieve a narrow DOF. But you will still have to learn to get a proper exposure to avoid washed out photos.
Apr 16, 2016 20:49:59 #
Dngallagher wrote:
You sure you are not wanting a circular polarizer for what you want?
You sure you are not wanting a circular polarizer for what you want?
First off -- thanks for your reply! I will put it to use.
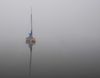
As for the circular polarizer -- I have one and find it only effective when the sun is around 90 degree angle to the camera. I've read where the ND4 or ND8 filters are helpful when facing the sun. Here is one example of how it helps with overexposure:

Hoya HMC Pro1 Neutral Density (ND) ND4 filter used to increase exposure time and accentuate water flow in daylight. This filter reduces the amount of light by 2 stops. Picture taken while hiking along Silver River and the Silver Falls of Upper Peninsula, Michigan.
Apr 16, 2016 20:54:06 #
DerBiermeister wrote:
First off -- thanks for your reply! I will put it to use.
As for the circular polarizer -- I have one and find it only effective when the sun is around 90 degree angle to the camera. I've read where the ND4 or ND8 filters are helpful when facing the sun. Here is one example:
As for the circular polarizer -- I have one and find it only effective when the sun is around 90 degree angle to the camera. I've read where the ND4 or ND8 filters are helpful when facing the sun. Here is one example:
Yes, that is exactly when a cpl is best 90 degrees ....
Apr 16, 2016 21:03:46 #
JohnSwanda wrote:
If your photos are washed out, they are overexpose... (show quote)
Thanks -- this is all sinking in. I have a question on the DOF though. Look at the photo I posted above. It was probably that demonstration that enticed me to buy the ND4 filter. The difference between the overexposure and the beautiful image from using the filter is dramatic. However, I do not see any narrowing of DOF in that image. Why would that be?
Apr 16, 2016 21:15:57 #
But the overexposure could be corrected just by the settings on the camera without the filter. On a photo like that one where everything is far from the camera, the DOF isn't as noticeable as focusing on a close subject where the background will be out of focus.
Apr 16, 2016 21:16:52 #
[quote=DerBiermeister]I have purchased an ND4 (2 step) filter primarily to bring color brightness back to what otherwise would be washed-out images on wide angle when facing the sun. The filter arrives on Monday, so I have not yet been able to experiment with it. I have also reviewed dozens of youtubes and articles on ND Filters and while they are informative, they don't address the basic BASICS.
I admit right up front that I am a dummy when it comes to instinctively knowing how to go through the set-up from beginning to end and I cannot find that kind of instruction.
I know it is important to have a low ISO setting. I know using the filter will also create a decrease in the f-stop setting by 2 stops. And as I am not after a blurring effect, I should stay with a fast shutter speed.
Check my setup steps here and correct me where necessary.
I believe I should first start off without filter in Auto and do an Auto focus and take note of my f-stop and shutter speed. I assume here that ISO will be around 100.
Before taking the picture, I should switch to A priority and also set focus to manual on the lens. I should also return the f-stop to whatever was shown when I was in Auto. (The filter will darken it to the equivalent of 2 stops.)
I guess that is one of my first questions? Do I do any manual adjustment to the f-stop setting or do I simply rely on the filter to do the job?
Is there anything else I need to do at that point? I am assuming that Live View will be pretty much useless. The Viewfinder not much better. I think it will be hard to assess just how effective the filter was until I download to a computer for analysis.
After I am comfortable with ND filter use for this purpose, I intend to buy a couple of more filters with higher values to begin to learn how to blur images.
Thank you for your help and your patience with a novice.[/quote
I would start in manual, set ISO to whatever you like,set aperture to desired DOF and guess on shutter speed, if you need adjustment afterwards its easy to do (kinda what one always does), and go from there!
Apr 16, 2016 22:41:12 #
I have always used ND filters for two purposes only:
1. To allow a large aperture in bright conditions.
2. To allow a slow shutter speed to blur water movement.
1. To allow a large aperture in bright conditions.
2. To allow a slow shutter speed to blur water movement.
Apr 17, 2016 06:28:02 #
IMO that is not the way to use nd filters. There are two reasons to use them
1 To blur water, clouds
2. to get large depth of field when it is bright out.
For number 1 - You determine the correct exposure without the filter however you like. Also focus. You do this on a tripod. Then put everything into manual and set the aperture to what you had determined. Set the speed 2 stops (factor of 4) slower to compensate for the filter. This should result in the same exposure you had without the filter but the water will be a little blurred. Actually I just realized that this is how you would do it for a 10 (factor of about 1000) or 16 (factor of 64000) stop filter when you can't see after the filter is in place. For a two stop filter, just put the filter on - set the aperture where you want it and, if in manual, then adjust the speed to give the right exposure. If in aperture priority the camera will adjust the speed.
For 2. The reason you need the filter is that without it, if it is bright and you want to use a wide aperture, the exposure may require a speed that is faster than the camera can do. If the speed is within the cameras range, you don't need the filter.
To daeken clouds, use a circular polarizer. May get uneven affect with wide angle lenses.
Apr 17, 2016 06:59:38 #
tinplater wrote:
I have always used ND filters for two purposes only:
1. To allow a large aperture in bright conditions.
2. To allow a slow shutter speed to blur water movement.
1. To allow a large aperture in bright conditions.
2. To allow a slow shutter speed to blur water movement.
:thumbup: :thumbup: :thumbup:
Apr 17, 2016 07:00:13 #
Dngallagher wrote:
Somehow, I am thinking that you are not going to g... (show quote)
:thumbup: :thumbup: :thumbup:
Apr 17, 2016 07:07:13 #

DerBiermeister wrote:
I have purchased an ND4 (2 step) filter primarily ... (show quote)
What you are after is best done shooting raw, with careful and correctly evaluated exposure, and applying saturation, dehazing, and exposure adjustments in post processing.
An ND filter is not going to do any of this. It will allow you to use a slower shutter speed, larger lens aperture or higher ISO - or some combination of all three.
Your sample image of the Silver River is overexposed, by at least two stops.
I'd say it's a good time to bone up on post processing skills in Lightroom Photoshop and/or whatever else you are using. A two stop ND isn't going to help you much, especially since water flowing usually needs between 1/2 sec and 3 secs to look OK, unless you are at the beginning or the end of the day, or you are in a deeply forested area with considerable canopy where very little light is getting in. The typical ND for this purpose is from 4 to 10 stops. But this is not your intent anyway, you just want to get better exposure and saturation.
Shooting raw allows you to capture a little more highlight detail. But when you have scenes such as this with such high contrast, a proper raw exposure will often result in darker images than you are accustomed to. Luckily this is easily addressed (notice I did not say fixed or recovered), in post processing.
To specifically darken and add detail to clouds the only sure-fire way to do this is to avoid overexposure (blown out areas). You can do this by using a polarizing filter - but it will not affect the clouds as much as it will affect the blue sky, with the greatest effect when you are at right angles to the sun, or with a graduated neutral density filter, which will gradually add density to the upper part of the filter. The drawback is that the added density is not selective, and if you have a "v" shaped sky area, all of the scene above the transition will be affected simultaneously, not just the sky. So tree tops, tops of buildings, rocky projections, distant mountains will all be darker at the top. The better way to do this is to expose for the sky (the highlights) and adjust overall tonality color and contrast in post.
A proper exposure is one that captures all the information you need to make a good image. It is seldom one that looks great right out of the camera. Admittedly, many images look ok out of the camera, but not great.
This is what can be done with post processing. Had you exposed the image correctly and shot raw, you would have had more sky detail to work with, and better tonality in the lower right hand corner, and better overall quality - all the highlights were blown out, and reducing the exposure level just made them go murky gray. Working on a small jpeg grabbed from a screen capture is far from ideal, but it does give you some sense of the possibilties.
BTW, the reason you did not see a change in depth of field in your example is that you did not change the aperture.

If you want to reply, then register here. Registration is free and your account is created instantly, so you can post right away.