Photoshop Processing of M101
Apr 10, 2016 23:16:08 #

The quality of the video is so so. It turned out to be too long but I was too tired to do another abbreviated one.
https://vimeo.com/162300693
I made it password protected....password is "ugly" drop the quotes
Hope you can make some sense out of it.
Should probably do one on Deep Sky Stacker to show my settings and processes.
You guys that are nailing planetary, solar and lunar images should also do one on your processes.
Quick Time Player offers a free version for screen movies.
Apr 11, 2016 01:22:02 #

nikonshooter wrote:
The quality of the video is so so. It turned out ... (show quote)
Edward,
Some really good pointers here. I will have to watch it again and make sure I capture all the things you were doing. I have Photoshop, and you were doing some things I hadn't tried. So really appreciate this effort.
Meanwhile, I get up a 5AM for that thing called JOB, so no more for me tonight.
Thanks
Apr 11, 2016 01:28:19 #
Apr 11, 2016 08:36:45 #
I am also curious about how you fix the gradient in Photoshop. You had mentioned that Photoshop could do this.
Thanks
Thanks
Apr 11, 2016 08:59:43 #
JimH123 wrote:
I am also curious about how you fix the gradient in Photoshop. You had mentioned that Photoshop could do this.
Thanks
Thanks
I was headed there when DINNER called. I am planning to pick up where I left off and deal with background imperfections, star color, star and galaxy masking, luminosity masking, how to use Nik Software to do some amazing tweaks - from noise removal to selective gradient management.
If you are using Photoshop - then you should consider adding the Nik Software Plugin Suite. It is my understand that Google (purchased this company) is now offering it free.
https://www.google.com/nikcollection/
I will be spend a good bit of time using their software on the next video.
Also, there are times - especially when trying to bring out colors that you know are there but your data says otherwise - when you have to use some other PS tools to bring out those colors.
Hopefully I can do one of these videos without smacking my lips - how annoying.
Apr 11, 2016 09:10:51 #
nikonshooter wrote:
I was headed there when DINNER called. I am pla... (show quote)
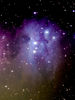
I took an image from last summer, and tried a few of your suggestions and made this image look a lot better. I did use Viveza 2 with Photshop. The bright star in the center is Deneb. I am using a modded Sony A55 that has full spectrum capability and a Tamron 70-200mm f2.8 lens and taken at 90mm & f2.8 at ISO 800. This is a stack using 4 images at 58 sec each. I am encourage now to try more of this as we get back into nebula season. I am also encouraged that this lens handled the bright star Deneb without blooming all over the place.

Apr 11, 2016 09:41:34 #
I'm only halfway through it, Ed, but already can see where I've been making my mistakes by jumping around in my program looking for changes.
Have to do my school run, but I shall return!
Thanks!
Have to do my school run, but I shall return!
Thanks!
Apr 11, 2016 10:10:40 #
Some great tips in here, some where simple...who would have thought to do some of PS auto functions multiple times (now I feel dumb). Great job on the video, look forward to the next. Can't wait to go back to some of my throw aways and try this out. Thanks again.
Apr 11, 2016 10:24:00 #
JimH123 wrote:
I took an image from last summer, and tried a few ... (show quote)
Good! I have not doubt all of you guys have captured some great data. Retrieving it can be a challenge though. Without a doubt, their is no software program that can manipulate pixels like PS.
What I like about PixInsight are a few processes (1)DBE Dynamic Background Extraction (2) Background Neutralization (3) Batch Processing Scripts for registration, calibration, and stacking. PixInsight has a steep learning curve and rather than climb it......I just get the basics done and move to PS where I am much more confident and have more experience.
BTW, using the Auto Color (does a color balance) and Auto Tone (does not affect REAL pixel color although it looks like it does - but instead it adjusts true tonality-luminosity)......when adding AC and AT watch the background......and when it starts looking dark grey - stop. You are done with that. You will no doubt have gradients but that are addressed LAST. In fact the last thing you do, is Gradient Removal and then dead last sharpen, SHARPEN. This is the case with any image - always sharpen last.
Also, do not SAVE to JPEG until your are done....until then save as a PSD file or TIFF (keep layers). Each time you save a JPEG, retrieve, work on it and save it....you lose pixels. At some point, saving a jPEG file over and over gain will create horrible artifacts. JPEG is a compression program and each compression throws out pixels.
Have fun!
Apr 11, 2016 11:10:14 #
nikonshooter wrote:
Good! I have not doubt all of you guys have capt... (show quote)
It also looks like DSS saves results as a 32-bit file of which only 16-bits has actual data. I have been experimenting with ImageMagick, a free conversion program which can do conversions from 32-bit to 16-bit from a DOS CMD window. Looks like you were doing this in PixInSight when you saved it as 16-bit integers. I notice the file shrinks by a factor of 2 when I use this on the output file from DSS. Haven't gotten very far with this yet.
Apr 11, 2016 11:54:45 #
JimH123 wrote:
It also looks like DSS saves results as a 32-bit file of which only 16-bits has actual data. I have been experimenting with ImageMagick, a free conversion program which can do conversions from 32-bit to 16-bit from a DOS CMD window. Looks like you were doing this in PixInSight when you saved it as 16-bit integers. I notice the file shrinks by a factor of 2 when I use this on the output file from DSS. Haven't gotten very far with this yet.
Jim you are "right on".....also, unless I am working in LAB in PS, I use 16 bit files. If you convert to 32 bit, some of Adobe's filters will not work.
Apr 11, 2016 22:43:07 #
nikonshooter wrote:
Jim you are "right on".....also, unless I am working in LAB in PS, I use 16 bit files. If you convert to 32 bit, some of Adobe's filters will not work.
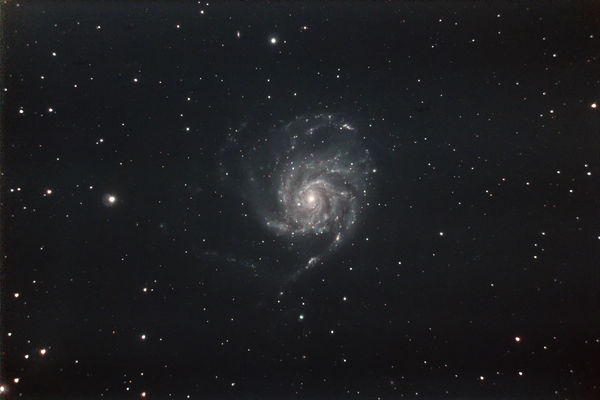
Another attempt at M101 using the tips from nikonshooter. I haven't yet tried all the tips that were shown in the video, but I did many of them. And I am finding that I felt more in control and at the same time, having more fun.
Here is the attempt.
Apr 11, 2016 22:56:14 #
JimH123 wrote:
Another attempt at M101 using the tips from nikonshooter. I haven't yet tried all the tips that were shown in the video, but I did many of them. And I am finding that I felt more in control and at the same time, having more fun.
Here is the attempt.
Here is the attempt.
Awesome! That makes me feel good. I started working on another video - realizing the need not to go to fast and assume too much. But the need to create a star mask - as well as a galaxy mask so you can work on both the background and stars/galaxy independently without the tweaks of one affecting the appearance of the other is needed in astro photography. Also I had questions about removing gradients that I will address.
I will also show you guys/gals how to use luminosity masks to make selective adjustments to structure, sharpening, color, tonality....and so on. That would need to be another video. There is a lot going on with "Luminosity Masking" but once you get that down....you can do anything in PS relative to pixel manipulation.
Apr 11, 2016 23:18:41 #
nikonshooter wrote:
Awesome! That makes me feel good. I started wo... (show quote)
Even if you don't feel our gratitude, I wanted to let you know how appreciative we are to your help...it's really amazing how one is afraid to "push that button", your video shows that it's not that bad, and in most cases, it's a good thing to do....i appreciate what you are doing, and I'll expand that to the frequent contributors to this forum...you are all great in everything you do to help others...I've tried recently to participate, but I have been watching/reading for a couple years. Everyone on this site has been great!
Apr 12, 2016 13:56:54 #
nikonshooter wrote:
The quality of the video is so so. It turned out ... (show quote)
Thank you very much Ed that was a great video. Wish I was more attuned in Photoshop.
All I'm able to do in there is make big messes.
Craig
If you want to reply, then register here. Registration is free and your account is created instantly, so you can post right away.