Tutorial: Evaluating and Characterizing Image Detail Prior to Sharpening
Feb 15, 2016 22:32:15 #

Evaluating and Characterizing Image Detail as a Basis for Sharpening Decisions in ACR/LR
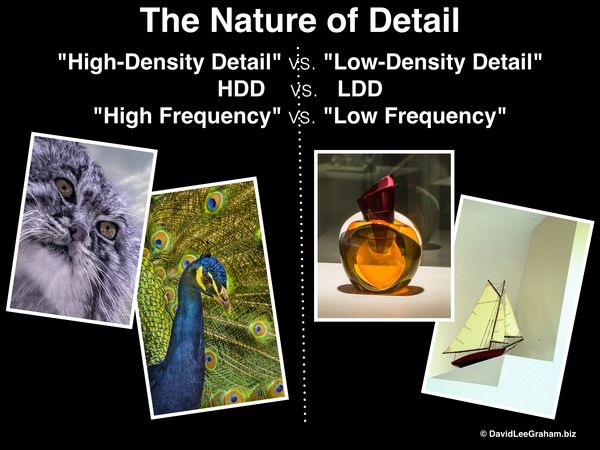
In order to make appropriate decisions regarding sharpening of any image it is crucial to characterize the nature of the detail requiring sharpening in that image with regard both to its density
and to its distribution.
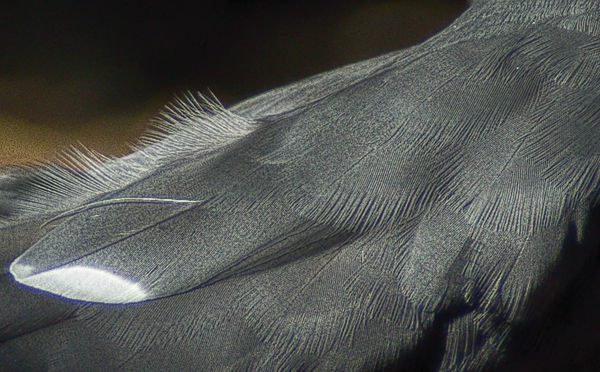
If your image contains (as most do) areas of "high frequency detail" (dense, closely-packed detail) that require local sharpening, you can conveniently use the adjustment brush to apply non-destructive, readily reversible, linearly processed local sharpening.
On the other hand, if your image contains some areas of high frequency detail, as well as areas of low density detail, the "Masking" control in the ACR sharpening menu permits you to choose which is the more important to appropriately sharpen.
In fact, Lightroom offers two separate "cookie cutter" sharpening options to keep it as simple as possible.
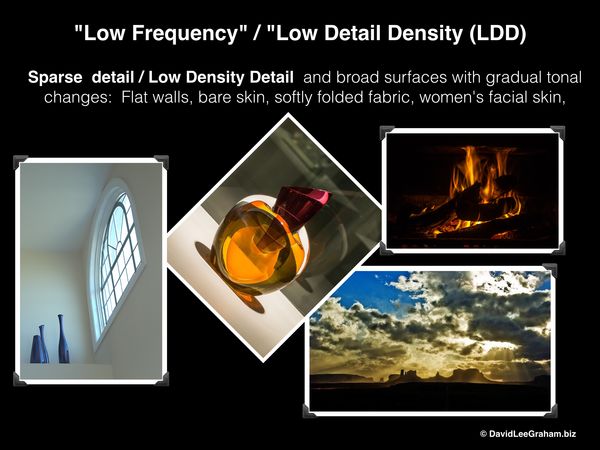
"Sharpen-Faces" (typical Low Density Detail- LDD - "low-frequency"images)
Amount: 35
Radius: 1.4
Detail: 15
Masking:60
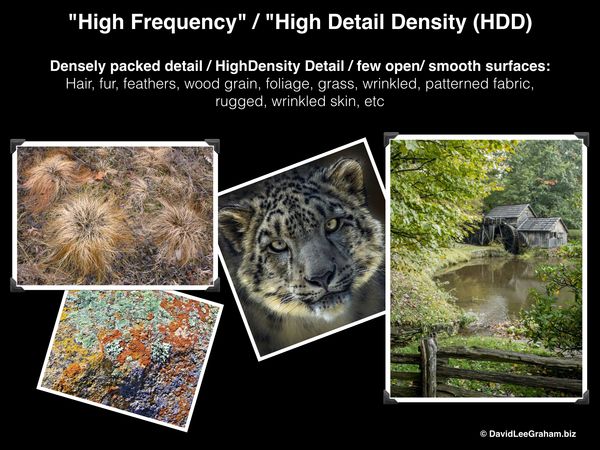
"Sharpen-Scenic" (typical High Density Detail - HDD -"high-frequency" images)
Amount: 40
Radius: 0.8
Detail: 35
Masking:0
Another option, of course, in order to keep all sharpening non-destructive (linear) in ACR is to
use the "creative sharpening" technique of localized sharpening with the Adjustment brush tool, and then using the adjustment brush tool with NEGATIVE SHARPNESS settings to apply easily controllable amounts of Gaussian blur where detail is to be softened, which, by contrast, accentuates the sharpening performed elsewhere.
...and, as general guides, I recommend:
For High Frequency (High Detail Density)
Use RADIUS relatively LOW (0.9 or lower)
and
Use MASKING LOW (ZERO to 15)
For Low Frequency (Low Detail Density)
Use RADIUS relatively High (1.2 to 1.9 - rarely higher than 2.0)
and
Use MASKING HIGH (70 to 100)
AMOUNT level is best determined by inspection in each image.
DETAIL level is judged by that level that best reduces visible halos to becoming just indiscernible at Normal Viewing Distance.
And remember, all sharpening should be performed at 100% (1:1).l
Best regards,
Dave Graham
In order to make appropriate decisions regarding sharpening of any image it is crucial to characterize the nature of the detail requiring sharpening in that image with regard both to its density
and to its distribution.
If your image contains (as most do) areas of "high frequency detail" (dense, closely-packed detail) that require local sharpening, you can conveniently use the adjustment brush to apply non-destructive, readily reversible, linearly processed local sharpening.
On the other hand, if your image contains some areas of high frequency detail, as well as areas of low density detail, the "Masking" control in the ACR sharpening menu permits you to choose which is the more important to appropriately sharpen.
In fact, Lightroom offers two separate "cookie cutter" sharpening options to keep it as simple as possible.
"Sharpen-Faces" (typical Low Density Detail- LDD - "low-frequency"images)
Amount: 35
Radius: 1.4
Detail: 15
Masking:60
"Sharpen-Scenic" (typical High Density Detail - HDD -"high-frequency" images)
Amount: 40
Radius: 0.8
Detail: 35
Masking:0
Another option, of course, in order to keep all sharpening non-destructive (linear) in ACR is to
use the "creative sharpening" technique of localized sharpening with the Adjustment brush tool, and then using the adjustment brush tool with NEGATIVE SHARPNESS settings to apply easily controllable amounts of Gaussian blur where detail is to be softened, which, by contrast, accentuates the sharpening performed elsewhere.
...and, as general guides, I recommend:
For High Frequency (High Detail Density)
Use RADIUS relatively LOW (0.9 or lower)
and
Use MASKING LOW (ZERO to 15)
For Low Frequency (Low Detail Density)
Use RADIUS relatively High (1.2 to 1.9 - rarely higher than 2.0)
and
Use MASKING HIGH (70 to 100)
AMOUNT level is best determined by inspection in each image.
DETAIL level is judged by that level that best reduces visible halos to becoming just indiscernible at Normal Viewing Distance.
And remember, all sharpening should be performed at 100% (1:1).l
Best regards,
Dave Graham

Feb 16, 2016 07:42:11 #

Advance physics, demystifies god and leaves the Catholic Church hustling to build bigger and better telescopes to compete with crass secular science.
https://en.wikipedia.org/wiki/Vatican_Advanced_Technology_Telescope
It is people like you Uuglypher who take the mystic romance out of using photo edit programs. You are providing a cook book edit step-wise receipt that my Aunt Jamima could use it to edit a pancake photo while cooking breakfast. Uuglypher, have you no shame!! :thumbup: :shock: :roll: :lol:
Feb 16, 2016 07:58:26 #
dpullum wrote:
Advance physics, demystifies god and leaves the Catholic Church hustling to build bigger and better telescopes to compete with crass secular science.
https://en.wikipedia.org/wiki/Vatican_Advanced_Technology_Telescope
It is people like you Uuglypher who take the mystic romance out of using photo edit programs providing a cook book that my Aunt Jamima could cook along with breakfast. Uuglypher, have you no shame!! :thumbup: :shock: :roll: :lol:
https://en.wikipedia.org/wiki/Vatican_Advanced_Technology_Telescope
It is people like you Uuglypher who take the mystic romance out of using photo edit programs providing a cook book that my Aunt Jamima could cook along with breakfast. Uuglypher, have you no shame!! :thumbup: :shock: :roll: :lol:
xxxxxxxxxxxxxx
Have I Shame? In the constant, perpetual quest for the pursuit and ultimate victory of reasoned advancement over stultifying, un-reasoned myth?
NONE!
NO! Not a scintilla of shame whatsoever!
one merely attempts to keep up the good fight!
Dave
:D ;-) ;-) :wink:
Feb 16, 2016 16:33:07 #
Uuglypher wrote:
Evaluating and Characterizing Image Detail as a Ba... (show quote)
No questions?
No comments?
any anecdotes of sharpening successes ...or otherwise?
Feb 16, 2016 20:00:20 #

I recently found out about Topaz Detail 3 and figured it was just another sharpening filter that did mostly the same thing as every other one. I tried it once and immediately bought it. There is a free trial and I recommend that everyone give it a try. It has, for starters, independent sharpening for small, medium and large details, and this can be applied overall or only to shadows or highlights. In addition to that, it has a deblur function that is processor-intensive but extremely effective. There is a built in mask so that sharpening can be painted onto specific areas, and at variable opacities.
I have also found that Topaz gives me less haloing than the sharpening found in Adobe products. I used to use the high pass mask trick for sharpening, but I find Topaz much better, and now use it for all my sharpening.
I do think it is worth a try--it has become indispensable in my workflow.
I have also found that Topaz gives me less haloing than the sharpening found in Adobe products. I used to use the high pass mask trick for sharpening, but I find Topaz much better, and now use it for all my sharpening.
I do think it is worth a try--it has become indispensable in my workflow.
Feb 17, 2016 11:45:12 #
kymarto wrote:
I recently found out about Topaz Detail 3 and figu... (show quote)
Hi, Toby
Thanks for mention of Topaz Detail. I tried Detail.2 about 5 years ago and,found it of less over-all refinement than ACR. I certainly will give Detail 3 a try....probably ought give Nik's sharpener another go as well.
My only concer with "pre-sets" upon which many plug-ins are based is that although some may find them helpful, they seem much like "Hamburger Helper" and packaged seasoning mixes appear to a chef who prefers to work "from scratch" for most refined results.
Still hoping to see some of your haiku from the land where they originated
Best regards,
Dave
Feb 17, 2016 12:11:30 #
Here's one:
On a cold spring morn
I reach and part the curtains,
Oh! The light! The light!
On a cold spring morn
I reach and part the curtains,
Oh! The light! The light!
Feb 17, 2016 12:24:12 #
kymarto wrote:
Here's one:
On a cold spring morn
I reach and part the curtains,
Oh! The light! The light!
On a cold spring morn
I reach and part the curtains,
Oh! The light! The light!
Beautiful!
Would seem incredibly apt to include with an appropriate image as a haiga.
Feb 21, 2016 16:39:34 #
kymarto wrote:
I recently found out about Topaz Detail 3 and figu... (show quote)
Hi, Toby,
Following your recommendation I have been using the Topaz Detail3 trial along with an ACR comparison on every sharpening job, personal as well as commercial, for the past four days and have to admit that I'm very impressed with the Topaz sharpening. We both need realize I've been using and teaching sharpening with ACR for almost 6 years, so am still far more comfortable with the predictability I've become used to with ACR, but just four days of using Topaz Detail 3 has convinced me that it may well be the equal of, and possibly be superior to my beloved ACR. I'm sure you'll admit that the Topaz learning curve is a steep one, particularly with sharpening controls and parameters and algorithms so very different from those I've been using for so long.
I've not been able to find any definitive statement concerning the types of algorithms used by Topaz, but given its memory-intensive nature, and it's necessity of "analyzing" each image I have to suspect that deconvolution is involved in most, if not practically every step. If I'm right, Topaz has figured out how to accomplish roughly classifying an image's point spread factors for the three classes of detail amazingly quickly...or perhaps they only do it just enough to reasonably "lump" the details in such a way that they are treatable by three distinctly different paths. Fascinating!
It may sound strange, but given your comment about seeing "less haloing" with Topaz sharpening than with ACR, Certainly agree, but also must say that I miss the stronger halos that are the definitive index of "over sharpening" from exuberant settings of Radius, Detail, and Amount in ACR! The ease of control of those halos (as the means of avoiding over sharpening) is what has endeared ACR to my sharpening heart!
But then, Topaz has its own characteristic "crunchiness" with over sharpening unrelated to traditional halos of the edge-sharpening algorithms. This also,to my mind, lends weight to my suspicion concerning Topaz's use of deconvolution algorithms.
I am still more confident of my results with ACR, as you may tell from the accompanying comparison, but at this point I'm making no bets which one I will prefer in a couple of months after I've ascended higher on the slope of that damned learning curve! My suspicion, from what I see so far, is that some images, depending on the character of their detail and its distribution, will be more amenable to sharpening with Topaz, and others more so with ACR.
Both images were sharpened at 100% (1:1). When sharpening was complete I regenerated a thin halo at a single strong edge to identify the one sharpened with ACR. The ACR sample experienced better noise reduction. ACR also shows residual noise in the immediate vicinity of edges in the medium-sized details, identical to that which occur at strong edges in "low-frequency" images sharpened with high "Masking" settings in ACR.
There are no halos in the Topaz sample, but at 100% there is more noise, both chromatic and luminous ( (however several of the tutorial from Topaz claim noise control should be excellent, so it may be the result of inexperience on my part.
Toby, I really appreciate your giving me the heads-up re Topaz, and I'll let you know how I progress. I would certainly recommend that for anyone not yet thoroughly familiar with one sharpening plug-in or application, by all means give others a try. What I've found hard to get used to with Topaz, may be just what someone else finds "a piece of cake", and what I consider easy in ACR, someone else may find to be an insurmountable problem.
As with so many aspects of artistic accomplishment and evaluation, personal opinions loom large...and I suspect that nowhere does the adage: "your mileage may vary" find greater applicability than in art matters.
Best regards, Toby, and thanks again for once more expanding my horizons.
Dave


Feb 21, 2016 18:57:55 #
I'm not a sharpening expert and generally stumble through without a real method or plan. I mostly used Smart Sharpen or USM in PS before. Stumbled onto Detail by accident. I have a lot more exploration to do, as I have only been doing overall sharpening and have not really played with darks/lights only.
They certainly could be using some sort of deconvolution. Speaking of which, I also have Piccure+ and have basically been underwhelmed by it. It does a good job with fine detail, but nothing after a certain threshold, so that I have found the look unnatural in many cases. It also gives no user controls to speak of, which I find frustrating. I'm running out the door--will check your examples later.
Glad you are finding this useful :)
Feb 22, 2016 08:54:47 #

Uuglypher wrote:
..probably ought give Nik's sharpener another go as well.
...
Dave
..probably ought give Nik's sharpener another go as well.
...
Dave
The Nik sharpener works pretty well. My own preferred way of using it is within Photoshop, using the photoshop brushes to apply it selectively. (Nik control points work pretty well for for some things but not for sharpening) Nik puts it on a PS layer for you so that it can still be fiddled with further or discarded, which is convenient.
Thanks to you and to Toby for an interesting discussion, will continue to follow it.
Feb 22, 2016 10:09:41 #
Checking your two examples at 100%, I certainly prefer the top example. I'm pretty casual about sharpening--have not ever embarked on a controlled study or methodology. I just play until I like it. Probably I should approach the whole subject a bit more scientifically.
Feb 23, 2016 15:11:16 #
kymarto wrote:
I recently found out about Topaz Detail 3 and figu... (show quote)
Two more sharpening efforts: A & B
If you want to reply, then register here. Registration is free and your account is created instantly, so you can post right away.