Horsehead
Feb 2, 2016 19:37:26 #

I have finally got around to processing my Horsehead files and integrating the RGB with the Ha and Lum data I had already acquired. The only real odd thing with my setup is the use of two seperate cameras. When I was hunting for a decent mono camera I was astounded not only at the cost of the camera, but the added cost of accessories they don't really tell you about, like the filter wheel and filters. Since I wanted to do narrow band this would neccessitate the use of a 7+ filter wheel, which if I was to go with the version my camera manufaturer lists as being compatable is almost the cost of the camera, not to mention the cost of filters. A good filters also can approach and even exceed the cost of the camera and filter wheel combined. I only have one NB filter in the Ha spectrum which I acquired used from A....mart. So instead of using a filter wheel I picked a mono camera that had the same sensor from the same manufacturer, in the thought of gaining the roughly the same output as the other. I did it this way to try and make PP easier, since I hate doing it.
Image 1) is a single RGB image and the only PP I used was to stretch the data and a process to eliminate the green color cast.
Image 2) is a single Ha image with no PP other than a linear stretch so the data could be seen.
Image 3) is the stacked result of my Ha subs
Image 1) is a single RGB image and the only PP I used was to stretch the data and a process to eliminate the green color cast.
Image 2) is a single Ha image with no PP other than a linear stretch so the data could be seen.
Image 3) is the stacked result of my Ha subs


Feb 2, 2016 19:38:36 #
Image 4) the combination of the Luminance data and Ha
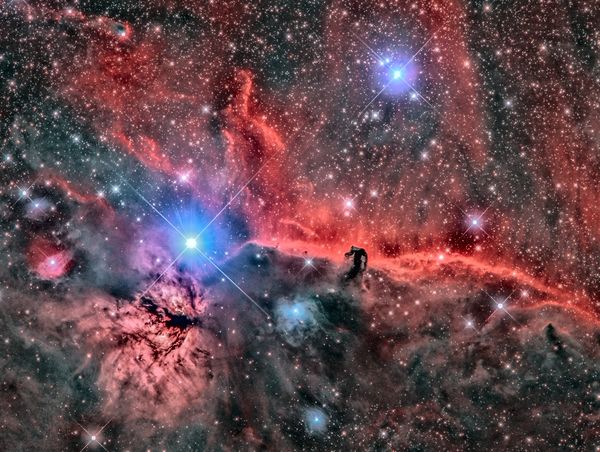
Image 5) Is my final result, I have probably close to 10+ hours in the processing of this data. Most of which was tossed onto the cutting room floor as I tend to experiment with different techniques. Some work, most don't.
Image 6) Is one image that I was working on trying to eek out as much detail as possible, but ultimately threw away as being too much, but I'll let you decide
Thanks for looking and as always any critque or critism is welcome,
Matthew


Feb 2, 2016 19:55:57 #
Check out Panorama section of our forum.
Feb 2, 2016 20:15:20 #
Feb 3, 2016 01:22:30 #

Oknoder wrote:
Image 4) the combination of the Luminance data and... (show quote)
Absolutely incredible!!! I'm still playing in the Little League. This is Major League level. Good work. And I am sure it was Lots of Work!
Feb 3, 2016 02:44:41 #
Lol thanks for all the kind words guys even though I have a long way to go. The biggest hurdle is the damn software. Getting everything to play well with each other then being able to find the hidden gems the software is able to produce. Learning how to pull detail out of the Lum, which I just recently figured out, has made the difference between day and night, pun intended. I have even tried it on DSLR images, while using a synthetic lum is not ideal it seemed to help enhance the finer structure and bring out more dust in the darker parts of the nebulousity.
Clear skies,
Matthew
Clear skies,
Matthew
Feb 3, 2016 10:32:06 #

Scrolling down the page, I nearly sprayed my coffee over the monitor when the 3rd image appeared! What a difference! This is excellent work...
Check out Video for DSLR and Point and Shoot Cameras section of our forum.
Feb 3, 2016 10:54:12 #

Feb 3, 2016 12:04:02 #
You got me right on the edge of my seat in the first post, Matthew.
Image 3, The spires on the bright star, I see artifacts of striations (for the lack of a better term) like I get in my single long time frame exposures from my G3 CCD. Or that are so prevalent in my raw files.
The marks that make them look dashed.
Those drive me crazy (short trip). They don't seem to be as prevalent with this camera (CAM 3), as they were in CAM 2.
In your experience, are those little irregularities a kind of "norm" with CCD sensors? And do they normally need smoothed over?
You said you used two cameras. Could you elaborate more on that?
I'm beginning to understand the use of a monochrome so one gathers the entire sensor bathed in L-R-G-B for those channels. As opposed to my current CCD which has a filter matrix laid upon the same sensor as the mono version from the same supplier.
One thing about a color version is the filtering does not need to be supplied after the fact. It does limit, in my mind, the effect of, say, my Ha7nm I think because some cells (or all maybe) wind up with a mix of filtering.
It warrants more experimentation on my part.
Something I ran across on the web is having a precision filter wheel like SBIG can supply. It didn't cross my mind before, but I could see how a filter wheel might affect the outcome if the filter was "loosely placed" in front of the camera. Variations can occur.
I have a 9 filter wheel. When thinking about filters (but being ignorant about them) I saw this 9 filter capacity wheel. Well sure, Mo is Betterer! So that's what I got.
Eventually I got tired of the draggy nature of the indexer on it, and dug into it to lube and improve the pawl function. Now it runs like a well oiled machine. (It uses a dimple and a detent as indexing. Which lends it to 'feel' centering.)
What is your experiences with filters? Do you still use your wheel, or do the screw... :?: (Screw on the filters individually)
OK, lastly, I personally enjoy Image 5 as your best result. I like all of them, and your steps which I'm sure took laborious hours to achieve. (I would never have had the patience)
I tend to agree with you that Image 6 is overcooked. But in this world of PP crazed people, I can understand the attraction to 'eye candy'.
#6 is a good example of why I am a PP Minimalist. The Odd Duck waddling along quacking about "Get it right in the camera", and don't-doctor-it, give me a shot straight up so I can taste the whiskey, kind of guy.
You have given me a fresh perspective and ideas to pursue with my filters now. Generally, I use very little.
My Moon and Skyglow is my #1 and is in all my pikturds.
Beyond that, my favorite is the Ha7nm to pull in the reds.
But I need to expand now, and take a look at what can be done with the others.
It might invigorate the interest.
Well done, Matthew. Astounding results. Image 5 is my personal favorite.
Thanks for sharing!
Feb 3, 2016 14:20:00 #
First off the diffraction spikes, many love them, personally they are the bane of my existance. I used to try and correct them but lately its just too much hassle to go in and try fixing an artifact that is present in almost all the bright stars. I am not sure why it tends to show that dashed look, but when combined in it tends to have a rainbow effect. My best guess is your support vane for the mirror is acting as diffraction screen and altering the wavelength of light as it passes by, so only a part of the spectrum is not effected. Honestly I have not thought too much about it other than try to figure out a DIY workaround to eliminate the spikes all together. I guess if I wanted to drop 10k I could get a 152mm APO, then again 500 on a small piece of glass makes me sick just to think about, lol.
As for the filter wheels go I own two, a cheap Orion I purchased when I was first beginning and an old 90's model SBIG CFW5c I believe. I got it from the local astronomy professor who was getting rid of some old equipment, it was designed for smaller CCD chips than what I have so I do not use it due to the amount of light lost through vignetting. My biggest issue with a focus wheel is the backfocus, with using a telecompressor and field flattener at or close to the specified distances from the sensor, there is just no more room to add anything else. I could mount them in front of all the glass but then again the vignetting becomes an issue. As I am using 2" filters already I shudder to think of the cost some of the larger square filters would run me, especially in the narrowband, where a grand per filter is not unheard of.
The issue with using filters with a OSC, and I too have done it on occasion is that you are already losing so much light because of the bayer filters blocking certain wavelengths then adding on the front a filter that is going to limit almost all but a very small bandpass. When you place a Ha filter infront of your sensor if it is a OSC, you have just taken away 75% of your theoretical resolution to start with, then depending on the width of your bandpass you limit it even further. This can be a good thing if you are sky limited to say 5 minutes or so. Because then you would be able to shoot much longer exposures without having to worry about the skylimit ceiling, or loss of signal due to the sky being too bright. The more narrow your bandpass the more light it is going to reject which will enhance contrast and lengthen the exposure time needed to get the same amount of data. Experimenting and taking notes is about the only real way to figure these numbers out for yourself as every system is different and every DSO will behave diffently depending on which filter is being used, and your local sky conditions.
I can only speak of Ha, as this is the only true narrowband filter I possess at the moment and I am using either a 12 or a 5nm filter. The 12nm filter is what I started out with and thought I would get better results with a narrower bandpass, but it wasn't until I stuck it on a mono camera that I had a 'WoW" moment. I not only was hooked but I swallowed the hook, line and sinker as they say.
I use two cameras, one for for just my Luminance and Ha, so I do not use a filter wheel I just put the Ha filter on when I want to begin collecting the hydrogen data, and a OSC for all the RGB data, and even use the RGB data to synthesize the Lum channel on occassion. Both cameras utilize the Kaf-8300, which is an older chip that is approximately the size of a 4/3 camera sensor, if I am not mistaken, not the best chip by anyone's standards but it seems to suit me well for the moment. When I started I was of the thinking I would use the mono to add L and Ha data to some of my current images, to give them a boost in resolution, but I seem to have gone off the rails as of lately. Presently I am scouting and shooting the Ha data first, then if I like the results I go back and acquire the LRGB components. I tend to go hunting for good narrowband targets when the moon is full because as long as it is not in frame or close enough to bypass my dewshield it has no effect on my data other than maybe limiting my exposure very slightly. Also because of the ability to platesolve I no longer worry about having to get all the data I need in one night, which helps allieviate some of the pressure of using unreliable equipment. I simply tell the program to go to this position as determined by one of the subframes I have of the target and it will get me within a few pixels of center. With a rotator I can frame up my shot to help eliminate much of the field I would otherwise have to crop out due to the frames not lining up perfectly. Plus I do dither 3-5 pixels between every frame to eliminate sensor noise, which helps out quite a bit.
Sadly I have come to the conclusion that since my mount is finicky to say the least, I will not be able to put my observatory in the ideal location as was planned. Having to go out in the middle of winter and walk a couple hundred yards from the house, uphill in the wind does not really appeal to me. So I will either have to decide to make the observatory closer to the house so it can be accessable without much fuss or push my chips in and get a top end mount that is remote capable. I am leaning towards the latter. lol. I know if I put it up on that hill out back that I will not even be tempted to walk out there in the dead of night, I will fire up the truck and baja my way there, and that is a recipe for disaster. In North Dakota we only have two seasons, frozen and muddy, and its only muddy on the five days of summer. I was told the other day that the good news this year is that summer is going to fall on a weekend, Lmmfao
Sorry for such a long post,
Matthew
Feb 3, 2016 14:45:43 #
Oknoder wrote:
Image 4) the combination of the Luminance data and... (show quote)
Correct me if I'm wrong but this is your finest work to date. I just wonder if there is any thing between 5 and 6.
I'm also a fan of the Monochrome too.
Did you PP these in DSS or PixInsight???
I can never get any work like this out of DSS.
How many and how long were the shots???
Craig
Check out True Macro-Photography Forum section of our forum.
Feb 3, 2016 15:09:59 #
I really like 3 and 5.
That said, who's to say if we were to be able to fly out to the Orion Nebula it wouldn't look like #6 a boiling caldron of gaseous goo? I like how #6 looks like what I would picture a birth place of stars to look like. Boiling and rolling around shaking up the cosmos with its beauty.
Nice work all around.
;)
:thumbup: :thumbup:
Feb 3, 2016 15:39:05 #
RGB subs were 300s Ha I had a cpl subs of 1800s but most at 600s, total time of exposure in Ha was a little over four hours. Took about 8 hours of data total in Ha but many were bad due to mount/tracking errors.
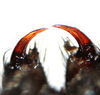
Personally I am partial to my Cone nebula I shot earlier, which part of my mosaic. I am beginning to go back through some of my older work, and I'm finding the detail is there I just wasn't able to highlight it. My main hindrance in some of my earlier work was the lack of sufficient data. Thinking 20 30s frames were enough was an error I am now coming to grips with.
Oh well the stars will be there and come around again soon enough to give me another chance.
PS all the PP was done in Pixinsight
Matthew
Feb 3, 2016 16:04:22 #
Oknoder wrote:
RGB subs were 300s Ha I had a cpl subs of 1800s bu... (show quote)
PixInsight, I thought so. I'm guessing from you and others you can do the whole process in there.
Feb 3, 2016 16:11:46 #
It's learning curve is very similar to photo shops. and by that I mean you know what you want to do and there are about a hundred ways of doing it and it seems like you have to stumble through 40 or 50 of them, until you find the one that works best for you and your situation.
it seems that it is more centralized around math geeks, so I fit right in. Lol. But it took me probably a year at least to be proficient in Photoshop and I have been using PixInsight now for a little over 3 months maybe four.
I do not think there is anything that you can do within PixInsight that you cannot do with Photoshop it's just that pixinsight is designed by astronomers for astronomers. While Photoshop, has geared itself to be a great common ground for all the various types of digital imaging.
I would not give up Photoshop for anything as I still use it for my day to day photography I even use it in Astro imaging, but lately just to fix minor color corrections and I find it easier to work with when making star masks
If you want to reply, then register here. Registration is free and your account is created instantly, so you can post right away.
Check out Advice from the Pros section of our forum.