Tutorial - A simple way to change a sky
Jan 28, 2016 05:31:33 #

This is the simplest sky replacement technique and worth trying before any other simply because of its so easy. It works remarkably well when the sky is blown or white over due to cloud etc
Try it on my images first and then experiment on your own. It can in a few clicks rescue an image you may well delete because of a bad sky.
It is written for Photoshop but should I believe work with Paint Shop Pro Elements and Gimp. Perhap user of other software can advise on their perticular application.
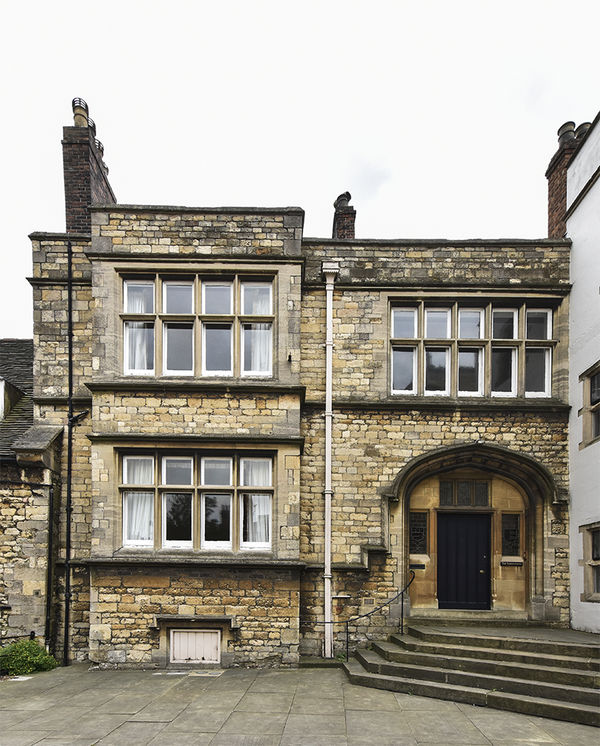
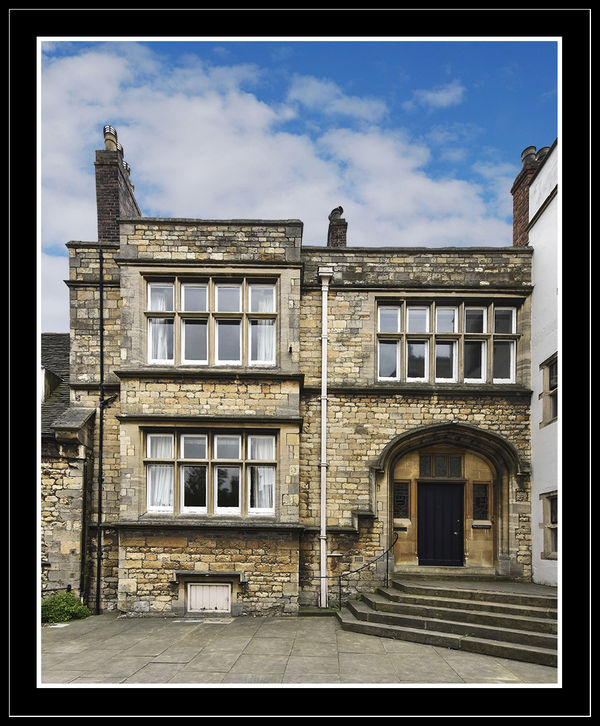
1) Open Building Photo
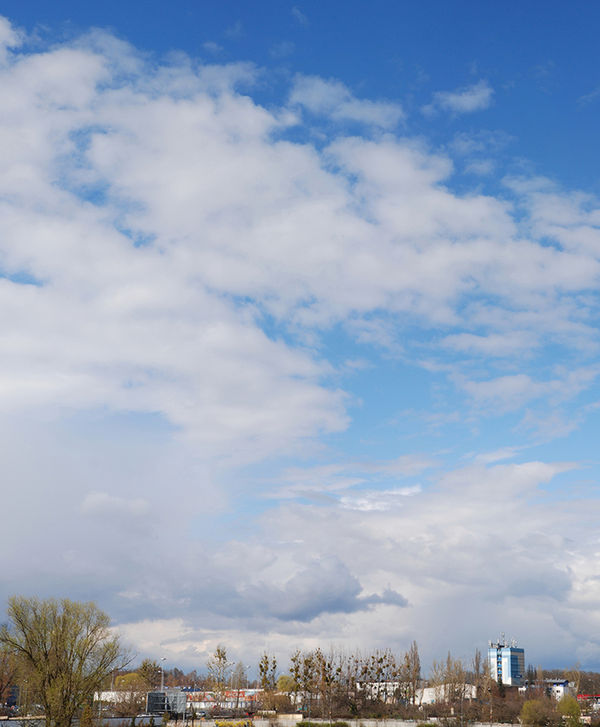
2) Open Sky Photo and copy and paste it above the Building
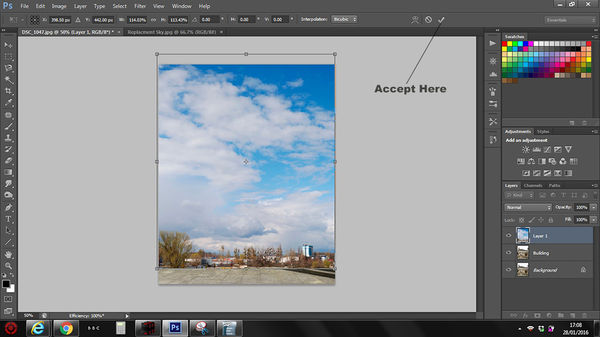
3) Press Ctrl/T and handles will appear to enable you to drag the sky image so it is the correct size. Click the arrow on the top tool bar to accept the changes. See Screen Shot 1
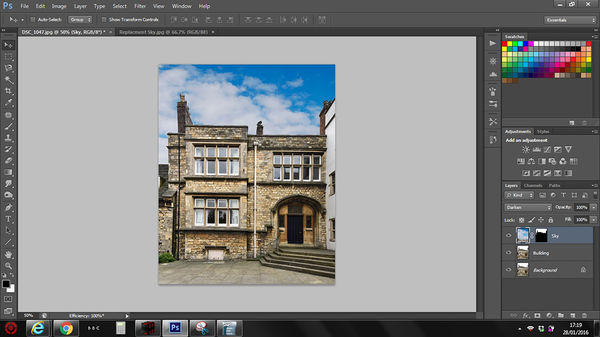
4) Change the Blend Mode of the sky image to Darken
5) Add a Layer mask to the Sky image and brush away, using a black brush, any remnants of the Sky image remaining on the building. See Screen Shot 2
6) Go Layer>Flatten image and then duplicate it. Change the Blend mode of the top image to Multiply and reduce Opacity to 50%. This ties the two images together a little better.
And its as simple as that to change a sky. Pleae try it and post your results here. Seeing people make good use the tutorials compensates for the hours spent writing and preparing them
Try it on my images first and then experiment on your own. It can in a few clicks rescue an image you may well delete because of a bad sky.
It is written for Photoshop but should I believe work with Paint Shop Pro Elements and Gimp. Perhap user of other software can advise on their perticular application.
1) Open Building Photo
2) Open Sky Photo and copy and paste it above the Building
3) Press Ctrl/T and handles will appear to enable you to drag the sky image so it is the correct size. Click the arrow on the top tool bar to accept the changes. See Screen Shot 1
4) Change the Blend Mode of the sky image to Darken
5) Add a Layer mask to the Sky image and brush away, using a black brush, any remnants of the Sky image remaining on the building. See Screen Shot 2
6) Go Layer>Flatten image and then duplicate it. Change the Blend mode of the top image to Multiply and reduce Opacity to 50%. This ties the two images together a little better.
And its as simple as that to change a sky. Pleae try it and post your results here. Seeing people make good use the tutorials compensates for the hours spent writing and preparing them
Building
(Download)
Sky
(Download)
Screen Shot 1
(Download)
Screen Shot 2
(Download)
Final Image
(Download)
Jan 28, 2016 08:20:06 #

Billyspad wrote:
This is the simplest sky replacement technique and... (show quote)
XXXXXXXXXXXXXXXXXXCC
very nicely, concisely, and flawlessly presented, Billy.An admirable tutorial that stands as a paradigm of excellence in being a life-change influencefor PP novices everywhere!
Good on ya' "My Man!"
Dave
Jan 28, 2016 08:50:30 #
Uuglypher wrote:
XXXXXXXXXXXXXXXXXXCC
very nicely, concisely, and flawlessly presented, Billy.An admirable tutorial that stands as a paradigm of excellence in being a life-change influencefor PP novices everywhere!
Good on ya' "My Man!"
Dave
very nicely, concisely, and flawlessly presented, Billy.An admirable tutorial that stands as a paradigm of excellence in being a life-change influencefor PP novices everywhere!
Good on ya' "My Man!"
Dave
Thank you for those kind words Dave
Jan 28, 2016 09:34:39 #

Billy, excellent tutorial. I enjoyed working with it as learning how to do Sky replacements is something I want to get better at. I was able to follow your instructions up until:
"Go Layer>Flatten image and then duplicate it. Change the Blend mode of the top image to Multiply and reduce Opacity to 50%. This ties the two images together a little better.
I tried this but it darkened the whole image too much. So I put an inverted mask on it and then painted in the areas I wanted to blend in better and also to darken. I am attaching the finished results for your feedback. And, if I missed something in this last step, please let me know.

Jan 28, 2016 11:27:43 #

Thanks for this tutorial, which sounds easy to follow. I'll try it out and see how badly I can mess it up:). I'll post what I come up with. Even for those of us who go far in the other direction to keep from blowing skies can use this, because none of us can order up a sky-of-choice, and sometimes nature does not gift us with the one we want. So, instead, there's Billy and photoshop to the rescue!
Jan 28, 2016 16:21:15 #
Here's mine. And of course I did not completely follow the directions, I wandered off into other pastures while fiddling. This works so much better than selections.
The first image is a basic LR edit of a local scene. I've gone back many times and tried to get the train going beneath me with better sky, and I've found better sky, but never any train when the sky is nice. So, Billy to the rescue. This is a quick fix, will work more on it. The mayor loves the one with the ugly sky, he has it in his office, but I think he'll like this one better when I get it done right.
The first image is a basic LR edit of a local scene. I've gone back many times and tried to get the train going beneath me with better sky, and I've found better sky, but never any train when the sky is nice. So, Billy to the rescue. This is a quick fix, will work more on it. The mayor loves the one with the ugly sky, he has it in his office, but I think he'll like this one better when I get it done right.


Jan 28, 2016 18:19:08 #
waltchilds wrote:
Billy, excellent tutorial. I enjoyed working with ... (show quote)
Nice result Walt and thank you for joining in. You now have a piece of Merry Olde England on your PC. I took the shot of the building in Lincoln last July, its in the Cathedral courtyard.
Re differences in in shading etc its one of the problems with writing tutorials. Every PC sems to render things differently and then of course all our eyes a different so any settings such as for Opacity are just a starting point and open to personal adjustments.
I see you had the skills to overcome the problem easily!
Jan 28, 2016 18:28:06 #
minniev wrote:
Here's mine. And of course I did not completely fo... (show quote)
What you did to achieve the result is not important min I think you will agree the image is improved by having a decent sky added.
Selections and changing skies I'll cover in a another tutorial but its very hard and extremely tedious for a line of trees such as you have in your image. If you see my further examples tutorial this method makes easy work of trees.
We see many shots on here with blown skies so it should help quite a few people I hope.
Jan 28, 2016 21:46:43 #
Billyspad wrote:
What you did to achieve the result is not important min I think you will agree the image is improved by having a decent sky added.
Selections and changing skies I'll cover in a another tutorial but its very hard and extremely tedious for a line of trees such as you have in your image. If you see my further examples tutorial this method makes easy work of trees.
We see many shots on here with blown skies so it should help quite a few people I hope.
With this particular image, the blend recommended mode didn't look good, so I went back to normal blending, but used a brush to mask out the parts of the sky image I didn't need till all that was left was the boundary of trees/sky. I used the clone tool set to darken to fix it, the same way I fix halos. I liked that extra touch of duplicating the layer and blending it at reduced opacity to get the two layers to work better together, only I used soft light as the mode.
Jan 28, 2016 22:35:34 #
Anything that mentions blend modes opacity or settings is just a starting point. All pictures are different and will react with each other differently. So experimentation is needed very often but easier if a starting point is established. Soft light is very often used to blend images together both in replacing skies and composites.
Jan 29, 2016 17:48:34 #
A handy and generous tutorial Billy, many thanks - and I just knew it wasn't a slice of downtown Manila! Could almost be downtown Lyme Regis, but I'll settle for Lincoln.
Jan 31, 2016 10:16:03 #
Billy, A quick and simple method, thanks. I left a bit of sky in the windows to reflect some blue...

If you want to reply, then register here. Registration is free and your account is created instantly, so you can post right away.