Should I have used a fill flash or reflector?
Dec 1, 2015 09:29:50 #

Rob47 wrote:
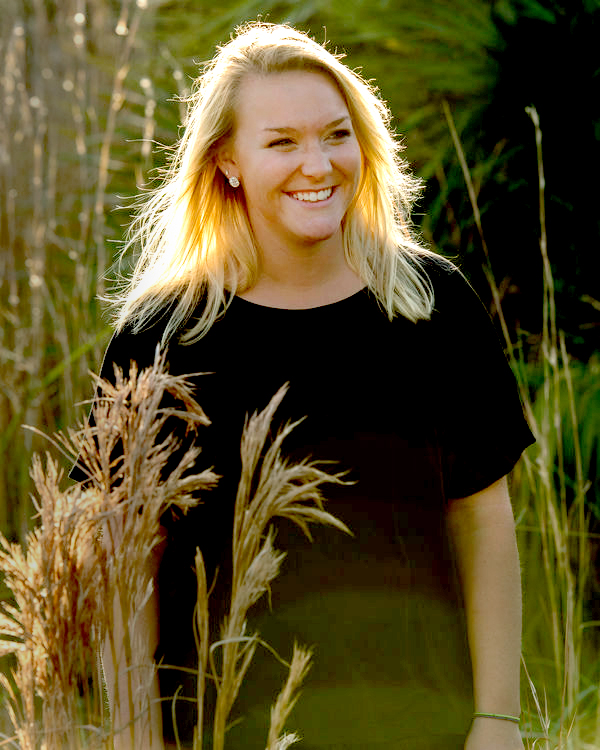
Over the few years I have been part of UH, I have learned so much from the pro, semi pro and amateur photographers who frequent this site. A friend asked me to take some shots of his daughter heading off to college. I like shooting with backlight but now asking the experts would these have been more effective using a fill flash or reflector? Or are they acceptable as they are? I chose to use spot metering. Always appreciate comments, help or suggestions.
Since someone else posted an edited image, here's my try. I did some color balance adjustment. I don't like purple faces. You might think I went too far.

Dec 1, 2015 09:30:55 #

ronwande wrote:
Since someone else posted an edited image, here's my try. I did some color balance adjustment. I don't like purple faces. You might think I went too far.
Is your monitor calibrated?
It looked great before with no purple on my monitor, now it looks red.
Dec 1, 2015 11:13:48 #
rpavich wrote:
Is your monitor calibrated?
It looked great before with no purple on my monitor, now it looks red.
It looked great before with no purple on my monitor, now it looks red.
I did a calibration with the ColorMunki within a week. I'll give it another try. Thank you for the input!
Dec 1, 2015 11:55:26 #

Thanks for checking them out. You were exactly correct. After your post I went back to my camera to check and now feel like an idiot. I had change the metering for a group shot and neglected to change it back to spot metering. Even with that, next time I'll try some fill flash or reflector. Fortunately, I shot in RAW and was able to lighten up the face some. Appreciate your comments and helpful suggestions.
tsilva wrote:
Don't know what you metered off of but these are unacceptably underexposed. You have more control over flash. 30% fill flash would be a good place to start, maybe as much as 50%.
Dec 2, 2015 15:46:06 #

The way I see it, there are allot of issues here that should be addressed in order to give the maker a more comprehensive set of remedies and preventative measures to apply so as to avoid imbalances in contrast in outdoor portraiture.
My fist rule of thumb and general suggestion, in all sorts of photography, is to address any problematic issues at the time of shooting rather than having to spend so much time and effort in post production editing in order to correct things after the fact. Oftentimes, the editing helps to some degree, but does not look as good as when the corrections or compensations are intrinsic in the camera work.
One of the most common problems with many internal camera metering systems is known as subject failure. Simply stated, this means that the metering system is reading the wrong area in the frame or is making an integrated reading rather than a spot reading and consequently transmits incorrect exposure data the the camera's automatic or programmed systems. If there is lots of light in the background, a mistaken reading, can cause the subject to be rendered in too dark a tone or even, in extreme cases, this may cause entirely silhouetting of the subject.
To avoid this issue, even without additional reflectors or flash fill, is to make sure the metering is zoned in on a diffuse highlight area on the subject's face. This can be accomplished in a number of ways; you can zoom in, make the reading and lock it in and then zooming out to the original framing before making the exposure. If you are not using a zoom lens, you can simply move in closer, to make and lock in the reading and the move back to make the shot. If you meter is center weighted or has a setting for that function, you can, especially if the subject's skin tone is not exactly in the center of your composition, is shift center reading zone to the diffuse highlight on the face, lock it in and return to your original composition before exposing.
Another method is to use a hand-held exposure meter in spot reading mode or use the incident light function by placing the meter in front of the subject's face and aiming the light receptor toward the camera.
Of course, a bit of chimping never hurts- just check things out on the camera's LCD screen, make any adjustments and if there is no noticeable change in the lighting, you can make a sequence of different poses and expressions without any further ado or re-adjustment.
FILL LIGHT VS. MAIN LIGH FUNCTION:
It would seem simple enough that adding what is commonly known as a fill light source, by means of electronic flash or the use of a reflector to pick up and redirect some light back to the subject thereby achieving a better ratio. In a studio scenario this works well because this method assumes that there is a main light which is providing dimensionality by means of light and shadow, oftentimes called the chiaroscuro effect or the illusion of dimension. This means that there is a form of portrait lighting already on the subject's face and the function of the fill light source is simply to provide detail to the shadows, of various degrees according to the desired lighting ratio.
In many cases, however, the existing lighting on the face is rather flat, not providing enough shadow to shape and add dimension to the face and/or properly light the eyes in terms of shadow detail and catch-lights. In the portrait submitted in this thread, some of theses issues exist. One of the indicators of good facial lighting are those catch-light in the eyes in the 11 or 2 o'clock position. In this case the available light is coming in from too high of an angle and has not properly illuminated the eyes. In addition to that there is not enough modeling on the face. So... a fill light will open up all the darkness but will not help the flat lighting.
What is needed here IS, no doubt, an additional light source but one that will act as a main light and provide modeling, dimensionality and good illumination (sparkle) in the eyes. This is what some call off camera lighting. In the case of outdoor portraiture, the flash or reflector becomes the main light and the natural light becomes the fill source. My own personal preference is the use of a reflector because you can see exactly what you are getting in terms of the lighting pattern on the face and the ratio that can be expected to be seen in the final print. In the image submitted here, there is definitely a need for this treatment because the existing light is not creating the portrait effect in that there is ample existing back lighting rather than any form of frontal or side lighting. In some outdoor situations there is enough soft or naturally diffused frontal or side lighting to do the job with no additional lighting at all- this entails the photographer's ability to fined the light if it is indeed there to be found and utilized. If we can't choose the time of day or the exact location where ideal lighting exists, than we must go to out bag of tricks: and create the lighting.
As for flash fill or flash augmentation, where the additional flash lighting acts as a main light; balancing the light is essential. For strictly fill usage, this is relatively easy; I suggest simply adjusting the flash output for 2 or more stops below the ambient light reading, depending on your desired ratio. For main light usage, I will expose for the flash exposure and use the shutter speed to admit enough ambient light to accommodate the desired fill ratio. In many typical portrait situations, where very wide apertures are needed to decrease depth of field and create good bokeh, only a wink of flash is required. It may be necessary to attenuate the flash output electronically or by means of adding diffusion, light modifiers or neutral density material in order to enable good balance and avoidance of over-filling and thereby washing out the subject.
As I have previously alluded to, what with all of the aforementioned flash procedures, I prefer reflector usage in that what you see is pretty close to what your get and when used properly, this method can work well with head shots, head and shoulders, ¾ and full length views as well as medium size groups in a wide variety of available light situations.
Yet, another method can be employed to correct for flat outdoor lighting situations- it's called subtractive lighting. This is where a black flag, a gobo or a black card is used to block light from one direction, thus causing a shadow area and then exposing for the relatively created reaming highlight area. This is especially helpful on cloudy-bright or moderately overcast days when the lighting becomes omnidirectional, extremely non directional or all over the place and flattens everything out. Again, this is a what you see is what you get system. If the manpower is available- 2 assistants, a gobo can be use in conjunction with a reflector which is pumping in highlights in toward the subject such as a rim light or a kicker (accent light)- really great for profile and ¾ view of the face.
Editing: I don't hate editing or dismiss it as useless. There are times when many elements are beyond our control or go out of our control. Murphy's law is very much a part of photography- we all try to dodge it but certain problems are ever-present. When we are shooting out door wedding formals or candids, we can't always pick ideal times of day for shooting, especially the formals. We could be shooting a family group or individuals with difficult or crying children. Theses problems reduce our windows of opportunity and time to get the best shots under the best lighting conditions. The weather can abruptly change and there is not always and alternative site for indoor shooing that will accommodate a rushed wedding schedule.
The weatherman can make mistakes and so can even the best of us can make significant boo-boos, dumb mistakes and even near create unmitigated disasters (photographically, that is) and there can also be undetected equipment failures that we only discover after the shoots. All of this is not good and that's when we have to thank goodness for PhotoShop, Lightroom, all those other nice plug-ins and other editing goodies. Of course, I do love my PhotoShop for enhancement, retouching and especial effect functions- just like I loved my custom darkroom and manual retouching methods back in the olden days.
The reason that I especially mention the old silver/analog/chemical darkroom is that is from where I draw most of my current electronically and digitally based editing functions. Since I always try hard to shoot clean and edit lightly, all I need to use in my PhotoShop program is a few simple actions for making corrections; dodging, burning, and contrast control. The dodging and burning functions can control most detail issues in the highlights, middle tones and shadows. Back in the day we had various paper grades and developer combinations to control all over image contrast. Nowadays, I find that the LEVELS action in IMAGE ADJUSTMENTS can take care of all over contrast and detail issues and a small amount of dodging and burning take care of local shortfalls in detail. I hardly use complex actions or many layers- it takes me less time to edit the average image than it took me to make a print on an analog optical enlarger.
Attached is the original image with a 3 minute edit- I also correct the color- it appeared a bit magenta but that may be my screen. My Mac is kept off line and is used exclusively for production. This is my dirty old PC!
By the way- the portrait features a lovely expression and nice use of the foliage in the foreground and background. One of the arms, however, is cut off at the bottom of the composition. I would have liked to see the arm raised so that the hand could rest nicely on her hip or otherwise shown holding a prop or resting on something. Another remedy for this, while shooting, is to use the natural foliage, close to the lens and out of focus for a natural vignette effect.
OK- this was a long one but I hope it helps all the folks who are interested in out-of-doors fine portraiture. Thanks to the maker for submitting a good portrait that brings out many fine points for discussion- good job!
Regards, Ed
Dec 2, 2015 16:43:55 #
Very nice job Ed. (that's why you are the greatest "hidden" asset of the wedding photography section"
I was going to take some time and work on the photo in post as well, but by golly, yours is exactly what I was going to shoot for, so other than playing around to appease my need to always keep trying to improve my PP skills, I won't even attempt to do better than you did.
I really do feel like this is a perfect example of why I'm still so partial to handheld meters. A lot of people "poo poo" the use of them, saying that the new digital camera metering technology is all you ever need except when using strobes, and even then, they just think a handheld meter is a toy. The meter would have read the light hitting the eyes, and this subject would have been perfectly exposed.
In my humble opinion, it is "possible" to get good exposure with the in camera meter, but it is "pretty much guaranteed" (barring user error) when you use a handheld meter.
Dec 2, 2015 19:56:37 #
Ed, you've been extremely helpful. Thank you for the extensive comment and advice. Being on UH gives me the opportunity to learn photography from many who have made the same mistakes. I do appreciate your input. I definitely recognize my error in metering and you made a great point in cutting off her hand. In this particular moment, everything happened very fast. I saw the backlight and composed her behind the straw. She is slightly heavy and wanted to divert to her face. I didn't realize her hand was cut off. Something I'll look for in the future. You are also correct, while you can fix a few things in PP, getting it right in the camera from the beginning is a goal I need to set for myself. I have the right equipment to take great shots, now it's just composing and shooting until it becomes automatic. While my vocation is being an entertainer, I'm consumed with shooting whenever I can. I envy your 50 years of experience. I'm only 48 behind you! :-)
Thanks again and I know who to turn to for advice. Rob
Thanks again and I know who to turn to for advice. Rob
Dec 3, 2015 11:05:20 #
Rob47 wrote:
Ed, you've been extremely helpful. Thank you for t... (show quote)
Naples?!?, you live in my home away from home. (Mother-in-law lives there, and we visit several times a year to take care of her) Since I purchased a mobile home for my parents in Indiana, I may not be able to afford to travel as much, but can take care of them much easier. Now, if I could just get the MIL to move this way.... Naples would be much better as a vacation spot, than a "go there to work" spot.
As for cutting off the hand, You also realize that the crop is at the 2:3 ratio, which is the "as shot" ratio. If you cropped it for a 4:5 (8"x10" or better yet, 16x20) you would have a very nice crop, that isn't cutting her off at the joint.
Dec 3, 2015 11:07:04 #
bkyser wrote:
Naples?!?, you live in my home away from home. (... (show quote)
Oops, just looked at the original again, maybe not a 2:3 ratio, but cropping tighter would help to relieve the stress that we feel when we see an appendage amputated.
Dec 3, 2015 11:50:16 #
Hi, Rob!
Thanks for your kind words and feedback- I really appreciate it!
As you probably know from your full-time profession, the experience is the best skill builder. In your photography, after a while with continual effort, practice, and stick-to-itiveness, many of the techniques we discussed will become second nature- virtually autonomic! Mistakes are alright as long as they serve as lessons and valuable learning tools.
Looking at your image, I sincerely feel that you have what it takes to potentially become a fine photographer. You have a good angle of the subject's face- what we call a 2/3 view, the expression is great and the background and foreground treatment is excellent. Lighting, of course, is a vital skill set in photography. After over 50 years in the business, I am still learning, researching and experimenting with various and different lighting concepts. As I alluded to before, with practice you will be able to just look at a subject and know exactly where to place your lights, adjust the power outputs and even know in advance what post production actions you might have to apply. The same applies to posing and composition. Not everything comes naturally in photography mainly because it is both an art and a science and, therefore, certain skill sets have to be learned and finite details have to be pointed out to you so that you can address them and continuously build you inventory of skill sets. Skills are just as important or even more important than equipment issues in that a knowledgeable, talented and experienced photographer can do better work with some decent basic gear than an inept worker with all manner of fancy equipment.
Oh- if you are an entertainer you must have good people skills and that is just about mandatory in portrait photography. If you can communicate well and motivate people in a relaxed and friendly manner, you are already a step ahead of others who do not possess theses attributes.
Good luck and keep up the good work. Post as often as you can- good critiques are the gold standard in learning methods.
Ed
Dec 3, 2015 15:51:45 #
Thanks. We love Naples. I moved here from MN almost 10 years ago. Haven't shoveled a thing since I've been here. :-) Never run out of things to photograph here. (except mountains) Thanks for the tip on cropping. I adjusted and cropped to 8x10. Much better. Will keep getting great help from UH users. Thanks again and come down anytime. (especially Winter)
Dec 3, 2015 16:34:00 #
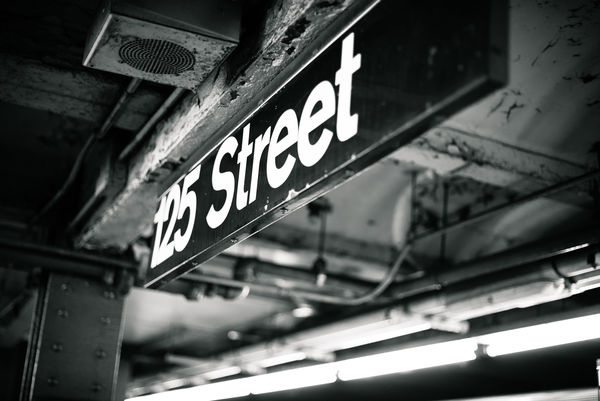
Yes, experience is definitely the key. When performing, I can do things without thinking about it including carrying on complete conversations while playing piano. I don't have to think about the music anymore. My goal is to get to the point where I'm just thinking about the lighting, composition and have camera settings be automatic. I watch Creative Live, take lessons on Lynda.com and watch many tutorials on Youtube. All of it helps but the information I've received from UH has been extremely helpful. I experimented with street photography in NYC a couple of months ago. These we a couple of my favorites. Thanks again for the encouragement. I'll keep at it.
Dec 3, 2015 21:24:09 #
NICE! New York City! My original hometown!
125th St. Station on the IRT Line- Right in the heart of Harlem, just a few blocks away from the famous Apollo Theater.
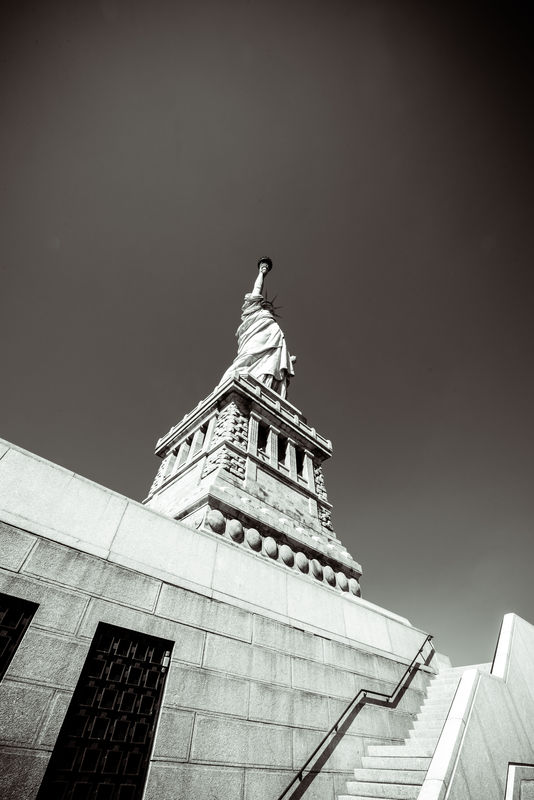
Interesting view of Miss Liberty. Liberty Island used to be known as Bedlow's Island thought to be part of New York City in New York State, however, a survey of the Hudson River later revealed that the Statue of Liberty and it's Island was actually located in the State of New Jersey.
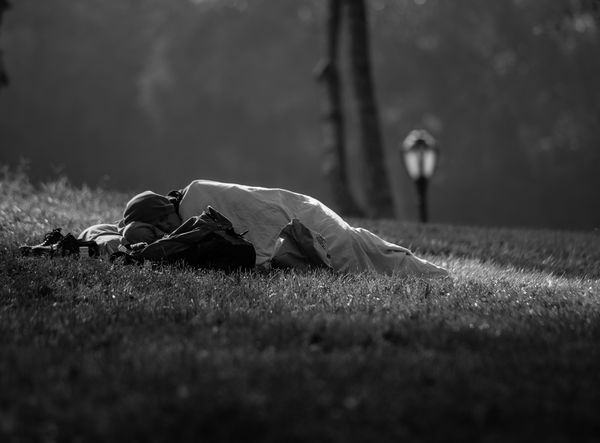
Central Park? Can't tell but the lamp post looks familiar. o
125th St. Station on the IRT Line- Right in the heart of Harlem, just a few blocks away from the famous Apollo Theater.
Interesting view of Miss Liberty. Liberty Island used to be known as Bedlow's Island thought to be part of New York City in New York State, however, a survey of the Hudson River later revealed that the Statue of Liberty and it's Island was actually located in the State of New Jersey.
Central Park? Can't tell but the lamp post looks familiar. o
Dec 4, 2015 06:47:52 #
Yes, homeless in Central Park about 9:15 AM. Liked the light and elements around. Pill & water bottle, Whole Foods bag, shoes, backpack, etc. There's a story there!! Forgot, Lady Liberty was actually in NJ and not easy getting a shot with no one around. Patience! And yes, 125th start of Harlem. Great city to shoot B&W.

Dec 6, 2015 21:36:09 #
A fill flash would be easier. more spontaneous then a reflector. the other issue is flare in the lens. sometimes that will work ,but this time it is a distraction. I use the TTL setting on the flash.automatically adjust for the camera settings. If you make changes the flash will follow.I know you can + or Minus,but i am not smart enough for all the fine tuning.
If you want to reply, then register here. Registration is free and your account is created instantly, so you can post right away.