Focus-Stacking Primer
Nov 15, 2015 14:49:47 #

I hope this can help someone. It is basic, but there are always beginners like me into the stacking process. I illustrated one of the things I consider when stacking or attempting to gather as much Depth of Field (DOF) in my shots.
Here we go: I hope this makes sense.
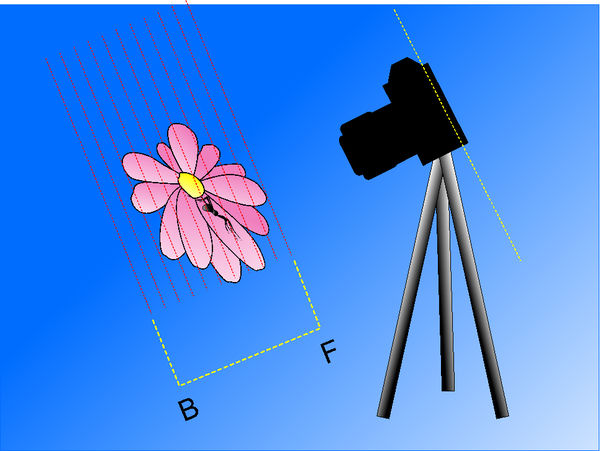
The following illustrations attempt to show how the camera film plane (SP)(sensor plane in digital) records the image when it focuses on a given subject. The yellow line through the back of the camera is where the SP is located. If you look at the bracket below the spider and flower, you will notice a series of red dotted lines that run parallel to the yellow sensor plane on the camera. When you focus on a subject, whether it be the spider or parts of the flower, there will only be one specific spot that will have the sharpest spot of focus. The space in front, and in back of, where you choose to focus will not be as sharp.
How do we get the image sharper throughout?
Notice there are red dotted lines running through the image of the flower and spider. When I stack the images, I am shooting a series of shots at numerous focus locations. (IMPORTANT) When you shoot a series, shoot them in order from front to back, or reverse. Do not mix the shots back and forth as the software for compiling the stacked final has more difficulty handling the mixed data.
The second illustration shows how you can increase the area in focus in each shot, and it also illustrates how tilting the SP to be more parallel to the subject surface can reduce the number of exposures required to capture the whole subject.
You will notice in the second illustration, the number of red slice lines are more than I need for the same subject in the first illustration.
Tilting the camera or the subject will enable you to secure captures with fewer attempts, and if you have a subject that will only let you get on shot before it moves, this is how you can increase the sharp field of view in a single capture.
I have been using this technique for over 35 years, and I am pleased with the results I get. I hope this was helpful to some of you as I see many people struggle with this concept when they begin in close-up and macro work.
Here is the summary:
1. Observe the subject and visualize where the flattest plane of focus would capture the most amount of detail.
2. Work in front to behind that single spot for your captures. Capture sequentially in one direction.
3. Don't change f stops within a series of shots.
4. Take more shots in the series as you subject angle becomes less parallel.
You are welcome to add helpful advice for others if you want, but please don't use this post for a rant as to how you have a better idea and mine doesn't work. I will post some more shots of the spider that I posted the other day, so you can see the results.
Remember, good equipment helps, but knowing what to do with it and how to handle the subject is essential in achieving higher end results. Good luck.
Here we go: I hope this makes sense.
The following illustrations attempt to show how the camera film plane (SP)(sensor plane in digital) records the image when it focuses on a given subject. The yellow line through the back of the camera is where the SP is located. If you look at the bracket below the spider and flower, you will notice a series of red dotted lines that run parallel to the yellow sensor plane on the camera. When you focus on a subject, whether it be the spider or parts of the flower, there will only be one specific spot that will have the sharpest spot of focus. The space in front, and in back of, where you choose to focus will not be as sharp.
How do we get the image sharper throughout?
Notice there are red dotted lines running through the image of the flower and spider. When I stack the images, I am shooting a series of shots at numerous focus locations. (IMPORTANT) When you shoot a series, shoot them in order from front to back, or reverse. Do not mix the shots back and forth as the software for compiling the stacked final has more difficulty handling the mixed data.
The second illustration shows how you can increase the area in focus in each shot, and it also illustrates how tilting the SP to be more parallel to the subject surface can reduce the number of exposures required to capture the whole subject.
You will notice in the second illustration, the number of red slice lines are more than I need for the same subject in the first illustration.
Tilting the camera or the subject will enable you to secure captures with fewer attempts, and if you have a subject that will only let you get on shot before it moves, this is how you can increase the sharp field of view in a single capture.
I have been using this technique for over 35 years, and I am pleased with the results I get. I hope this was helpful to some of you as I see many people struggle with this concept when they begin in close-up and macro work.
Here is the summary:
1. Observe the subject and visualize where the flattest plane of focus would capture the most amount of detail.
2. Work in front to behind that single spot for your captures. Capture sequentially in one direction.
3. Don't change f stops within a series of shots.
4. Take more shots in the series as you subject angle becomes less parallel.
You are welcome to add helpful advice for others if you want, but please don't use this post for a rant as to how you have a better idea and mine doesn't work. I will post some more shots of the spider that I posted the other day, so you can see the results.
Remember, good equipment helps, but knowing what to do with it and how to handle the subject is essential in achieving higher end results. Good luck.


Nov 15, 2015 15:03:47 #
Very illustrative & educational. A picture is worth a thousand words. I hope Nikonian adds this to the focus-stacking thread.
Nov 15, 2015 15:16:01 #
LoneRangeFinder wrote:
Thanks. I didn't realize there was a specific stacking thread, but the technique works for both individual and stacked images.Very illustrative & educational. A picture is worth a thousand words. I hope Nikonian adds this to the focus-stacking thread.
I just thought it might help some to better understand how the image is recorded -especially when they are close-up to the subject.
Nov 15, 2015 15:52:19 #
Bozsik wrote:
It may be a locked thread. Thanks. I didn't realize there was a specific stacking thread, but the technique works for both individual and stacked images.
I just thought it might help some to better understand how the image is recorded -especially when they are close-up to the subject.
I just thought it might help some to better understand how the image is recorded -especially when they are close-up to the subject.
The concept of keeping the lens tangential to the most critical elements to maximize the narrow DOF is well illustrated in your example. it's a critical piece of macro photography-- and difficult to explain textually.
Nov 15, 2015 16:01:01 #

Excellent demo. Might want to mention if your moving the camera forward/rail or refocusing the lens forward of starting point. Aperture of choice. Flash or natural light.
I'm sure Douglass could Lock this thread so we can hear Only your option as you've already demonstrated your qualified to chair this topic. Nice of you to stop in and share..
I'm sure Douglass could Lock this thread so we can hear Only your option as you've already demonstrated your qualified to chair this topic. Nice of you to stop in and share..
Nov 15, 2015 16:13:16 #
martinfisherphoto wrote:
I don't necessarily need the thread locked, but I find that some folks like to argue, and I just post things I think can help.Excellent demo. Might want to mention if your moving the camera forward/rail or refocusing the lens forward of starting point. Aperture of choice. Flash or natural light.
I'm sure Douglass could Lock this thread so we can hear Only your option as you've already demonstrated your qualified to chair this topic. Nice of you to stop in and share..
I'm sure Douglass could Lock this thread so we can hear Only your option as you've already demonstrated your qualified to chair this topic. Nice of you to stop in and share..
And yes, there are certainly other things to consider. I only touched on the one with the illustrations. Thanks for stopping by and adding to the post. I appreciate any help I can get. :thumbup: :thumbup:
Nov 15, 2015 16:39:42 #
Bozsik wrote:
I think the idea of a locked thread is to keep the information isolated from the comments which sometimes by their numbers can make the info harder to find. Appreciate your willingness to share.I don't necessarily need the thread locked . . .
Nov 15, 2015 17:19:28 #
OK, share a little more info with us if you will. Aperture, ISO, Lighting, Distance between photos, Overlap. Do you denoise and PP all of your photos before running thru your stacking program, or afterward. What flavor stacking software are you using. Using a macro slider or refocusing your camera, or are you tethered to a computer and it's making the slices for you. Fill us in and I'll think of another dozen questions.
Nov 16, 2015 00:17:41 #
I want David to briefly answer Martin's questions. Then David & I will edit this thread information, and David will re-post as an FAQ.
Nov 16, 2015 07:21:45 #

Great tutorial, thanks for taking the time to help us get a better understanding of this topic. Also, looking forward to hearing your answers to Martin's suggestions for additional information.
Nov 16, 2015 09:45:44 #
Nikonian72 wrote:
I want David to briefly answer Martin's questions. Then David & I will edit this thread information, and David will re-post as an FAQ.
Good Morning Douglas,
The original post was made to cover just the concept of film plane and how I use it to encompass more of the image field of view with more overall sharpness.
If I address all of the components Martin is requesting, should it be in a series of posts, or all in one post. He asked me to explain a whole host of subjects. I use to cover this in the community college Biological Photography class, but it was encapsulated within more than one session.
Do you want me to send the text and images to you so you can edit it and then post? It will take a bit longer to do the illustrating, but it is doable. Photos are nice, but I find even a simple drawing adds a lot to the understanding of many concepts.
The last thing is with the time constraints I have just before the holidays, I could do this in pieces as I don't have the free time to spend working on a complete description with photos right now. I would be willing to address spacing, f/stops, ISO, etc. in segments when they effect each other, and individually when the concern is not co-dependent upon the other.
The other thing is I don't claim to be an expert, but I do enjoy the results I am getting and am willing to share what little knowledge I have to provide for others, if that works for you. I know you may not want to have to deal with the extra text editing.
I have to get ready for school right at the moment, so have a great day.
Thanks to the rest of you, and I will begin assembling some of the information soon. I am glad you find this somewhat helpful. It was my intention to provide people with a launching point.
db
Nov 16, 2015 15:38:24 #

Thanks David - I did a 3 layer stack & it came out OK - I will try for a 6 layer soon.
Nov 16, 2015 20:46:15 #
Harvey wrote:
:thumbup: We need to meet up and we can set up some stacks if you want.Thanks David - I did a 3 layer stack & it came out OK - I will try for a 6 layer soon.
Nov 16, 2015 23:48:10 #
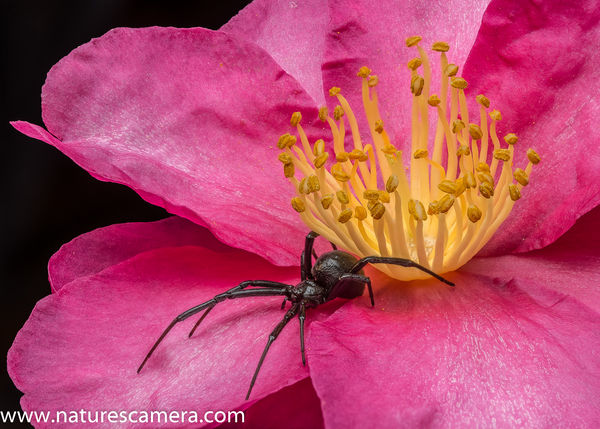
Here is the last one from that series. Enjoy
I have started on the follow-up about building an image like this.
I have started on the follow-up about building an image like this.
Nov 16, 2015 23:54:47 #
Bozsik wrote:
Exceptional. I love the very, very deep DoF.Here is the last one from that series.
If you want to reply, then register here. Registration is free and your account is created instantly, so you can post right away.