HORIZON LINE IN PANORAMA
Aug 12, 2015 07:34:23 #

RTS100 wrote:
Dear Everybody, br The attached image is a panoram... (show quote)
Good morning, I've read the comments so far and one I haven't seen is something I try to do, if you are planning on a panorama take a monopod, rotate the camera around on the pod, not you rotate, even hand holding on a walking stick or some other support will help, as for overlap I try to use the focus spots on the camera screen, usually moving left to right the out side left dot moved to the spot the center spot occupied in the previous frame, Bob.
Aug 12, 2015 09:17:45 #

I always try to use my tripod when taking shots to be stitched into a panorama and I swing the camera into a vertical rather than horizontal position so as to get more height in the final product. This involves taking more overlapping photos, but in my opinion results in a more balanced photo. As others have stated, it is also important to maintain the same camera settings for all your shots.
Aug 12, 2015 09:34:44 #
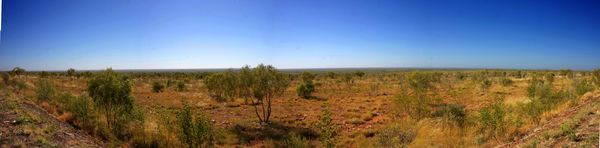
I have outlined the area I think you are talking about. If you could tell use what software you were using. Would it be possible to post the last or two (Your right) photos. thank you
I see you have CC, was this stitched there or in another program.
I see you have CC, was this stitched there or in another program.

Aug 12, 2015 10:01:37 #

My 2¢ worth, you say same settings for all shots but when you are in aperture priority how can you verify that. Even minor fluctuations can ruin a pano. Trust me, I've ruined several in the ongoing training process. You really need to be in manual and then you can state all settings are equal. Oh yes, even down to white balance. Yours was set to auto so fluctuations can and do happen. Now if your shooting RAW then no problem with white balance BUT you will need to synch all shots to one setting.
Something I might recommend, if you don't already do it, is to do several dry runs (no shutter actuations) simply make the rotation several times to figure out the start and stop points as well as the up/down angle you need. Pay attention to the horizon and remember that the horizon can and frequently does not go level unless you're on the ocean/large lake, flat desert etc. Make mental note of how many pics it will take to complete the pano. If using a wide angle remember that the horizon MUST be dead center in the frame to keep the horizon dead level. If shooting at 50mm or above then horizon placement is not as critical because perspective is maintained throughout the frame.
I have done many hand held panos and am getting quite good at it but the use of a leveled tripod is always the best option. When I am on my own and it is a predetermined shot the tripod is used but for those spur of the moment scenes, feet spread to shoulder width and at a slight angle to the center point of the scene. Elbows tucked into body and twist from the waist, shoulders and head are locked.
RTS100 wrote:
Same camera settings for each shot,
Aug 12, 2015 11:34:09 #

This is the best advice so far. I noticed the same thing that Big-Guy did. Aperture priority and auto W/B. No bueno. Use M and pick a W/B setting or shoot in raw. In raw the W/B setting makes no difference, but before you stitch the images together, you need to post process one image and make sure you choose a W/B setting then sync the images before you stitch them. Don't overdo the post processing here. Just adjust the W/B, sharpen, and possibly adjust clarity. That's it. Then sync them all so they all have the exact same settings before you stitch them.
One thing nobody mentioned is that your sensor is extremely dirty. I see the same spots in every frame of your pano. If you are not shooting raw, then I suggest that you choose the best 16-bit jpg and most color space your camera can produce. Sometimes you'll get banding in your blue skys no matter what but shooting in raw is best, 16-bit jpg second best and use sRGB or AdobeRGB color space for the most colors to avoid banding. Also, the reason people asked if you use a CP filter is because as you move your camera the filter will change each frame. Don't use a CP filter when doing panos.
One thing nobody mentioned is that your sensor is extremely dirty. I see the same spots in every frame of your pano. If you are not shooting raw, then I suggest that you choose the best 16-bit jpg and most color space your camera can produce. Sometimes you'll get banding in your blue skys no matter what but shooting in raw is best, 16-bit jpg second best and use sRGB or AdobeRGB color space for the most colors to avoid banding. Also, the reason people asked if you use a CP filter is because as you move your camera the filter will change each frame. Don't use a CP filter when doing panos.
big-guy wrote:
My 2¢ worth, you say same settings for all shots b... (show quote)
Aug 12, 2015 11:36:16 #
Aug 12, 2015 17:09:32 #

Aug 12, 2015 18:45:01 #
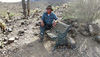
Just one other thing to look at. It appears in the first picture that your sensor needs to be cleaned. If you have an automatic cleaning program in your camera, now is a good time to use it. The images repeat the spots in the exact same place just above the areas you are questioning. This has nothing to do with your original problem, but I thought you might want to save some correcting time in post. Nice pano!
Aug 13, 2015 13:17:54 #
[quote=RTS100]Clone area with 20 or 30% opacity and you can clean it up. David
clone clean 20 or 30%
Aug 16, 2015 05:44:32 #

Aug 16, 2015 05:45:55 #
Aug 17, 2015 06:43:08 #
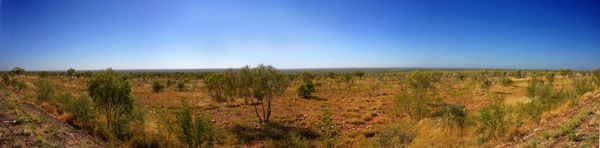
Bob, interestingly, the Sturt Plateau panorama was hand held. The other (Mt Isa, Queensland) was shot using a tripod. The hand held stitched together OK except for the dots and dashes on the horizon. The tripod one has the big jump as shown by the power line. I carry a monopod in the car; I just wasn't smart enough to use it. BobS
Aug 17, 2015 06:44:15 #
Aug 17, 2015 06:52:05 #
Bill, You've picked the area of concern to me. I want to print the image and those dots and dashes will show up. It was stitched in Photoshop CC.

Aug 17, 2015 07:00:54 #
Meives, absent a 'system' fix, cloning seems to be the only way out. Just curious as to why the dots and dashes should have appeared in the first place. Thanks for the demo. BobS
If you want to reply, then register here. Registration is free and your account is created instantly, so you can post right away.