How do you make the ends round in PS?
Jun 3, 2015 08:19:53 #

Question for PS CS6.
My problem is I don't know how to ask the proper question in Google...
To me the clip is called reverse text.
I made and "new", gave the dimension, filled the White space with Black. Then typed the text in White; thus reversed text?
However, my question is how do I round off the ends of the file from the square?
Thanks for any help.
Dave
Reverse Text?

Jun 3, 2015 08:54:21 #
Reverse text is actually completely reversed. You would use it for when you want to make a sign that sticks on the inside of glass, so people can't pick off the vinyl. What you have done is just standard white text on a black background.
Now, the easiest way to make the rounded corners is to use a different shape. One of the selections if you open it up, will be a rectangle with rounded corners. To evenly round the ones that you have there, I guess you could use that new shape to make a selection, reverse the selection then delete what is outside. I think for something so simple, I'd start over and just make the shape correct in the first place, and retype the text.
Now, the easiest way to make the rounded corners is to use a different shape. One of the selections if you open it up, will be a rectangle with rounded corners. To evenly round the ones that you have there, I guess you could use that new shape to make a selection, reverse the selection then delete what is outside. I think for something so simple, I'd start over and just make the shape correct in the first place, and retype the text.
Jun 3, 2015 09:06:27 #
Understand the reverse as you described it OK.
Now, you mention one of the selections....where are these selections? And I agree I will start over instead of making round corners from the one I displayed. Where would I find the selection you describe?
Thanks!
Dave
Now, you mention one of the selections....where are these selections? And I agree I will start over instead of making round corners from the one I displayed. Where would I find the selection you describe?
Thanks!
Dave
bkyser wrote:
Reverse text is actually completely reversed. You... (show quote)
Jun 3, 2015 09:08:32 #
Understand the reverse text as you described it.
However, where would I find the selection(s) that would make the round end instead of the square one? And yes, I agree, I will start over!
Thanks
Dave
However, where would I find the selection(s) that would make the round end instead of the square one? And yes, I agree, I will start over!
Thanks
Dave
bkyser wrote:
Reverse text is actually completely reversed. You... (show quote)
Jun 3, 2015 09:10:04 #
Sorry for the duplicate.....
Now, How do I delete the duplicate?
Now, How do I delete the duplicate?
Jun 3, 2015 09:23:59 #
SqBear wrote:
Sorry for the duplicate.....
Now, How do I delete the duplicate?
Now, How do I delete the duplicate?
Can't delete duplicate posts, you can edit them in the first 30 minutes to just say "oops, duplicate post" but that's about it.
I'm not at a computer with PS on it, so I can't tell you where to find it, but if you google "shapes in PS 6" you'll find it. A lot of people use it for scrapbooking, etc.
Jun 3, 2015 10:51:01 #
Thanks again for the information.
I will search for this!
Dave
I will search for this!
Dave
bkyser wrote:
Can't delete duplicate posts, you can edit them in the first 30 minutes to just say "oops, duplicate post" but that's about it.
I'm not at a computer with PS on it, so I can't tell you where to find it, but if you google "shapes in PS 6" you'll find it. A lot of people use it for scrapbooking, etc.
I'm not at a computer with PS on it, so I can't tell you where to find it, but if you google "shapes in PS 6" you'll find it. A lot of people use it for scrapbooking, etc.
Jun 3, 2015 13:59:18 #

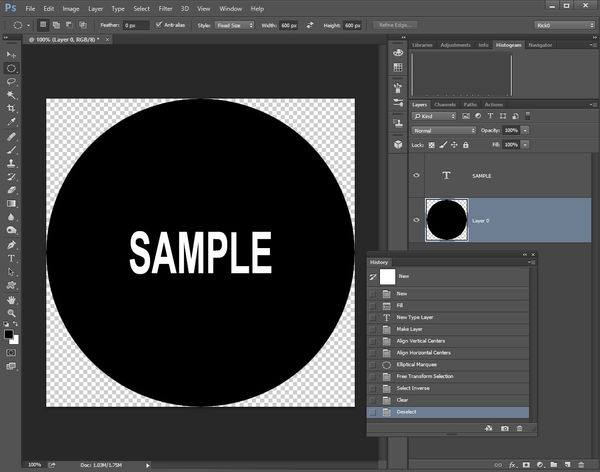
I'm sure there may be faster ways of getting the job done. But, this is fairly simple, and will do what I think you want to do.
1. Create a document & fill background with desired color.
2. Unlock background layer.
3. Select desired shape with Elliptical Marquee tool (feather 0) .
4. Adjust selection as needed with Select>Transform Selection command.
5. Invert Selection with Select>Inverse Command
6. Clear selected area with Delete or Backspace key. (deselect- w/crtl-d after clear command)
7. Use Image>Trim to remove excess transparent pixels from outside.
8. Create your text layer.
9. Highlight (select) both layers from the layers panel.
10. Use the Move tool and select 'Align vertical centers' and 'Align Horizontal Centers' from the tool options bar.
Jun 3, 2015 18:08:01 #

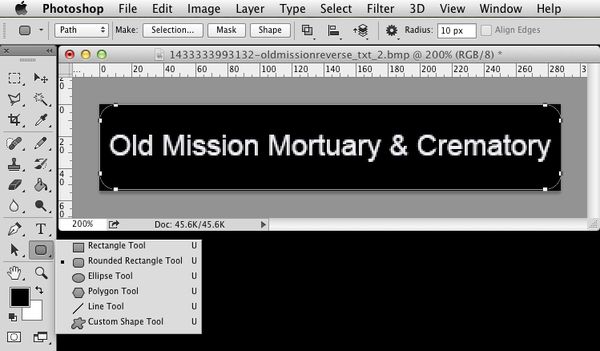
I would use the Rounded Rectangle tool for that task. Adjust the Radius so that it makes sense, then 'Make: Selection', Invert the selection, & Cut the corners off. Or you could just use the round-cornered selection to Copy & Paste to a new layer, if necessary.
Jun 4, 2015 06:40:33 #
Rick36203, thanks for the reply and the "how to" description. I tried it and well, I need to study and practice some more on the steps. Placing the Marquee tool was the biggest hang-up. Step 10 was the biggest problem for me. Not sure where to find align vertical and horizontal tool option bar.
Thanks again and I'm still working on the instructions.
Dave
Thanks again and I'm still working on the instructions.
Dave
Rick36203 wrote:
I'm sure there may be faster ways of getting the j... (show quote)
Jun 4, 2015 06:43:25 #
Dr.db. Thank you for your reply and the step instructions. Had some issues with setting the radius as illustrated. Have not given up yet. Still working on the information you provided.
Thanks again!
Dave
Thanks again!
Dave
Dr.db wrote:
I would use the Rounded Rectangle tool for that task. Adjust the Radius so that it makes sense, then 'Make: Selection', Invert the selection, & Cut the corners off. Or you could just use the round-cornered selection to Copy & Paste to a new layer, if necessary.
Jun 4, 2015 07:11:18 #

Just go to Rounded Rectangular tool two tools below the Text tool on PS6. Select your Fill colour and thats it
Add your text merge the layers a job is done my man
Add your text merge the layers a job is done my man
Jun 4, 2015 08:47:32 #
Dr. DB and Billyspad are talking about the tool I mentioned, I just didn't have access to find out where the bugger was hiding.
Jun 4, 2015 09:43:09 #

When you have the image the way you want it, make sure you SAVE it in the proper file format since the FILE itself will still be a rectangle, but saving in a format that allows the 'transparent' pixels to remain invisible will be important since some formats automatically replace those pixels with white.
Jun 4, 2015 10:36:56 #
Understand - Thanks!!
Dave
Dave
bkyser wrote:
Dr. DB and Billyspad are talking about the tool I mentioned, I just didn't have access to find out where the bugger was hiding.
If you want to reply, then register here. Registration is free and your account is created instantly, so you can post right away.