Dallas After Dark - Traveling Man #2
Apr 15, 2015 13:52:54 #

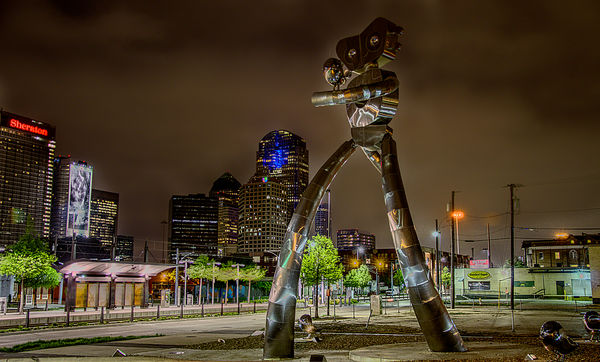
This is one of the art installations at a DART rail station. Trying to get a handle on HDR...... The metal guy was in total darkness and the station was brightly lit. I not happy with the artifacts / grain / color in the statue. I'm thinking that I may have unnecessarily complicated (overworked) the image. I used auto-bracketing in aperture priority mode w/ to create the RAW files..... The ones I used for this image were shot at f3.8, ISO-800 and w/ exposure times ranging from 1/10 to 2 sec.. Any comments / suggestions would be appreciated.... BTW, shot w/ a Nikon D5100 & a 18-105mm - tripod, remote release, m-focus, live view.... Software Fusion 2.0 & Gimp 2.8
Apr 16, 2015 09:21:54 #
ajohnston3 wrote:
This is one of the art installations at a DART rail station.
I really like the reflections on the sculpture. I like the lighting on the buildings. I find the color of the trees in between the sculpture's legs a bit too green and distracting. Except for that, I like this photo!
Apr 16, 2015 13:09:06 #

There's a bit of diffuse haloing round the head of the statue. I'm not sure if it's due to the HDR merging or your editing. Too much Clarity can do that - in fact in the wrong circumstances even a very small amount of Clarity can do it (it's been plaguing me while trying to de-haze landscape shots).
You need a bit more contrast between the statue's head and the sky. I suspect the best way to do that is to select the sky and lift the shadows to the max, then re-adjust the brightness level if necessary. Ideally the face of the statue would be brighter, but if you just lighten it, it will take it closer to the brightness level of the surrounding sky, so again contrast (or lack of it) would be a problem.
You need a bit more contrast between the statue's head and the sky. I suspect the best way to do that is to select the sky and lift the shadows to the max, then re-adjust the brightness level if necessary. Ideally the face of the statue would be brighter, but if you just lighten it, it will take it closer to the brightness level of the surrounding sky, so again contrast (or lack of it) would be a problem.
Apr 16, 2015 13:18:39 #

ajohnston3 wrote:
This is one of the art installations at a DART rai... (show quote)
ajohnston3,
You have made a good attempt to utilize HDR processing, there is more you can do next time to help capture the image you saw with your eyes. You have un-natural highlights around the body and head of the statue; this is usually caused by over processing in the HDR tools (Local Tone Mapping).
If you are to attempt again try for the evening hour, just after sunset, or before sunrise.
Lower the ISO to around 400 200 to reduce grain. Set Aperture to f/5.6. Set the auto bracketing and Exposure Compensation to +1.6 to -1.6 Ev. Auto focus on the stature chest, switch focus to Manual and leave alone. Meter your exposure for the sky between the legs. If your camera requires more than 3 bracketed exposures allow it to capture as many as it needs at the above values.
When you perform the HDR processing select the exposure images that were at +1.6, 0.0, and -1.6Ev, you now have a reference to photograph and perform PP.
Consider changing the format from horizontal to vertical, if the foreground will support the overall image. If the vertical format will not work, use the horizontal and move the statue a bit more to the right frame to give it more room the walk into the frame. This would also include more of the background buildings and RT station.
After your first series of captures, move the camera to different locations to capture a different perspective between statue and background. At twilight, you will have about 45 minutes of good light. :-)
Michael G
Apr 16, 2015 14:50:13 #
ediesaul wrote:
I really like the reflections on the sculpture. I like the lighting on the buildings. I find the color of the trees in between the sculpture's legs a bit too green and distracting. Except for that, I like this photo!
Thanks.... In retrospect, I think backing off with the color saturation is a good call....
Apr 16, 2015 14:56:01 #
R.G. wrote:
There's a bit of diffuse haloing round the head of... (show quote)
Thanks for taking time to respond R.G.. Your comments have real merit & will be taken into account on my next similar project.
Apr 16, 2015 15:11:37 #
Armadillo wrote:
ajohnston3, br br You have made a good attempt to... (show quote)
Just wanted you to know how much I appreciate your excellent response. This is exactly the type of information I was looking for. I get the ISO & Ev stuff but if f/5.6 is better then why not f/7 or even higher.... smaller aperture means more DOF? or is there a limit to this?? (BTW - I'm saving this post for future reference)
Apr 16, 2015 15:59:51 #
ajohnston3 wrote:
Just wanted you to know how much I appreciate your excellent response. This is exactly the type of information I was looking for. I get the ISO & Ev stuff but if f/5.6 is better then why not f/7 or even higher.... smaller aperture means more DOF? or is there a limit to this?? (BTW - I'm saving this post for future reference)
if f/5.6 is better then why not f/7 or even higher
The f/5.6 aperture was selected in combination with your original aperture setting and the high ISO of 800.
Lowering the ISO reduces both the sensitivity and the digital grain. We are talking about a one two stop reduction in ISO, and increasing the aperture to maintain the relative same exposure values.
smaller aperture means more DOF? or is there a limit to this??
Physically, the only limitation in f/stops is the mechanical works of the lens and camera body.
Realistically, the higher limitation for f/stops is around f/11, and in your image, you would see the effects of f/32. (From f/11 on up, the blades of the Aperture close down to a smaller diameter (not a perfect circle), but an octagonal geometric shape). From f/11 and up the edges of the aperture blades begin to cause light refraction off the sharp edges, this looks like ghosted blurs in contrasting picture elements.
Michael G
If you want to reply, then register here. Registration is free and your account is created instantly, so you can post right away.