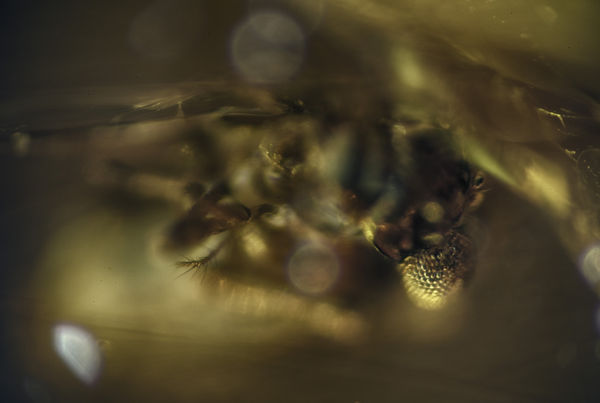
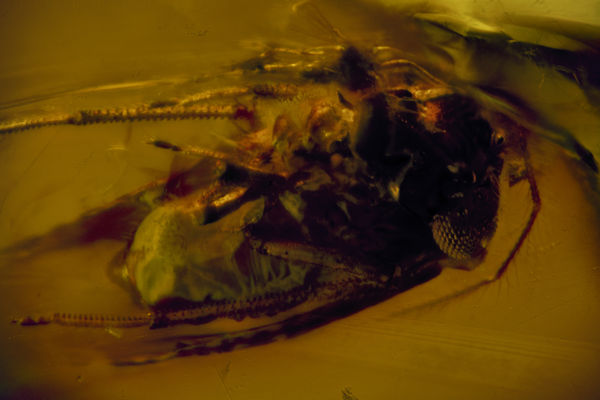
First single image at 20:1 = 20x lifesize
Apr 3, 2015 19:17:02 #
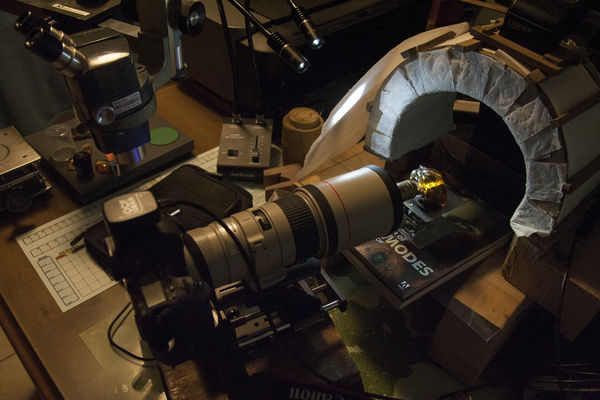
Just got the adapter that connects my 400mm lens to a Nikon Plan Achromat 10x Objective lens. In theory, this is a 20x mag.
Lighting is going to be everything, and will have to experiment to see how the flash will work. This image was a twenty second exposure with diffused directional lighting on the crane fly embedded in Amber (which is going to drive me crazy with reflections, etc). But one big plus is that inside of Amber, the insect does not collect dust!
Lighting is going to be everything, and will have to experiment to see how the flash will work. This image was a twenty second exposure with diffused directional lighting on the crane fly embedded in Amber (which is going to drive me crazy with reflections, etc). But one big plus is that inside of Amber, the insect does not collect dust!
Apr 3, 2015 20:15:09 #
pfrancke wrote:
:thumbup: And it does not move. At least under it's own power. But one big plus is that inside of Amber, the insect does not collect dust!
Apr 3, 2015 20:26:54 #

Compensating for the added "optics" of the amber will be important.
What is the Working Distance between objective lens front element and amber surface?
Is the amber surface tangent to lens?
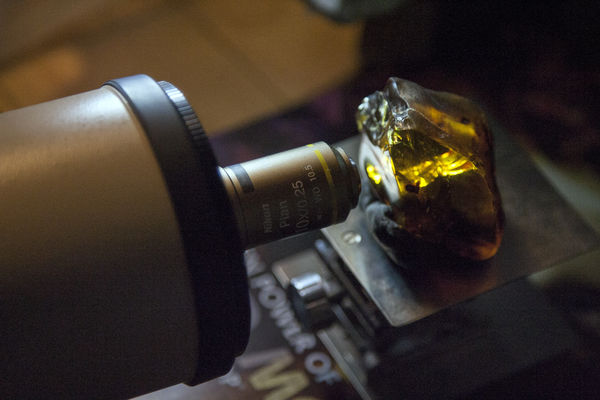
For our edification, please take a photo of just the mounted lenses.
What is the Working Distance between objective lens front element and amber surface?
Is the amber surface tangent to lens?
For our edification, please take a photo of just the mounted lenses.
Apr 3, 2015 21:47:19 #
Muddyvalley wrote:
:thumbup: And it does not move. At least under it's own power.
Hi Muddy, LOL, no, not under it's own power. but believe me, it moves between shots. I'm getting ghosts in my stacks!!!!
Apr 3, 2015 21:53:21 #
Nikonian72 wrote:
Hi Douglass, I just ran a stack where I attempted to compensate for the lens-like attributes of the amber. I did this by having my diffused flash be offset behind the Amber. I got fairly good light and detail doing this, but alas, there were areas where the light just wasn't strong enough. But the reflections were gone. I'll put that stack up in a moment. What is the Working Distance between objective lens front element and amber surface? Is the amber surface tangent to lens?
For our edification, please take a photo of just the mounted lenses.
For our edification, please take a photo of just the mounted lenses.
Working distance seems around 1/2 inch. For my first shot, you can see the amber and the lights diffused a little bit anyway. They were brighter when I shot the amber.
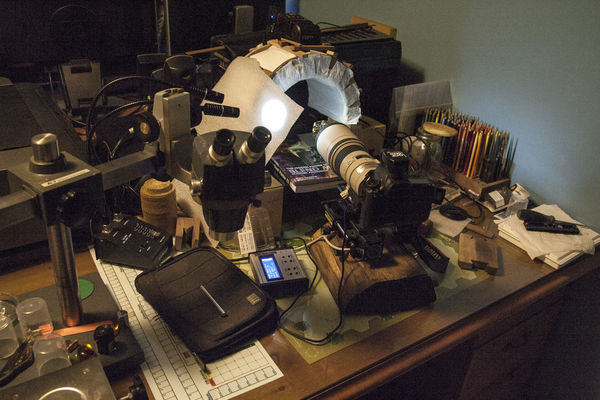
And for the stack that follows, you can see where I placed my flash-diffuser.
Apr 3, 2015 21:54:53 #
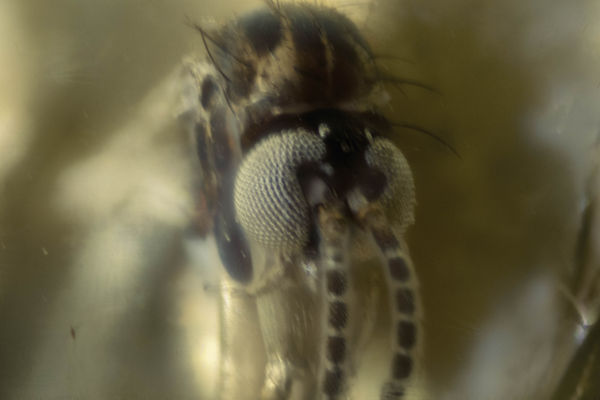
and here is the first stack with 21 frames -- backlighted with the concave diffuser as seen in the earlier images posted.
So, I don't think I'm steady/stiff enough for this. I see ghosting because Zerene probably had alignment issues. And 21 frames was not enough, I think I see some banding, most obvious in the eye. And bad lighting.
So, I don't think I'm steady/stiff enough for this. I see ghosting because Zerene probably had alignment issues. And 21 frames was not enough, I think I see some banding, most obvious in the eye. And bad lighting.
Apr 3, 2015 22:29:59 #
pfrancke wrote:
Not too shabby. Technical problems, such as lighting, can be solved. You are setting precedent. You might consider posting to "amber collecting" websites to see if anyone else is doing this, or similar.and here is the first stack with 21 frames.
Apr 3, 2015 23:00:48 #
I like the tunnel diffuser. Do you have the Stack Shot anchored to that log?
Apr 3, 2015 23:25:39 #
Nikonian72 wrote:
Douglass, that is not a bad idea. I should at least lurk in such places and see what I can learn. I tend to make many mistakes blundering about in the dark and need to be smarter about standing on the shoulders of others. I know that UHH certainly has changed what I do with my time, but I am SUCH a SLOW learner!! Not too shabby. Technical problems, such as lighting, can be solved. You are setting precedent. You might consider posting to "amber collecting" websites to see if anyone else is doing this, or similar.
Muddyvalley wrote:
Thanks Muddy, I like how that diffuser works on insects - got some great hornet shots using it. I like the tunnel diffuser. Do you have the Stack Shot anchored to that log?
The log is about 10x8x3 and has felt pads on the four corners and is pretty solid and flat on the sheet of glass that covers the desk. Then I've got a couple of quick-release type plates screwed into it and the plates in turn hold the stack-shot. The Stack Shot does not have much wobble, but there is more play than what I like.
I like the convenience of it, you can slide it around easily for coarse adjustments. And I let it settle down before it fires. BUT -- It is an area that needs improvement. At some point I need the Stack Shot to be rock solid, and it isn't. I like the block of wood as a base though, I think I need a better way to connect it to the Stack Shot!!!
Edit -- I think I owe Muddy a beer. I still don't like that only two screws hold the quick release plates to the wood, but Muddy made me realize just how loose those screws have become. I was able to significantly tighten them and am curious about how much cleaner the next stack will be as a result!!!
Apr 4, 2015 00:00:48 #
Using Helicon remote with my Stackshot on a tripod, I am surprised at how much shake I see on the screen after each adjustment it makes. Not really noticeable looking at the lens, but it sure shows up when magnified on the monitor. I give it 2 to 3 seconds to calm down before each shot. I was considering anchoring it to a heavy board like yours that extends to hold the subject stage. I'm very new to all this.
Apr 4, 2015 00:16:42 #
Muddyvalley wrote:
I was running under the theory that the subject and stage should be independent so the any motion from the rail does not affect it.. But if the motion impacts both equally.. That sounds interesting.. I like the wooden block on a desk, I think the wood softens/camps vibration. And if you take the block outside, you can get it nice and low. Before the screw tightening, I fear my system may have been settling in different places though. Using Helicon remote with my Stackshot on a tripod, I am surprised at how much shake I see on the screen after each adjustment it makes. Not really noticeable looking at the lens, but it sure shows up when magnified on the monitor. I give it 2 to 3 seconds to calm down before each shot. I was considering anchoring it to a heavy board like yours that extends to hold the subject stage. I'm very new to all this.
I am fairly new to this also. I fear that ideally the stack shot should be mounted on a heavy piece of metal! Someone please weld the quick release plates to a piece of railroad track. Or maybe held in a vise...
Apr 4, 2015 00:39:58 #
A good thought! I do happen to have a chunk of I-beam and actually a piece of narrow guage rail road track. I could drill & tap it for machine screws instead of welding. While I do have a drill press, I don't weld. :-)
I imagine that they would shake at different frequencies even tied to the same base. But it might help some the next time my wife walks into the room & the floor shakes. :-)
I imagine that they would shake at different frequencies even tied to the same base. But it might help some the next time my wife walks into the room & the floor shakes. :-)
Apr 4, 2015 21:17:13 #
Muddyvalley wrote:
Muddy, I am envious of your machinist skills. I bet it would work really well. Only other thing I could think to add to such a setup would be to have it sitting on a slice of memory foam or some such -- then between the weight of it, and the dampening effect, it might be pretty awesome.A good thought! I do happen to have a chunk of I-beam and actually a piece of narrow guage rail road track. I could drill & tap it for machine screws instead of welding. While I do have a drill press, I don't weld. :-)
I imagine that they would shake at different frequencies even tied to the same base. But it might help some the next time my wife walks into the room & the floor shakes. :-)
I imagine that they would shake at different frequencies even tied to the same base. But it might help some the next time my wife walks into the room & the floor shakes. :-)
On my struggles, one thing I found out it that things are better if the lens autofocus is OFF. Sheesh!
And it helps a lot to be perpendicular to the surface of the amber. Or else the image has a lot of warping going on between the different slices.
But I am still doing something wrong.. I ran a stack with live view looking at it on my tablet and things were looking pretty good. But when I ran it on the camera, the images were not nearly as crisp. In other words, what I was seeing in live-view on the tablet had much greater detail than what I ended up with. Perhaps mirror slap is getting me and I need to wait longer between the mirror lock and the actual shot (I am letting the rail software trigger the camera - If I use live-view via tablet, I have to press tablet shutter button)
So anyway, am frustrated, that is it for today and perhaps I will set this aside and practice on things not in amber to ensure I know what I am doing before adding in additional variable.
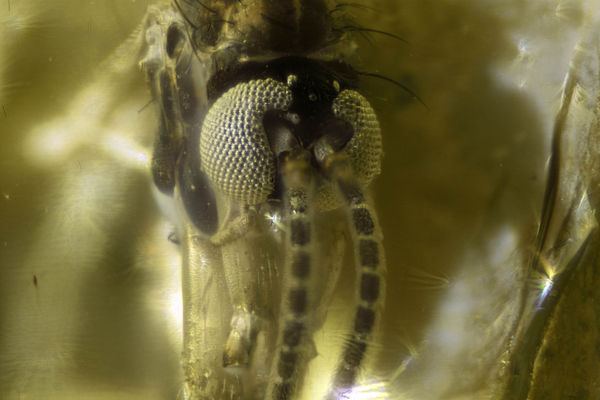
Last attempt:
Apr 4, 2015 22:03:15 #
pfrancke wrote:
I'm fumbling through the learning process and not the best source of advice. But it does sound like camera movement if it's clear on the monitor. Can you lock the mirror up on your camera? You might give the free month of Helicon remote a try. One nice feature I like about it is that it will calculate the number of slices based on the aperture and the distance. I am somewhat mathematically handicapped & that helps a lot in reducing banding for me. Also, I believe that there is no need to lock the mirror as it is always up during live view. It auto controls everything for the stackshot. Perhaps mirror slap is getting me and I need to wait longer between the mirror lock and the actual shot (I am letting the rail software trigger the camera - If I use live-view via tablet, I have to press tablet shutter button.
Apr 5, 2015 09:11:14 #
Muddyvalley wrote:
This blind squirrel found a big nut! I've been using dsrl controller on my tablet and have been too lazy to hook the PC up. Anyway, muddy, you made do my research and my problem was as simple as turning on live-view on my camera. And after that Stack Shot could control the camera fully while I overview in DSLR controller.I believe that there is no need to lock the mirror as it is always up during live view. It auto controls everything for the stackshot.
At the 10x image preview, I still see motion that perhaps can be stopped by increasing the shutter speed or by using flash. (these were at 1/20 sec) And at least now the focus banding can be clearly seen (since some of it is actually in focus!) And at some point I am going to have to improve my stand and base (block of wood) I guess. Waiting to see some images from an I-Beam!!!!
If you want to reply, then register here. Registration is free and your account is created instantly, so you can post right away.