Fancy edges for card- or photobook photos
Mar 14, 2015 11:58:10 #
Before you start with this, make sure your editing is done: colour correction, sharpening, etc.
Then:
You've got a photo that would be just perfect for a greeting card, for a birthday, or Christmas,
or Thinking of you or Get Well.
You could have it just printed and then glue it to a stock card and write your message inside.
Or you could make it a bit fancier, give the photo a fancy edge, place your copyright or designer
information on the back and a message on the inside, then have it printed on say, 28lb or heavier
paper, and fold it in four, to fit your envelope.
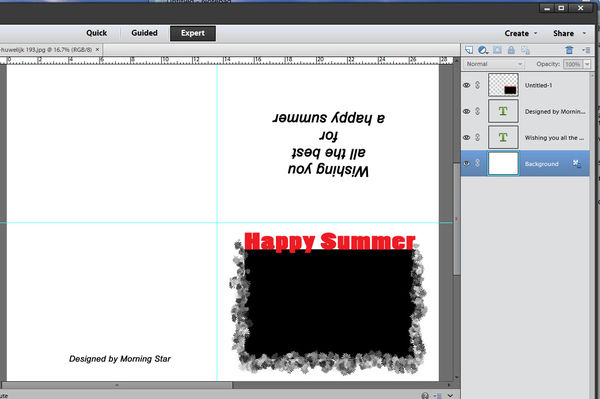
So here goes: Layout:
Open a new document, the size of your paper (legal, letter, A4).
The division of the paper is: two upper quadrants: become inside of card, and should have any text
upside down.
Two lower quadrants: become outside of card, and image and/or text shold be right side up.
Use the guides, if your program has them, to make the divisions (the thin green lines in my image).
For the image:
Make a new document, 1/2 the width and height of the card, and make sure the background is transparent.
With the marquee tool, draw a rectangle, leaving fairly generous borders (you can adjust size afterwards),
and fill with black.
Type a text, adjust size and style (fat, cursive, etc), and move the text to the letters just touch
the outside edge of the black shape.
Select a fancy brush, adjust size, and under brush settings, scatter and spacing. Then just move the
cursor around the edge of the black shape. No need to worry about keeping your cursor in a straight line.
Now merge the layers of this document - your clipping mask is ready. Save As, and give it a name.
Select the card document, then drag and drop this clipping mask to the lower right quadrant of your
"card" and adjust it for size and position.
In the lower left, place your designer and/or copyright info.
In the upper left or right, or even right across, place your greeting. When typed, click the green
arrow to accept, then click on the text to select it and use a corner handle to turn it upside down.
Also use the corner handles to adjust the text for size, use the move tool to adjust for location.
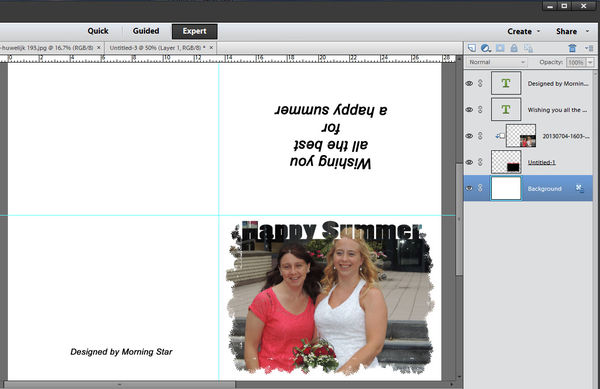
Now drag and drop your photo to the design you made (make sure the photo layer is above the clipping
mask layer) and press Ctrl+G.
As soon as you press Ctrl+G, the photo will take the shape of the clipping mask - the outline of
the photo is still visible and can be used for adjusting photo size. Click the green checkmark to accept.
Even after you click the green checkmark, you can still adjust clipping mask or the photo by selecting
the layer it is on.
At this point, it may be wise to merge the photo and mask layers, so you won't accidentally move the
photo or change its size.
When you're completely happy with it, Save the card.
Remains to print it, or have it printed, handwrite another message inside or just sign your name,
stick it in an envelope and send.
I usually make my clipping masks black, but any colour works.
This technique also works nicely if you make photobooks, with Shutterfly or Blurb or other company.
Then:
You've got a photo that would be just perfect for a greeting card, for a birthday, or Christmas,
or Thinking of you or Get Well.
You could have it just printed and then glue it to a stock card and write your message inside.
Or you could make it a bit fancier, give the photo a fancy edge, place your copyright or designer
information on the back and a message on the inside, then have it printed on say, 28lb or heavier
paper, and fold it in four, to fit your envelope.
So here goes: Layout:
Open a new document, the size of your paper (legal, letter, A4).
The division of the paper is: two upper quadrants: become inside of card, and should have any text
upside down.
Two lower quadrants: become outside of card, and image and/or text shold be right side up.
Use the guides, if your program has them, to make the divisions (the thin green lines in my image).
For the image:
Make a new document, 1/2 the width and height of the card, and make sure the background is transparent.
With the marquee tool, draw a rectangle, leaving fairly generous borders (you can adjust size afterwards),
and fill with black.
Type a text, adjust size and style (fat, cursive, etc), and move the text to the letters just touch
the outside edge of the black shape.
Select a fancy brush, adjust size, and under brush settings, scatter and spacing. Then just move the
cursor around the edge of the black shape. No need to worry about keeping your cursor in a straight line.
Now merge the layers of this document - your clipping mask is ready. Save As, and give it a name.
Select the card document, then drag and drop this clipping mask to the lower right quadrant of your
"card" and adjust it for size and position.
In the lower left, place your designer and/or copyright info.
In the upper left or right, or even right across, place your greeting. When typed, click the green
arrow to accept, then click on the text to select it and use a corner handle to turn it upside down.
Also use the corner handles to adjust the text for size, use the move tool to adjust for location.
Now drag and drop your photo to the design you made (make sure the photo layer is above the clipping
mask layer) and press Ctrl+G.
As soon as you press Ctrl+G, the photo will take the shape of the clipping mask - the outline of
the photo is still visible and can be used for adjusting photo size. Click the green checkmark to accept.
Even after you click the green checkmark, you can still adjust clipping mask or the photo by selecting
the layer it is on.
At this point, it may be wise to merge the photo and mask layers, so you won't accidentally move the
photo or change its size.
When you're completely happy with it, Save the card.
Remains to print it, or have it printed, handwrite another message inside or just sign your name,
stick it in an envelope and send.
I usually make my clipping masks black, but any colour works.
This technique also works nicely if you make photobooks, with Shutterfly or Blurb or other company.
Mar 14, 2015 16:42:32 #

Morning Star wrote:
Before you start with this, make sure your editing... (show quote)
This was very informative. Thank you for sharing.
Mar 15, 2015 20:10:10 #
If you want to reply, then register here. Registration is free and your account is created instantly, so you can post right away.