Day 67 - Photo A Day Challenge - 3-7-2012
Mar 7, 2012 02:12:54 #

Welcome to Day 67 :) ... My goal for this month, is to have us all shooting comfortably in manual mode by spring. Today is just the beginning. So hang in there ...
and don't be afraid to ask questions if you don't understand something after I explain the process.
Today is all about Understanding Aperture. Now don't panic .. it's easier to understand then we have been led to believe.
Your camera is basically a light-capturing device. The Aperture (or fstop) works the same way your eye does. In bright-light situations
the iris adjusts its size to reduce the pupil opening and limit the amount of light that enters the eye. And in dim-light situations, the iris adjusts so as to maximize
the size of the pupil opening and increase the amount of light that enters the eye.
As you photograph the world around you, the aperture setting in your camera works just like the iris of your eye. It controls the amount of light entering your camera,
the bigger the hole, the greater amount of light, and the smaller the hole, the less light comes through. That part is easy to remember right?
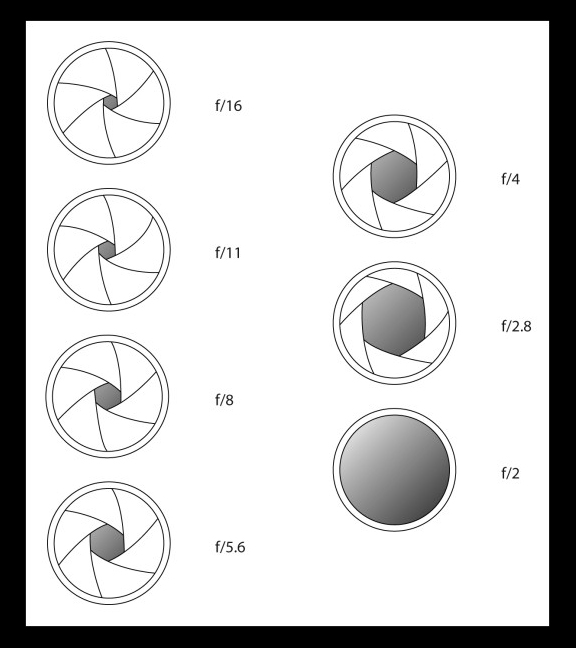
Now here is the tricky part ... It's all backwards ... The larger the f-number, the smaller the hole. ... The smaller the f-number, the bigger the hole.
Take a minute to let that sink in because it is totally opposite to how we think about size and numbers. (See the first photo for a guide)
The main reason to adjust your aperture for the particular photo you are taking is that the size of the hole (the aperture or fstop) will affect the focus.
A small aperture (fstop) will be great for shallow depth of field and great bokeh :) because it will blur everything in the background. The further the background is from
subject the more blur there is.
A large aperture (fstop) is great for landscapes where you want everything in focus including the mountains in the background. This is also called deep depth of field.
Taking better images starts with taking control of your camera, and learning what aperture is and how it can improve your photography is a good place to start.
But nothing beats taking what youve learned and applying it.
So what I want you to do for this challenge is put the camera on A or AV (aperture priority) This step is very important !
It will allow you to only have to think about adjusting the aperture (fstop).
The camera will take care of all the other settings for you. So don't even think about ISO or Shutter Speed. Today is only about the Aperture.
Do not zoom .. keep the lens on the widest setting.
Use a tripod ... to make sure the camera doesn't move.
Find anything that has at least 4 feet of distance between the front and the back of the photo.
Turn the dial to set the aperture (fstop) to the smallest number your lens allows. Get your subject in focus. Take the shot.
You shouldn't have to keep adjusting the focus ... Once it's set for the first shot leave it alone.
Turn the dial to a larger number (fstop) and take the photo. Repeat this step until you are at the highest fstop your lens allows.
A series of 3 or 4 photos should be enough ....you can skip numbers in between.
The main thing is to see the difference in the first shot and the last shot.
After this exercise you will be able to understand what Aperture setting you need for any given situation.
Here are some examples and the settings so you can see what happens with just this one adjustment. Remember all I did was change the fstop, the camera decided the ISO and
Shutter Speed. Also I did no post processing on these so that you can see what happens with the changes in fstop.
and don't be afraid to ask questions if you don't understand something after I explain the process.
Today is all about Understanding Aperture. Now don't panic .. it's easier to understand then we have been led to believe.
Your camera is basically a light-capturing device. The Aperture (or fstop) works the same way your eye does. In bright-light situations
the iris adjusts its size to reduce the pupil opening and limit the amount of light that enters the eye. And in dim-light situations, the iris adjusts so as to maximize
the size of the pupil opening and increase the amount of light that enters the eye.
As you photograph the world around you, the aperture setting in your camera works just like the iris of your eye. It controls the amount of light entering your camera,
the bigger the hole, the greater amount of light, and the smaller the hole, the less light comes through. That part is easy to remember right?
Now here is the tricky part ... It's all backwards ... The larger the f-number, the smaller the hole. ... The smaller the f-number, the bigger the hole.
Take a minute to let that sink in because it is totally opposite to how we think about size and numbers. (See the first photo for a guide)
The main reason to adjust your aperture for the particular photo you are taking is that the size of the hole (the aperture or fstop) will affect the focus.
A small aperture (fstop) will be great for shallow depth of field and great bokeh :) because it will blur everything in the background. The further the background is from
subject the more blur there is.
A large aperture (fstop) is great for landscapes where you want everything in focus including the mountains in the background. This is also called deep depth of field.
Taking better images starts with taking control of your camera, and learning what aperture is and how it can improve your photography is a good place to start.
But nothing beats taking what youve learned and applying it.
So what I want you to do for this challenge is put the camera on A or AV (aperture priority) This step is very important !
It will allow you to only have to think about adjusting the aperture (fstop).
The camera will take care of all the other settings for you. So don't even think about ISO or Shutter Speed. Today is only about the Aperture.
Do not zoom .. keep the lens on the widest setting.
Use a tripod ... to make sure the camera doesn't move.
Find anything that has at least 4 feet of distance between the front and the back of the photo.
Turn the dial to set the aperture (fstop) to the smallest number your lens allows. Get your subject in focus. Take the shot.
You shouldn't have to keep adjusting the focus ... Once it's set for the first shot leave it alone.
Turn the dial to a larger number (fstop) and take the photo. Repeat this step until you are at the highest fstop your lens allows.
A series of 3 or 4 photos should be enough ....you can skip numbers in between.
The main thing is to see the difference in the first shot and the last shot.
After this exercise you will be able to understand what Aperture setting you need for any given situation.
Here are some examples and the settings so you can see what happens with just this one adjustment. Remember all I did was change the fstop, the camera decided the ISO and
Shutter Speed. Also I did no post processing on these so that you can see what happens with the changes in fstop.
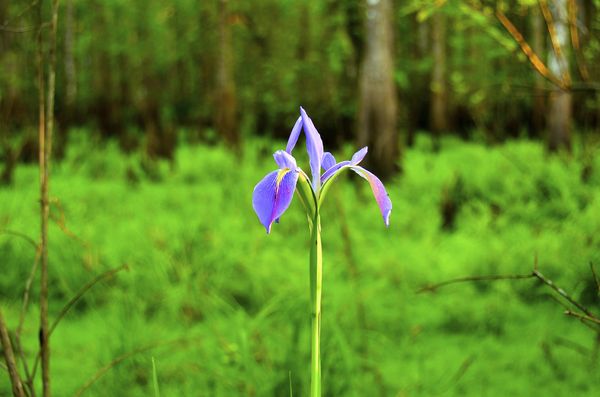
Aperture examples
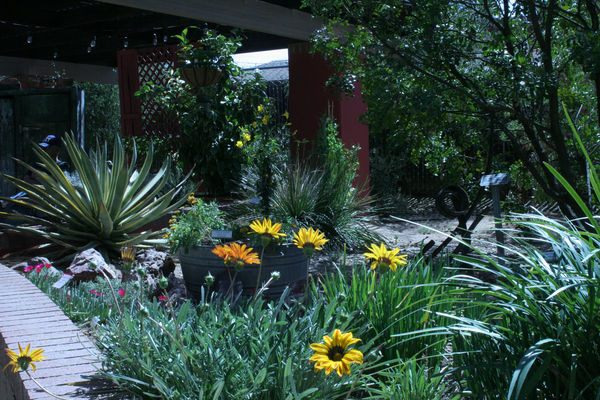
f/4 ISO 800 1/4000 - just the front in focus
f/7.1 ISO 800 1/2000 - front and close center in focus
f/18 ISO 800 1/400 -front and center in focus
f/22 ISO 800 1/250 - whole thing in focus .. front to back
Mar 7, 2012 02:20:15 #
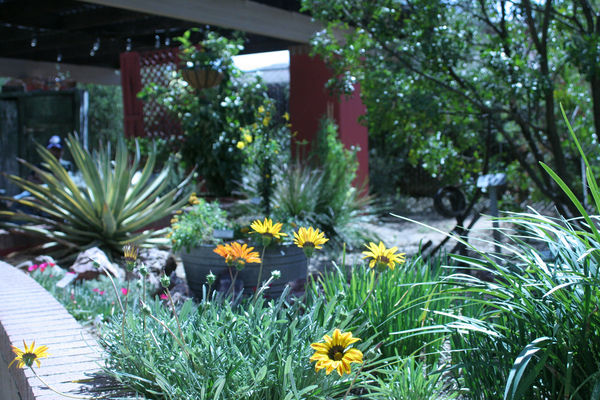
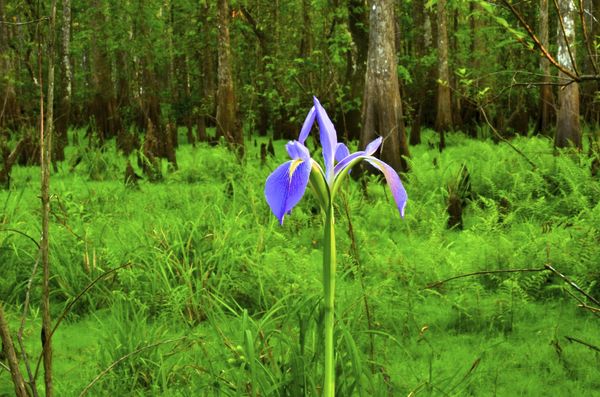
Another example ... Shot on Aperture Priority
f/4 ISO 100 1/1250
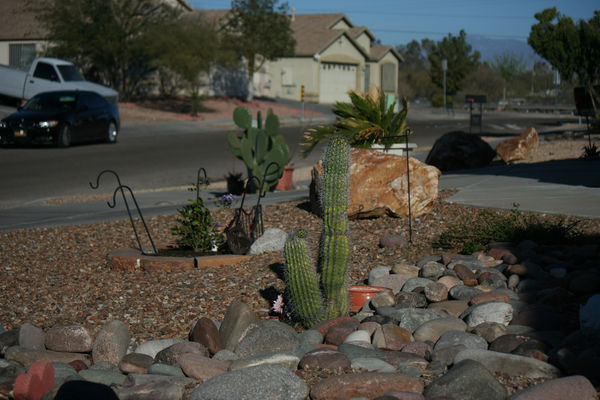
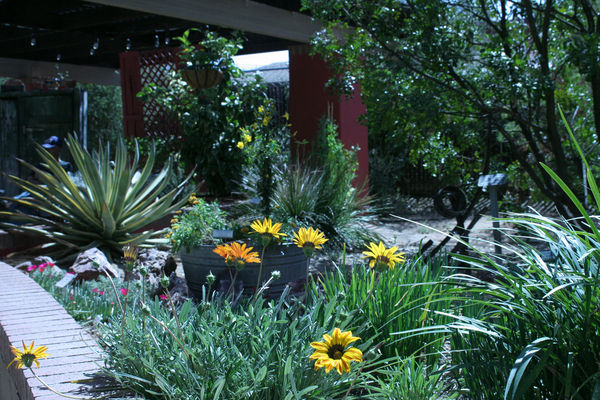
f/8 ISO 100 1/320
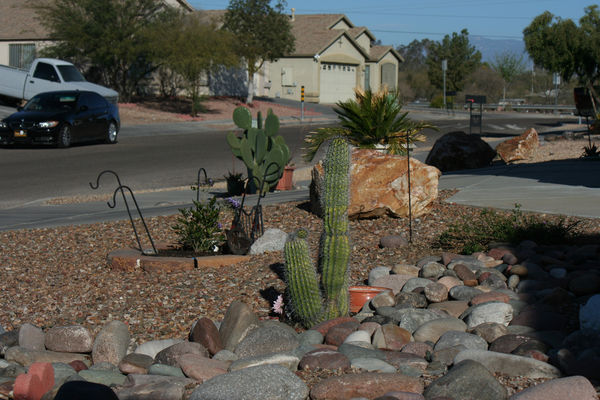
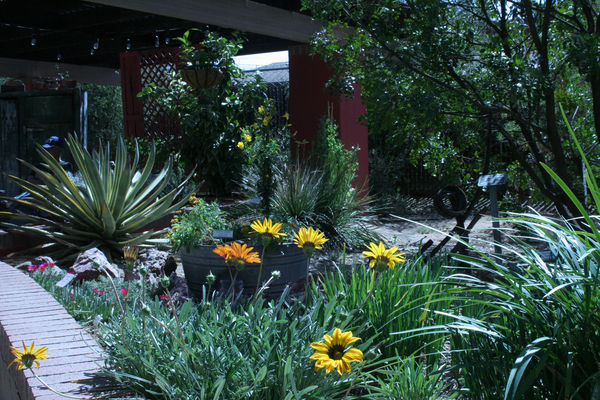
f/22 ISO 100 1/50

Mar 7, 2012 02:37:02 #

photogrl57 wrote:
Welcome to Day 67 :) ... My goal for this month, ... (show quote)
perfect explanation and wonderful examples photogrl!
my question has nothing to do with your explanation, it is wonderful. Just squint your eyes and the same thing happens - things farther away seem less focused.
I will have fun with this since the weather is supposed to be nice tomorrow! (today)
Mar 7, 2012 02:39:20 #
Janice wrote:
perfect explanation and wonderful examples photogrl!
my question has nothing to do with your explanation, it is wonderful. Just squint your eyes and the same thing happens - things farther away seem less focused.
I will have fun with this since the weather is supposed to be nice tomorrow! (today)
perfect explanation and wonderful examples photogrl!
my question has nothing to do with your explanation, it is wonderful. Just squint your eyes and the same thing happens - things farther away seem less focused.
I will have fun with this since the weather is supposed to be nice tomorrow! (today)
Hey ! I never thought of that .. squinting is something I don't even need to practice LOL
Mar 7, 2012 02:45:28 #
photogrl57 wrote:
Hey ! I never thought of that .. squinting is something I don't even need to practice LOL
Janice wrote:
perfect explanation and wonderful examples photogrl!
my question has nothing to do with your explanation, it is wonderful. Just squint your eyes and the same thing happens - things farther away seem less focused.
I will have fun with this since the weather is supposed to be nice tomorrow! (today)
perfect explanation and wonderful examples photogrl!
my question has nothing to do with your explanation, it is wonderful. Just squint your eyes and the same thing happens - things farther away seem less focused.
I will have fun with this since the weather is supposed to be nice tomorrow! (today)
Hey ! I never thought of that .. squinting is something I don't even need to practice LOL
LOl - me either
Mar 7, 2012 02:46:49 #

Explanation was GREAT and even me (The BLONDE) may get it.....so, tomorrow, I'm gonna take the plunge and use the AV setting...
I printed your explanation..gonna make a 3-ring binder with all your technical stuff....
SO...if I don't post tomorrow night..means I didn't get it. LOL
Thanks, again, PG for taking the time to help us.
I printed your explanation..gonna make a 3-ring binder with all your technical stuff....
SO...if I don't post tomorrow night..means I didn't get it. LOL
Thanks, again, PG for taking the time to help us.
photogrl57 wrote:
Another example ... Shot on Aperture Priority
Mar 7, 2012 03:09:33 #

Goddess97633 wrote:
Explanation was GREAT and even me (The BLONDE) may get it.....so, tomorrow, I'm gonna take the plunge and use the AV setting...
I printed your explanation..gonna make a 3-ring binder with all your technical stuff....
SO...if I don't post tomorrow night..means I didn't get it. LOL
Thanks, again, PG for taking the time to help us.
I printed your explanation..gonna make a 3-ring binder with all your technical stuff....
SO...if I don't post tomorrow night..means I didn't get it. LOL
Thanks, again, PG for taking the time to help us.
photogrl57 wrote:
Another example ... Shot on Aperture Priority
What a great Idea !!!
chris
Mar 7, 2012 05:49:35 #

How do you come up with all this?? :D I'm happy that you do tho because I'm new and all these things are surely helping me learn ty I will try these later today and post
Mar 7, 2012 07:07:21 #
Aperture, OK. I get it. My favorite thing. My aperture is as wide as it gets this hour of the day.
f stop= wide, shutter = slow, iso = "I SO" plan to see you all later after both my apertures are open.

Mar 7, 2012 07:08:13 #

Great lesson. Helps you control the out come of your photo, puts you in the drivers seat. Here's an example taken this week. Not the best photos. Please use the download for the full affect
f/5 1/125 66mm ISO320
f/29 1second 66mm ISO320
Mar 7, 2012 07:19:19 #

That is just too funny!!! My first giggle of the day -- no, wait I'm actually laughing out loud!!
PAToGraphy wrote:
Aperture, OK. I get it. My favorite thing. My aperture is as wide as it gets this hour of the day.
Mar 7, 2012 07:23:08 #

photogrl57 wrote:
Hey ! I never thought of that .. squinting is something I don't even need to practice LOL
Janice wrote:
perfect explanation and wonderful examples photogrl!
my question has nothing to do with your explanation, it is wonderful. Just squint your eyes and the same thing happens - things farther away seem less focused.
I will have fun with this since the weather is supposed to be nice tomorrow! (today)
perfect explanation and wonderful examples photogrl!
my question has nothing to do with your explanation, it is wonderful. Just squint your eyes and the same thing happens - things farther away seem less focused.
I will have fun with this since the weather is supposed to be nice tomorrow! (today)
Hey ! I never thought of that .. squinting is something I don't even need to practice LOL
An O.T. on squinting....
Ok for those who wear glasses, take 'em off. Take your left and right index fingers and touch the ends so as to form a 90° angle. Then place your thumb along one of the fingers, parallel so as the end of the thumb is touching the other index finger. you will see a verry small hole at the junction...look through this hole, as close to your eye as possible and you can read text.
Mar 7, 2012 07:32:04 #
Judy wrote:
That is just too funny!!! My first giggle of the day -- no, wait I'm actually laughing out loud!!
PAToGraphy wrote:
Aperture, OK. I get it. My favorite thing. My aperture is as wide as it gets this hour of the day.
p1 - thanks Judy. On cup #1. When I get to cup #2, both apertures should be open.
Mar 7, 2012 07:32:58 #
Roadrunner wrote:
quote=photogrl57 quote=Janice br perfect explan... (show quote)
P1 - RR too technical for me. Can't you see I only have 1 aperture open??
Mar 7, 2012 07:36:39 #
If you want to reply, then register here. Registration is free and your account is created instantly, so you can post right away.