Trying Long Daylight Exposures
Feb 8, 2015 11:51:16 #

ajohnston3 wrote:
I read an article on using ND filters to create ex... (show quote)
We all know that full mid-day light on a cloudless day is NOT the best time to do long exposures. Late or early in the day or overcast days work better. But I'm not convinced that this, or the stacking itself, explains the problems you had with this image.
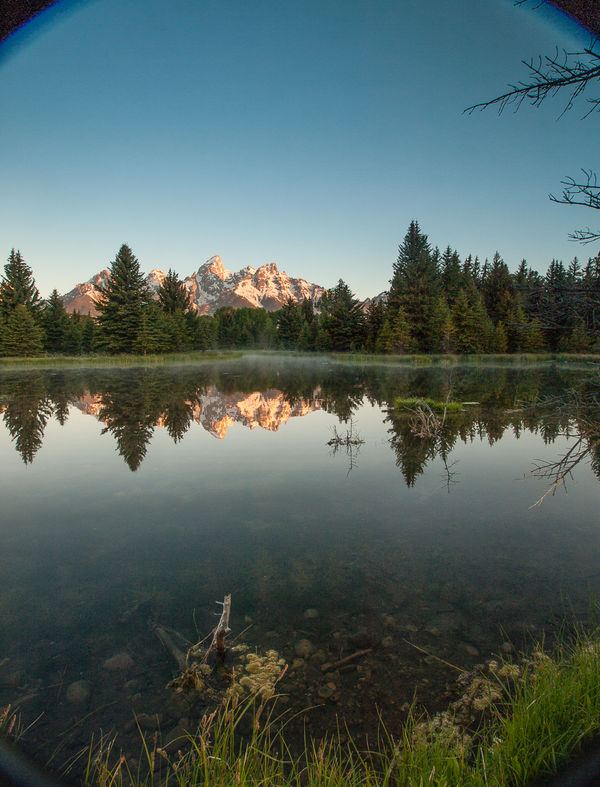
I am attaching a photo I took some years ago, taken with a stacked ND filter and polarizer (because I didn't have but one ND filter at that time and resorted to emergency measures as you did.) Mine were NOT expensive filters, basically the eBay kind. As you see there is no color shift and no color correction was done in post. What it did do (I cropped this out in the finished version but left it in here for demonstration) was created some really dreadful vignetting in the corners. It is better to have ND filters in multiple strengths than to stack, but I can't see how stacking should have caused this in and of itself unless there was some weird interaction between the filters. I wonder if the lens has anything to do with it?
A review of the shot in the histogram and/or use of "blinkies" could have showed you the strange colors and the blown highlights. If you shot in raw, the color problem can be addressed better, and to some extent possibly the blown highlights, but what is truly blown is just gone and it looks like you've got some of that here. Interesting problem...
Feb 8, 2015 15:49:33 #

jerryc41 wrote:
Don't be too concerned about color shift. That's what post processing is for. Yes, filters can affect color.
Here's a good, lengthy article.
http://www.the-digital-picture.com/Reviews/10-Stop-Neutral-Density-Filter.aspx
Here's a good, lengthy article.
http://www.the-digital-picture.com/Reviews/10-Stop-Neutral-Density-Filter.aspx
~~~~~~~~~~~
Initial scan thru... looks like exactly what I need. I'm setting some time aside to give it a good read later... Thanx....
Feb 8, 2015 22:11:17 #
zigipha
Loc: north nj
minniev wrote:
We all know that full mid-day light on a cloudles... (show quote)
Why did you use a ND filter on a landscape?
Feb 8, 2015 22:12:01 #
zigipha
Loc: north nj
ND filters don't "darken" the shot; they reduce the amount of light coming in so you can get a longer exposure time. Lightness/darkness comes from having too much/too little light for the iso setting.
Feb 8, 2015 22:28:50 #
zigipha wrote:
Why did you use a ND filter on a landscape?
Did you read the original post? Seems to me he explained why he wanted to try an ND filter.
You haven't looked at many (any?) landscape/outdoor photography magazines, have you?
I doubt there's a single issue that doesn't include an example of long-exposure landscapes (usually to smooth water to clouds).
Feb 8, 2015 23:47:33 #
mariraju wrote:
I think it is because of the combination of two filters. Never happened to me. Even just using ND filter, I have always got good color. I have always used it for longer exposure. It is always good to have at least ND 2, 4, 6, 8. Depending on the condition and how long you need the exposure to be, you can use one of those.
You can also try only with CPL and the setting f22, ISO 100 with lower shutter speed of about 1/4 or 1/2 or even 1 second. You should be able to get a good result.
You can also try only with CPL and the setting f22, ISO 100 with lower shutter speed of about 1/4 or 1/2 or even 1 second. You should be able to get a good result.
Thanks for the tips!
Feb 8, 2015 23:54:08 #
UXOEOD wrote:
Yes, creating and using a custom white balance val... (show quote)
by 'custom white balance' are you referring to Preset Manual? My D5100 has options for the ususal (Direct Sunlight, Cloudy, Incandescent, ect.) and Preset Manual where you actually take a reading before hand. (I think....)
Feb 8, 2015 23:56:14 #
jimmya wrote:
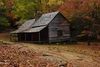
I shot this with my t3i in bright sun with double stacked ND filters at 1/2 second, f/20, ISO 100, tripod of course with a Canon 18-55 at 25mm. I see only one highlight that is too hot but I believe that in bright sun that's a price you're going to pay.
No PP on this shot, straight from the camera.
No PP on this shot, straight from the camera.
Great colors and water effect..... this is what I'm working toward....
Feb 8, 2015 23:57:48 #
warrior wrote:
Just a UV filter used here.
Ditto.... I keep a UV filter on all my good lenses..... They have saved my bacon more than once!
Feb 9, 2015 00:03:15 #
Rongnongno wrote:
Filters, regardless of quality create a modificati... (show quote)
~~~~~~~~~~~~
Yup....... If I'm going to keep doing this (& I've decided I will) I'm going to have to invest in some stuff..... I've been looking at 3"x4" slider systems. I'm looking at some of the color calibration stuff on Amazon as well.
Feb 9, 2015 00:12:10 #
minniev wrote:
We all know that full mid-day light on a cloudles... (show quote)
~~~~~~~~~~~~~~~~~~~
I want to thank you for taking the time for a really great response to my query. You obviously have a lot of experience and put a lot of thought in to it. (Great Shot, BTW!!!) I think you are spot on about the full sunlight issue & will look for an overcast day for my next attempt. I don't think the lens is the culprit. I've gotten excellent results with it in other instances. I shoot with the high res. JPG & RAW save option. Raw does allow a lot more 'fiddle room' so to speak. I'm just now getting used to looking at the histograms on my shots.... another good reason to keep after it.... thanks again for your input. It is appreciated. :)
Feb 9, 2015 09:47:48 #
ajohnston3 wrote:
~~~~~~~~~~~~~~~~~~~ br I want to thank you for tak... (show quote)
One more hint: you don't need as slow a shutter speed as you used (10 seconds according to the exif). Of course that varies based on how fast the water is running and how milky you want it, but my best guess is that you could've got this one pretty milky-looking with a 2 second shutter. Start there, review your shot- if it has lost all detail (like the one you posted), speed up a fraction of a second. If it looks like it has clods of buttermilk in it, slow down a fraction. Keep working till you get the texture you want without blown highlights in the blinkies or histogram. You'll eventually learn some general parameters for which shutter/aperture combinations work for water flowing at which speeds and in what kind of light. A little trickling brook will need a pretty slow shutter, but a roaring cascade might be plenty blurred at 1/2 second.
Feb 9, 2015 13:29:24 #
ajohnston3 wrote:
By #8, I assume you mean an eight stop ND filter. Correct? Did you establish a proper exposure first, before adding the ND stack? An ND filter isn't to darken an exposure, although you can do that. It's to allow a longer exposure, slower shutter speed, while giving a proper exposure. Don't think I've ever seen a cyan cast from one. What was the proper unfiltered exposure?I read an article on using ND filters to create ex... (show quote)
Feb 9, 2015 13:39:17 #
ajohnston3 wrote:
But then a UV filter has nothing, even remotely, to do with the subject at hand.Ditto.... I keep a UV filter on all my good lenses..... They have saved my bacon more than once!
Feb 9, 2015 17:07:15 #
minniev wrote:
One more hint: you don't need as slow a shutter sp... (show quote)
~~~~~~~~~~~~~~~~~~~
If this beautiful sunny weather will ever cease and desist :) I will definitely give your suggestions a try! Thanks again....
If you want to reply, then register here. Registration is free and your account is created instantly, so you can post right away.