Tutorial - Creating a Simple Multi-Shot Panorama using Microsoft's Free I.C.E. (Image Composite Editor) Software
Feb 7, 2015 00:21:55 #

When shooting panoramas there are few things that should be done while shooting the individual images to be stitched together later:
1. Shoot in Vertical Orientation. This will leave plenty of foreground and sky that can be cropped out later and still leave enough material to work with.
2. Shoot in Manual Mode except for using Autofocus. This includes setting ISO instead of using Auto ISO. This will ensure your lighting values will remain constant across all your shots and you won't get banding in the sky because of different exposue values as you move across the horizon.
3. Overlap your photos by 30 to 40%
I got interested in I.C.E. because Jerryc41 posted that Microsoft had just upgraded it to Version 2.0, it's what he uses for panoramas, it works really well and it's free. I had asked him to post an example, but I never got a reply to the request. I figured I would work one out for myself, and post the workflow as I went along.
I.C.E. is a standalone program that will export final results as .jpg, .png, .tif, or .pdf. It uses 4 simple steps, outlined below (and illustrated in the workflow photographs). You can download it here: http://research.microsoft.com/en-us/um/redmond/projects/ice/
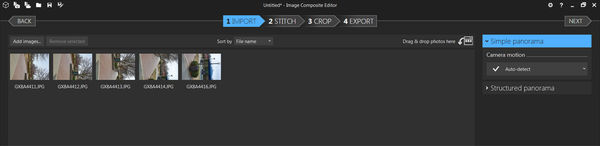
1. Import - in my case, I used 5 individual images. There is a browse function which enables you to select photos from anywhere on your computer
2. Stitch - there are some interesting features built in to the software. It handles chromatic aberration, photo alignment, and even has a rudimentary camera movement detection/correction function.
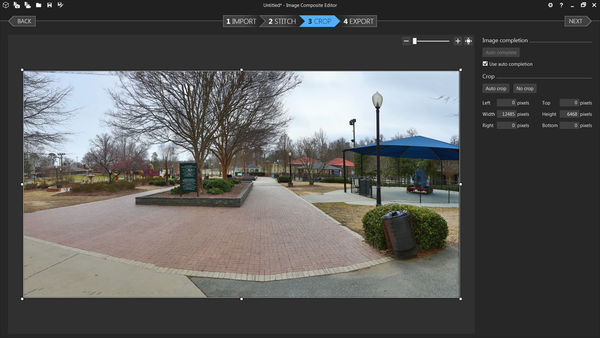
3. Crop - invariably you will end up cropping your photo to get rid of uneven edges, unwanted foreground, and maybe too much sky. It also allows you to rotate your image to align properly with a grid. The program has a content-aware function that will fill in blank sections where the crop doesn't find any pixels in the original photo. Be sure the "Use Auto Completion" box is checked.
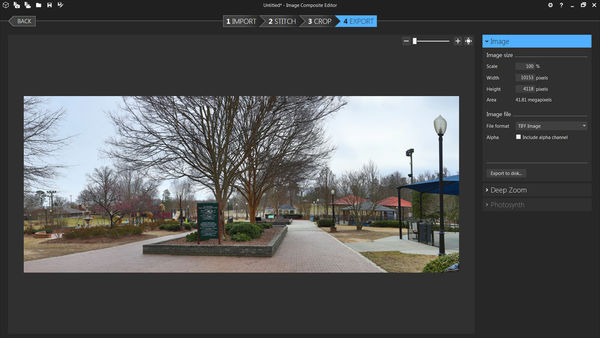
4. Export - You can specify which image format to use, where to stage it, and what level of accuracy you would like for the final image.
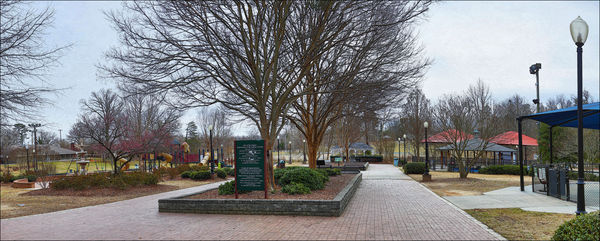
Once I had exported my final image as a large resolution .jpg file, I opened it in PS CC 2014 for some final editing.
1. Shoot in Vertical Orientation. This will leave plenty of foreground and sky that can be cropped out later and still leave enough material to work with.
2. Shoot in Manual Mode except for using Autofocus. This includes setting ISO instead of using Auto ISO. This will ensure your lighting values will remain constant across all your shots and you won't get banding in the sky because of different exposue values as you move across the horizon.
3. Overlap your photos by 30 to 40%
I got interested in I.C.E. because Jerryc41 posted that Microsoft had just upgraded it to Version 2.0, it's what he uses for panoramas, it works really well and it's free. I had asked him to post an example, but I never got a reply to the request. I figured I would work one out for myself, and post the workflow as I went along.
I.C.E. is a standalone program that will export final results as .jpg, .png, .tif, or .pdf. It uses 4 simple steps, outlined below (and illustrated in the workflow photographs). You can download it here: http://research.microsoft.com/en-us/um/redmond/projects/ice/
1. Import - in my case, I used 5 individual images. There is a browse function which enables you to select photos from anywhere on your computer
2. Stitch - there are some interesting features built in to the software. It handles chromatic aberration, photo alignment, and even has a rudimentary camera movement detection/correction function.
3. Crop - invariably you will end up cropping your photo to get rid of uneven edges, unwanted foreground, and maybe too much sky. It also allows you to rotate your image to align properly with a grid. The program has a content-aware function that will fill in blank sections where the crop doesn't find any pixels in the original photo. Be sure the "Use Auto Completion" box is checked.
4. Export - You can specify which image format to use, where to stage it, and what level of accuracy you would like for the final image.
Once I had exported my final image as a large resolution .jpg file, I opened it in PS CC 2014 for some final editing.
Import
(Download)
Stitch

(Download)
Crop - "Use auto completion" box is checked
(Download)
Export
(Download)
Final - "Panorama - Burlington City Park in Winter"
(Download)
Feb 7, 2015 01:18:03 #

Feb 7, 2015 01:31:08 #
St3v3M wrote:
You're welcome St3v3M. It's easy software to use and turns out a great product (seamless stitching).Thank you for sharing.
Feb 7, 2015 01:32:06 #
Bob Yankle wrote:
You're welcome St3v3M. It's easy software to use and turns out a great product (seamless stitching).
Used it before, but nice to see a walk-thru. S-
Feb 8, 2015 07:51:44 #

Nicely detailed tutorial, Bob. Thanks for this. Your final pan photo turned out great.
Feb 8, 2015 09:04:20 #
Cotondog wrote:
Thanks for your kind words Cotondog. I believe in the old saying "Share the wealth".Nicely detailed tutorial, Bob. Thanks for this. Your final pan photo turned out great.
Feb 8, 2015 10:11:17 #
Thank Bob,
I saw JerryC41's post recently and had it in the back of my mind to check out when I had time. Thanks for explaining it so well. I see another day in front of the 27" iMac...... :D
I saw JerryC41's post recently and had it in the back of my mind to check out when I had time. Thanks for explaining it so well. I see another day in front of the 27" iMac...... :D
Feb 8, 2015 10:21:24 #
346pak wrote:
Thanks 346pak. You know what they say ...... there's no time like the present.Thank Bob,
I saw JerryC41's post recently and had it in the back of my mind to check out when I had time. Thanks for explaining it so well. I see another day in front of the 27" iMac...... :D
I saw JerryC41's post recently and had it in the back of my mind to check out when I had time. Thanks for explaining it so well. I see another day in front of the 27" iMac...... :D
Feb 8, 2015 12:31:08 #
Feb 8, 2015 12:51:12 #

Thanks Bob, this is a great program, lots better than the one I used before. and a walk through, even better. Cheers, Nancy p.s. your pano is super
Feb 8, 2015 14:30:42 #
yhtomit wrote:
You're welcome yhtomit. It cuts down on several steps from doing the same thing in Photoshop.Thank you.
Feb 8, 2015 14:31:54 #
Nancy J wrote:
You're welcome Nancy. One of things that Searcher wanted to do with the PP Forum was to review software that might prove useful to our viewers. This one certainly fits that description.Thanks Bob, this is a great program, lots better than the one I used before. and a walk through, even better. Cheers, Nancy p.s. your pano is super
Feb 8, 2015 14:35:50 #

Feb 8, 2015 14:38:03 #
NJFrank wrote:
You're welcome Frank. If you notice in my comment, you can download this for free. Maybe you can circumvent the bucket.Bob thanks for the post. I guess i have to add it to my bucket list. :)
Feb 8, 2015 17:47:21 #
Bob Yankle wrote:
You're welcome Frank. If you notice in my comment, you can download this for free. Maybe you can circumvent the bucket.
Well the bucket part of the list is to try my hand at it. OF course i could not complete the download. I am sure i missed doing something correctly to get it up and running
If you want to reply, then register here. Registration is free and your account is created instantly, so you can post right away.