need some help with group portrait
Dec 6, 2014 20:53:47 #
Hello eager, talented post processors!
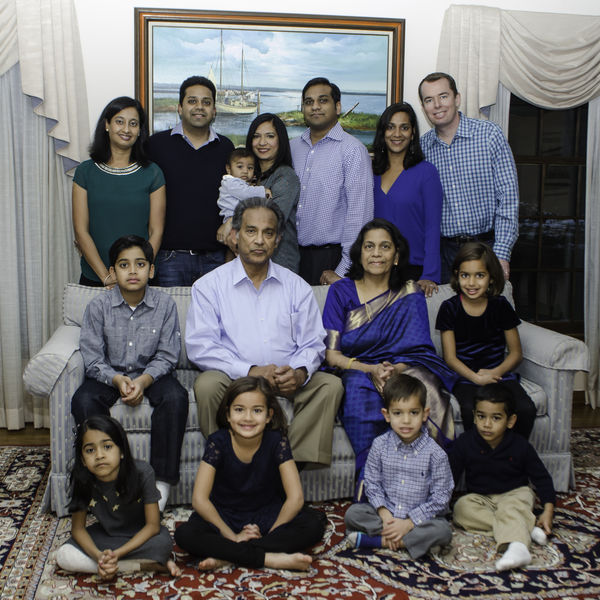
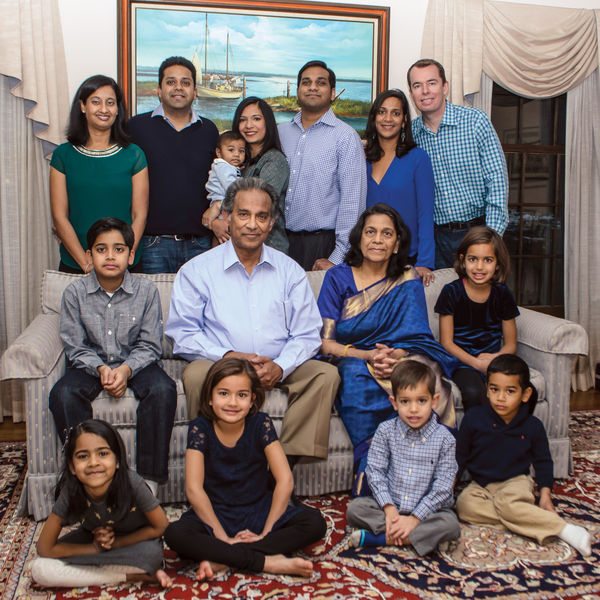
I'm attaching files of two shots I need to combine. I'm having trouble head swapping because of the similarity of the little boy's hair and the area behind him. The main image is 1466. I would like to cut the head of the little boy in image 1457 and move it to 1466. I'm also wondering if there is any way to correct the crooked armchair cover. Thanks so much for any help you can give me. I will be finishing the editing after the head is swapped to match the other images ordered. I'm happy to pay someone to help me with this.
I was going to attach PSD files but I see now that UHH doesn't take PSDs. I can't afford any file loss because this needs to be printed at 25x25 size. Any suggestions? I will attach the jpgs but I'm already dangerously low in pixels.

Dec 6, 2014 22:12:38 #
I was able to move the boy, but the arm cover i had lot of trouble.
I'm sure someone with more expertise will do better for you
I'm sure someone with more expertise will do better for you

Dec 6, 2014 22:23:29 #
Bob1190 wrote:
I was able to move the boy, but the arm cover i had lot of trouble.
I'm sure someone with more expertise will do better for you
I'm sure someone with more expertise will do better for you
Thanks for trying, Bob. When I tried it the boy ended up with TWO arms! lol
Dec 6, 2014 23:43:26 #
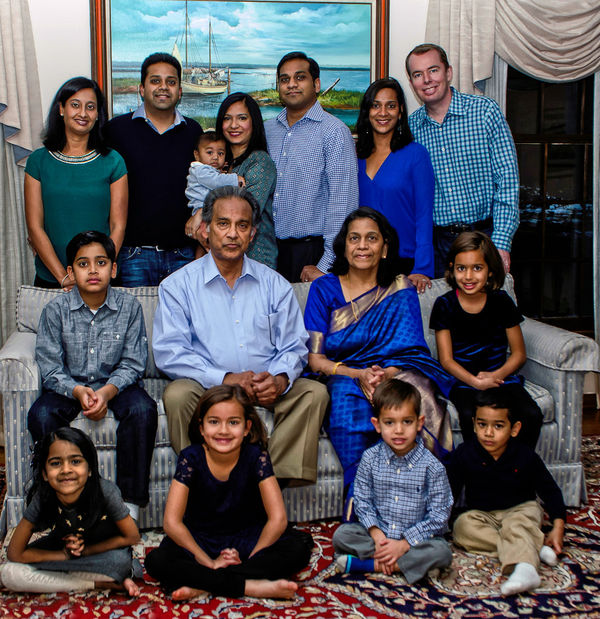
Had to give this one a shot, Donna, since photo "surgery" is something I always need practice on. And yes, the PSD would sure be better for editing... I did attach a small PSD here for test purposes, and it's possible to do that, but there's no preview and it probably has to be <20MB.
I took the liberty of adjusting what I perceive as a rather extreme cyan cast while I was at it, since my very first impression was that the skin tones needed some help... (and I hope it isn't just my monitor - whaddya think?)
I took the liberty of adjusting what I perceive as a rather extreme cyan cast while I was at it, since my very first impression was that the skin tones needed some help... (and I hope it isn't just my monitor - whaddya think?)
Dec 6, 2014 23:49:58 #
Dr.db wrote:
Had to give this one a shot, Donna, since photo &q... (show quote)
It looks pretty darn good, Dr.db! And HOW in the HECK did you straighten that arm cover????
When I tried to download it I got a tiny pic of a dog. ????
Dec 6, 2014 23:52:41 #
donnahde wrote:
It looks pretty darn good, Dr.db! And HOW in the HECK did you straighten that arm cover????
When I tried to download it I got a tiny pic of a dog. ????
When I tried to download it I got a tiny pic of a dog. ????
And yes, I do see the cyan cast now that you've corrected it. Nice job! I was so disappointed in much of this shoot - in that I had to crop so tightly because I didn't notice their curtains different on each side and I didn't notice my light bag on the right of the sofa on the floor which made me have to crop so tightly. Guess it was the 7 kids that threw me off my game. And I USED to be a child care provider! Ha! I'll have to auto white balance the rest of the shots from the session.
Dec 7, 2014 00:05:24 #
donnahde wrote:
The dog pic was just to test a PSD upload, so I guess that worked. :thumbup:It looks pretty darn good, Dr.db! And HOW in the HECK did you straighten that arm cover????
When I tried to download it I got a tiny pic of a dog. ????
When I tried to download it I got a tiny pic of a dog. ????
I cheated by grabbing a copy of the other arm cover, then flipping, rotating and distorting it into place, along with a good bit of cloning of course.
The cyan cast thing is something I learned to fix (and to notice!) from one of Photoshop guru Dan Margulis' books. It is SO simple, provided you can edit in CMYK. Just change to CMYK mode and drag a Cyan curve down in the middle by about 10 or so. And in addition to fixing skin tones, it usually fixes the rest of the shot also. Especially good for harsh casts from shooting under a blue, blue sky. Definitely a Photoshop "old-timer" trick from the print world...
Dec 7, 2014 06:44:41 #
Dec 7, 2014 07:12:26 #
Dec 7, 2014 07:38:21 #
Dr.db wrote:
The dog pic was just to test a PSD upload, so I gu... (show quote)
Simply amazing. And thanks for writing out what you did. I think I need a mentor standing right behind me to really learn that kind of post processing. I'll try uploading the PSD file just for fun. What size jpeg did that end up being?
Dec 7, 2014 07:51:58 #
donnahde wrote:
Simply amazing. And thanks for writing out what you did. I think I need a mentor standing right behind me to really learn that kind of post processing. I'll try uploading the PSD file just for fun. What size jpeg did that end up being?
Uploading the PSD did not work.
Dec 7, 2014 09:02:50 #
donnahde wrote:
Simply amazing. And thanks for writing out what you did. I think I need a mentor standing right behind me to really learn that kind of post processing. I'll try uploading the PSD file just for fun. What size jpeg did that end up being?
I think the size returned will be fine for printing at the size I need. Thanks again so very much. Can I compensate you? Feel free to respond by PM.
I have another image that has a spot of glare on a framed picture behind them that I've tried numerous things to remove or diminish. I doubt there's anything that can be done about it though. I definitely should have used my backdrops but they seemed to want it with their furnishings in a small dark room. Thanks again for what you've done.
Dec 7, 2014 09:27:24 #
Here is my adjustments on the photo . I also straightened out the photo some what because the painting was so tilted . Hope you like
Dec 7, 2014 09:54:24 #
MyPharo wrote:
Here is my adjustments on the photo . I also straightened out the photo some what because the painting was so tilted . Hope you like
Nice effort, MyPharo. Thanks for trying. I had straightened using the folds in the drapes. If you look at yours now the picture is straight but the drapes are crooked. Trust me, I went back and forth multiple times on the straightening issue. Yours is also much darker than Mrdb. The family seems to like the lighter images. Good job on that arm cover!! I'm amazed at anyone who can take care of editing like that!
Dec 7, 2014 12:58:29 #
donnahde wrote:
I think the size returned will be fine for printin... (show quote)
And thank you all for the compliments. No compensation is expected or required for something like this (although any of you folks can certainly feel free to visit my music website and mash the "Donate" button any time, no problem!).
If you want to reply, then register here. Registration is free and your account is created instantly, so you can post right away.