PS Controling noise reduction
Jul 17, 2014 18:16:07 #

When we reduce noise we introduce a systematic blur to the image that is usually (un)controlled by using empiric masking masking.
I am using a method that I recently got down pat using 'surface masking'.
The process is relatively simple once you realize that everything is concentrated on preparing the mask more than de-noising.
Noise is all over the image, there is no question but it is more visible in than dark than in the bright areas so the idea is to isolate the dark using a level mask then...
I hope you can follow through.
Open the image, do your global adjustments.
Place all the changes into a group including the background layer as a copy, duplicate that group. Open the group duplicate and merge everything onto one single image. This image will be the start of de-noising. Why create groups in order to do that? Simply for protection, there is no other purpose.
Un-select the 'real background layer'
Make sure the image in the group layer is selected, nothing else.
Create a selection using CTRL-Alt-3 twice
Create a mask from the selection by clicking on the mask icon
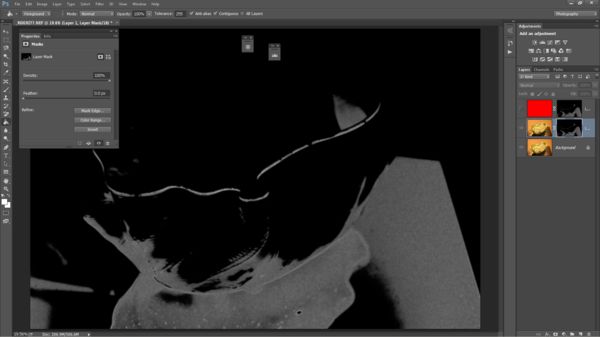
Activate the mask so that you work on it, not the image (ALT-Click on mask)
Use filter style find edge, adjust depending your picture (experiment)
Increase the mask contrast using Levels (CTRL-L) DO NOT USE ADD LAYER. Use the slider to increase the contrast so that the black area become more restricted and that the white expand.
Blur the mask slightly using Gaussian blur filter (2px usually works).
(Invert the mask (CTRL-I) This select the dark + area)
Deactivate the mask
If you want to check where your next adjustment will be used duplicate the layer and use a contrasty color fill (color bucked opacity 100, tolerance 255).
Now for the de-noising proper
Select Gaussian blur, apply as needed, you are done.
If you look at the corrected image most if not all the visible noise is gone and your image has not lost any of its sharpness in the highlight areas.
You can create an action to this with interactive options.
I am using a method that I recently got down pat using 'surface masking'.
The process is relatively simple once you realize that everything is concentrated on preparing the mask more than de-noising.
Noise is all over the image, there is no question but it is more visible in than dark than in the bright areas so the idea is to isolate the dark using a level mask then...
I hope you can follow through.
Open the image, do your global adjustments.
Place all the changes into a group including the background layer as a copy, duplicate that group. Open the group duplicate and merge everything onto one single image. This image will be the start of de-noising. Why create groups in order to do that? Simply for protection, there is no other purpose.
Un-select the 'real background layer'
Make sure the image in the group layer is selected, nothing else.
Create a selection using CTRL-Alt-3 twice
Create a mask from the selection by clicking on the mask icon
Activate the mask so that you work on it, not the image (ALT-Click on mask)
Use filter style find edge, adjust depending your picture (experiment)
Increase the mask contrast using Levels (CTRL-L) DO NOT USE ADD LAYER. Use the slider to increase the contrast so that the black area become more restricted and that the white expand.
Blur the mask slightly using Gaussian blur filter (2px usually works).
(Invert the mask (CTRL-I) This select the dark + area)
Deactivate the mask
If you want to check where your next adjustment will be used duplicate the layer and use a contrasty color fill (color bucked opacity 100, tolerance 255).
Now for the de-noising proper
Select Gaussian blur, apply as needed, you are done.
If you look at the corrected image most if not all the visible noise is gone and your image has not lost any of its sharpness in the highlight areas.
You can create an action to this with interactive options.

Jul 18, 2014 07:49:26 #

Nice but I will stick with Topaz DeNoise. I think it is the best one out there but that is only my opinion. Plus I think it easier to use. If you would like to see it they have good webinars on YouTube....Rich
Jul 18, 2014 08:14:58 #
Interesting, will have to give this a try and compare to Topaz. Now need to find a dark place to take a photo.
Jul 18, 2014 09:24:07 #
wtw2143
Loc: West Hempstead, NY
bigwolf40 wrote:
Nice but I will stick with Topaz DeNoise. I think it is the best one out there but that is only my opinion. Plus I think it easier to use. If you would like to see it they have good webinars on YouTube....Rich
:thumbup: :thumbup:
Jul 18, 2014 09:40:44 #

I like this approach as it targets only the noise.
I use something similar for sharpening, more work but better results for sure.
I use something similar for sharpening, more work but better results for sure.
Jul 18, 2014 09:53:41 #
One question, I have CS5,
"Use filter style find edge, adjust depending your picture (experiment)"
I don't have an option to adjust find edge, am I missing something?
"Use filter style find edge, adjust depending your picture (experiment)"
I don't have an option to adjust find edge, am I missing something?
Jul 18, 2014 10:28:28 #
lorenww wrote:
One question, I have CS5,
"Use filter style find edge, adjust depending your picture (experiment)"
I don't have an option to adjust find edge, am I missing something?
"Use filter style find edge, adjust depending your picture (experiment)"
I don't have an option to adjust find edge, am I missing something?
This is how it is in PS CC
Filter > Stylize > Find Edges
Jul 18, 2014 13:34:19 #
wtw2143 wrote:
I deliberately choose not to depend on add-ins or plug-ins as whatever they do can be done better, at no cost, once you gain the experience and knowledge....
This is about learning to fish vs buying it.
Jul 19, 2014 11:17:46 #
Searcher wrote:
This is how it is in PS CC
Filter > Stylize > Find Edges
Filter > Stylize > Find Edges
I don't get an option to fine tune, it just finds the edges it wants, I would like the option to find more edges.
I use that a lot but get different results with the same image a different sizes.
Jul 19, 2014 11:29:27 #
You can alter the mask by using it full screen (Alt-Click) on the mask.
You can also use style trace contour...
Just do not create a layer.
You can also use style trace contour...
Just do not create a layer.
If you want to reply, then register here. Registration is free and your account is created instantly, so you can post right away.