To Post-Process or Not Post-Process?
Apr 1, 2014 11:30:15 #

I'm somewhat "old school" and have resisted the temptation to tweak photos once they've been taken. Oh, I had a darkroom back in the medieval era, and really like developing and printing (mostly B&W), but I've stayed away from software to enhance the pictures I've taken.
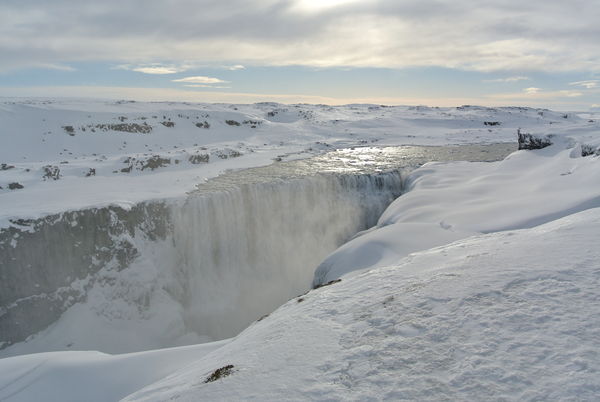
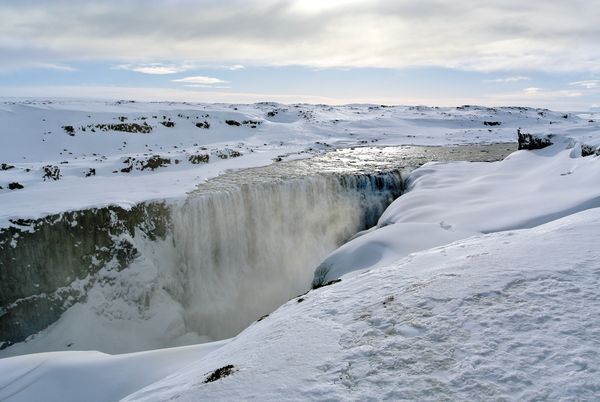
So, here I have a picture I took recently in Iceland. It was a fairly bleak day, but the sun was trying to peak through. The subject is the up-river waterfall (Selfoss) from the powerful Dettifoss.
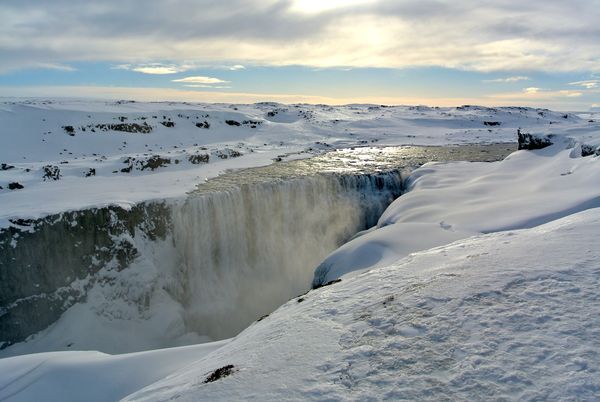
The first picture is how it looked originally, the second is after a bit of minor tweaking (saturation, mostly) in iPhoto.
While I like the overall look of the second better, I notice that some of the clarity in the sunlight and rock detail is washed away.
Comments? Suggestions?
So, here I have a picture I took recently in Iceland. It was a fairly bleak day, but the sun was trying to peak through. The subject is the up-river waterfall (Selfoss) from the powerful Dettifoss.
The first picture is how it looked originally, the second is after a bit of minor tweaking (saturation, mostly) in iPhoto.
While I like the overall look of the second better, I notice that some of the clarity in the sunlight and rock detail is washed away.
Comments? Suggestions?
Apr 1, 2014 11:39:45 #

I like your PP pic... good job!
You didn't "go overboard" with it. Looks natural and that's what I'm after inPP.
h2
You didn't "go overboard" with it. Looks natural and that's what I'm after inPP.
h2
Apr 1, 2014 11:41:10 #
The second photo is much better. The PP brings out some color and contrast which is lacking in the first photo.
Dennis
Dennis
Apr 1, 2014 11:41:19 #

Apr 1, 2014 11:45:36 #
Apr 1, 2014 11:50:34 #

You do not want to exceed maximum luminance values in either highlights or shadows, and you clearly have done that in the bright clouds for highlights and the dark rocks for shadows. This is not a matter of saturation (although increasing color saturation can drive extreme values on either end into clipping), rather it appears to be a matter of having remapped the luminance values using contrast or brightness manipulation.
I don't have a clue about iPhoto, but in Photoshop you can use levels or preferably curves to bring your highlights to their maximum and shadows to their minimum value without clipping them (in which case detail and tonal information is lost). From there you can make the whole picture darker or lighter in various ways without exceeding the max/min values (this is easiest in the curves window)--but it is important to have some indication of when the values are clipped. I don't know if iPhoto has something that will give you that feedback.
Alternately you can use dodging and burning tools to do spot adjustments of brightness, such as darkening the rocks on the left, without then driving the middle rocks into crushed blacks. Likewise lightening snow highlights without blowing out the sky.
There are many further adjustments possible, such as shadow and highlight adjustment, but you have to have software with such capabilities, and it is always better to start with raw images and convert to 16 bit for any adjustments, which will give you much more room to adjust without getting stairstepped tonality and banding.
Overall your processed image has much more punch, but I personally would not accept the loss of highlights and shadows the way you have done this.
Apr 1, 2014 11:52:06 #

#2 is gorgeous!
As for resisting software to enhance, remember that the jpg is already manipulated - whether by your choices (such as exposure compensation) or the camera's.
There is no shame in making a little tweak here and there to have your "natural" image look the best it can be :)
As for resisting software to enhance, remember that the jpg is already manipulated - whether by your choices (such as exposure compensation) or the camera's.
There is no shame in making a little tweak here and there to have your "natural" image look the best it can be :)
Apr 1, 2014 11:53:43 #

Apr 1, 2014 11:54:47 #
Welcome, Fred. I like the enhanced version. Not sure what camera you have, but many digitals have the option of enhancement in-camera using the Vivid (or comparable) feature. I don't think I'm ever happy with straight out of the camera shots and use PP a lot...maybe (as noted by some) way too much. ;-)
Apr 1, 2014 11:58:10 #

Apr 1, 2014 12:53:31 #
Thanks, everyone. I appreciate your comments. After I get accustomed to my new D7100, I may invest in PhotoShop or some such (I'll look for a thread with recommendations :) ).
And, since I forgot, here are the specs for the original photo: Nikon 1 J1, 1 Nikkor VR 10-30mm f/3.5-56, ISO 100, 10.7mm, 1/800, f/7.1.
And I also mistakenly identified the waterfall as Selfoss; this is actually Detifoss.
And, since I forgot, here are the specs for the original photo: Nikon 1 J1, 1 Nikkor VR 10-30mm f/3.5-56, ISO 100, 10.7mm, 1/800, f/7.1.
And I also mistakenly identified the waterfall as Selfoss; this is actually Detifoss.
Apr 1, 2014 15:08:54 #

Just Fred wrote:
On a subject like this one that is highly contrasted you need to apply your changes selectively.I'm somewhat "old school" and have resis... (show quote)
To add more contrast is an error. You need first to play with the exposure, it is slightly off. Then using levels you need a couple of selective adjustments to avoid blowing out the sky. From there the green cast can be removed from the snow.
I can post a variation from your edit, if you like.
Apr 1, 2014 15:10:28 #
Rongnongno wrote:
I can post a variation from your edit, if you like.
Sure! I'm here to learn.
Please post what you did, how you did it, and using what, if you will.
Thanks.
Apr 1, 2014 15:15:11 #
I use PS CC.
Import with ACR, correct exposure there (not much but it does influence everything)
Using levels I first adjust the image (I always do this first - for every image)
Using levels three times I selectively adjust what needs to be.
Using curves I removed the color cast (and left it in the shadow area).
Apr 2, 2014 10:07:02 #
Just Fred wrote:
I'm somewhat "old school" and have resis... (show quote)
Just to note. You don't have a choice as to whether to post process your image. If you can see it then it has been post processed.
The only question is whether you are going to be satisfied with the post processing your camera does, over which you have limited control, or are you going to invest the effort to control your image?
In this case your post processed image is a significant improvement but, as some have noted, with a little more practice and perhaps different software you can have your cake and eat it too on this image. That is, make it better with no loss of clarity. In fact, you can have it better and improve clarity.
If you want to reply, then register here. Registration is free and your account is created instantly, so you can post right away.