Color
Feb 27, 2014 15:58:33 #
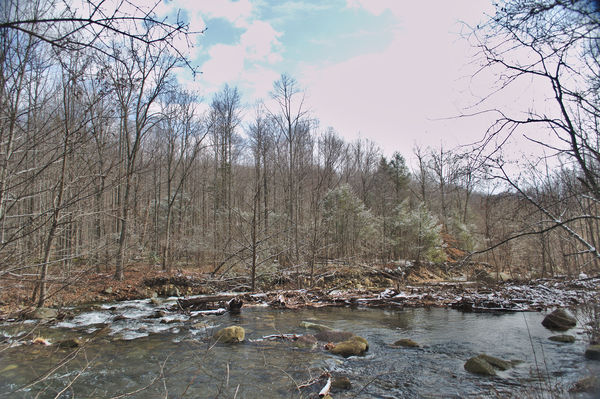
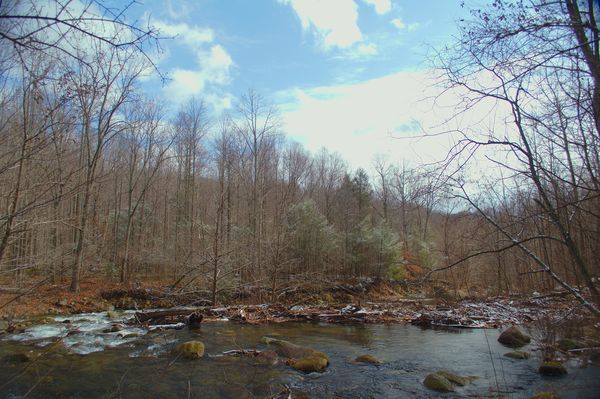
Took this one with a D90 and a 18-55 kit lens. I increased all the color saturations and increased the contrast. I don't like how blow out the sky looks, but I don't know how I would correct it.

Feb 27, 2014 16:10:02 #
If you have Picas or Light Room, it's an easy fix. It appears to be a little over exposed. Not having down loadable version. We can't what your settings were. Perhaps you might want to click the Store button, to make it down loadable.
Feb 27, 2014 16:16:01 #
Exif data
Camera Nikon D90
Exposure 0.01 sec (1/100)
Aperture f/5.0
Focal Length 18 mm
Focal Length 18.3 mm
Exposure Bias +1/3 EV
Flash No Flash
ISO Speed 100
X-Resolution 1
Y-Resolution 1
Subfile Type Reduced-resolution image
Orientation Horizontal (normal)
Software darktable 1.1.3
Date and Time (Modified) 2014:02:25 13:37:20
Reference Black White 0 255 0 255 0 255
Rating 1
Rating Percent 20
Date Time Original 2014:02:25 13:37:20
TIFF- EPStandard ID 1 0 0 0
Exposure Program Manual
Date and Time (Original) 2014:02:25 13:37:20
Date and Time (Digitized) 2014:02:25 13:37:20
Max Aperture Value 3.5
Metering Mode Spot
Light Source Unknown
Sub Sec Time 00
Sub Sec Time Original 00
Sub Sec Time Digitized 00
Color Space sRGB
Sensing Method One-chip color area
CFAPattern [Green,Blue][Red,Green]
Custom Rendered Normal
Exposure Mode Manual
White Balance Auto
Digital Zoom Ratio 1
Focal Length (35mm format) 27 mm
Scene Capture Type Standard
Gain Control None
Contrast Normal
Saturation Normal
Sharpness Normal
Subject Distance Range Unknown
Maker Note Version 2.10
Quality RAW
White Balance Auto
Focus Mode AF-A
Flash Setting Normal
White Balance Fine Tune 0 0
WB_ RBLevels 1.94140625 1.2109375 1 1
Program Shift 0
Exposure Difference -0.8
Flash Exposure Comp 0
ISOSetting
AAAAAA==
External Flash Exposure Comp 0
Flash Exposure Bracket Value 0.0
Exposure Bracket Value 0
Crop Hi Speed Off (4352x2868 cropped to 4352x2868 at pixel 0,0)
Exposure Tuning 0
Serial Number 3443201
Color Space sRGB
VRInfo Version 0100
Vibration Reduction On
Active D- Lighting Normal
Picture Control Version 0100
Picture Control Name Vivid
Picture Control Base Vivid
Picture Control Adjust Default Settings
Picture Control Quick Adjust Normal
Sharpness 4
Contrast Normal
Brightness Normal
Saturation Normal
Hue Adjustment None
Filter Effect n/a
Toning Effect n/a
Toning Saturation n/a
Timezone -07:00
Daylight Savings Yes
Date Display Format D/M/Y
ISOExpansion Lo 1.0
ISO2 100
ISOExpansion2 Lo 1.0
Lens Type G VR
Lens 18-55mm f/3.5-5.6
Flash Mode Did Not Fire
Shooting Mode Single-Frame
Lens FStops 5.33
Contrast Curve (Binary data 578 bytes, use -b option to extract)
Shot Info Version 0213
Firmware Version 1.00i
Shutter Count 5432
NEFCompression Lossy (type 2)
Noise Reduction Off
NEFLinearization Table (Binary data 624 bytes, use -b option to extract)
Color Balance Unknown
Lens Data Version 0204
Exit Pupil Position 97.5 mm
AFAperture 3.6
Focus Position 0x06
Focus Distance 3.35 m
Lens IDNumber 154
Min Focal Length 18.3 mm
Max Focal Length 55.0 mm
Max Aperture At Min Focal 3.6
Max Aperture At Max Focal 5.7
MCUVersion 156
Effective Max Aperture 3.6
Raw Image Center 2176 1434
Retouch History None
Flash Info Version 0103
Flash Source None
External Flash Firmware n/a
External Flash Flags (none)
Flash Commander Mode Off
Flash Control Mode Off
Flash Compensation 0
Flash GNDistance 0
Flash Color Filter None
Flash Group AControl Mode Off
Flash Group BControl Mode Off
Flash Group CControl Mode Off
Flash Group ACompensation 0
Flash Group BCompensation 0
Flash Group CCompensation 0
Multi Exposure Version 0100
Multi Exposure Mode Off
Multi Exposure Shots 0
Multi Exposure Auto Gain Off
High ISONoise Reduction Off
Power Up Time 2014:02:25 13:36:37
AFInfo2 Version 0100
Contrast Detect AF Off
AFArea Mode Auto-area
Phase Detect AF On (11-point)
Primary AFPoint Mid-right
AFPoints Used Mid-right, Lower-right
Contrast Detect AFIn Focus No
File Info Version 0100
Directory Number 100
File Number 0484
Compression JPEG (old-style)
XResolution 300
YResolution 300
Resolution Unit inches
Preview Image Length 109610
YCb Cr Positioning Co-sited
Light Switch LCD Backlight and Shooting Information
AFArea Mode Setting Auto-area
Center Focus Point Normal Zone
AFAssist Off
AFPoint Illumination Off
Focus Point Wrap Wrap
AELock For MB- D80 Unknown (0x18)
MB- D80 Battery Type LR6 (AA alkaline)
Beep Off
Grid Display Off
ISODisplay Show ISO Sensitivity
Viewfinder Warning On
No Memory Card Release Locked
Screen Tips On
File Number Sequence On
Shooting Info Display Auto
LCDIllumination On
Easy Exposure Comp Off
Reverse Indicators + 0 -
Exposure Control Step Size 1/3 EV
Center Weighted Area Size 8 mm
Fine Tune Opt Matrix Metering 0
Fine Tune Opt Center Weighted 0
Fine Tune Opt Spot Metering 0
CLMode Shooting Speed 3 fps
Exposure Delay Mode Off
Auto Bracket Set AE Only
Auto Bracket Order 0,-,+
Func Button Spot Metering
OKButton Select Center Focus Point
AELock Button AE/AF Lock
Command Dials Reverse Rotation No
Shutter Release Button AE- L On
Metering Time 6 s
Remote On Duration 1 min
Self Timer Time 10 s
Self Timer Shot Count 3
Playback Monitor Off Time 20 s
Image Review Time 20 s
Menu Monitor Off Time 20 s
Shooting Info Monitor Off Time 10 s
Flash Shutter Speed 1/60 s
Internal Flash TTL
Manual Flash Output Full
Repeating Flash Output 1/32
Repeating Flash Count 10
Repeating Flash Rate 10 Hz
Flash Warning On
Commander Internal TTLComp 0
Modeling Flash Off
Auto FP Off
Commander Group A_ TTLComp 0
Commander Group B_ TTLComp 0
Live View AF Normal Area
XMPToolkit XMP Core 4.4.0-Exiv2
Rating 1
Derived From DSC_0484.NEF
Xmp_version 1
Raw_params 0
Auto_presets_applied 1
History_modversion 1
History_enabled 1
History_operation sharpen
History_params 000000400000003f0000003f
Blendop_version 4
Feb 27, 2014 17:44:10 #
I don't know a way to fix blown clouds in the sky. A neutral density filter would have helped here, to place over that bright sky. Looks like the exposure was good, if slightly overexposed, for the water and trees, but the sky is way overexposed. If someone else knows how to fix this, I hope they can share it with you. If it were mine, I'd need to re-shoot. If you don't have a neutral density filter, expose for the sky, not the trees, and you can bring up the details in the dark areas much more easily than fixing something that is blown out.
Feb 27, 2014 17:52:34 #
If you wish I'm sure we could show how this will clean up. If you wish I'll do it in Picasa which is a free program from Google.
Feb 27, 2014 22:47:35 #
Two things.
A ND filter would not work because it would darken the whole image and your meter would put you back in the same place. A circular polarizer is often suggested in a situation like this, but again, it will darken the whole image. A graduated ND filter could be used to darken the sky and have little or no visible effect on the other elements.
The sky, besides being overexposed is very magenta. To correct this, you could try adding more green which will enhance the ground elements and the water. If your software provides a magenta adjustment, decreasing the amount will get rid of the magenta and also bring out more green in other elements.
Feb 27, 2014 23:26:45 #

Not enough info about the photo, could you give us a little more? :lol: Just giving you a hard time - I don't know enough about it to know more than about 10% of what all that means.
But I do know a fix in PP would make it an even nicer photo than it already is. :thumbup:
But I do know a fix in PP would make it an even nicer photo than it already is. :thumbup:
Feb 28, 2014 12:44:30 #
Thanks for all the hints. I started again with the RAW version, exposed as well as I could for the sky in one version and exposed for the trees in a second version. I used a Linux program Fotoxx to combine into HDR version. It came out better, but I need to do a re-shoot to make it better.
Feb 28, 2014 14:17:16 #
Curve_in wrote:
Thanks for all the hints. I started again with the RAW version, exposed as well as I could for the sky in one version and exposed for the trees in a second version. I used a Linux program Fotoxx to combine into HDR version. It came out better, but I need to do a re-shoot to make it better.
That's very nice work with what you had to start with. Looks much better. Do you have a graduated ND filter to take in the field for next time? Skies so often need some taming. :-P
Feb 28, 2014 14:30:42 #
Heirloom Tomato wrote:
... Do you have a graduated ND filter to take in the field for next time? ...
I don't have one of those. I do wonder how well it would work with a skyline that is not straight.
Feb 28, 2014 14:32:58 #
Curve_in wrote:
I don't have one of those. I do wonder how well it would work with a skyline that is not straight.
I wonder too. The kind that fades gradually might work better, and you would attach it at whatever angle best fits your horizon.
Feb 28, 2014 17:24:01 #
Curve_in wrote:
Worked on it a bit and this is what I came up with in Smart Photo Editor---hope it's OK...............Thanks for all the hints. I started again with the RAW version, exposed as well as I could for the sky in one version and exposed for the trees in a second version. I used a Linux program Fotoxx to combine into HDR version. It came out better, but I need to do a re-shoot to make it better.

Mar 1, 2014 11:12:33 #
coco1964 wrote:
Worked on it a bit and this is what I came up with in Smart Photo Editor---hope it's OK...............
That's great! Can you let me know what steps you took in processing?
Mar 1, 2014 13:23:21 #
Curve_in wrote:
Go into SPE and go to "Select Area", select sky from the options, fill in area you want to change with brush, click on confirm and then choose from hundreds of skies that you would like to replace and click on the one you want and hit confirm. I then went into "Image Tx" and worked with exposure and setting multiple sliders to get what you want the photo to look like. Go to upper left click on edit and save---when it has completed uploading to your pictures hit exit and you're done. The photo I did was done under 15 minutes and would probably looked better if I would have taken more time but just an example to show you the capabilities of the program and ease of use.........That's great! Can you let me know what steps you took in processing?
If you want to reply, then register here. Registration is free and your account is created instantly, so you can post right away.