How to show original and modified picture in CS6
Feb 1, 2014 06:50:22 #
Is there an easy way to show the original and modified picture in CS6?
I've made a copy of the original layer and switch back and forth it works but it doesn't show side by side.
I've made a copy of the original jpg and open both, it works well but takes up disk space.
Any other ideas?
Thanks,
Ed
I've made a copy of the original layer and switch back and forth it works but it doesn't show side by side.
I've made a copy of the original jpg and open both, it works well but takes up disk space.
Any other ideas?
Thanks,
Ed
Feb 1, 2014 08:11:16 #

OviedoPhotos wrote:
Is there an easy way to show the original and modified picture in CS6?
I've made a copy of the original layer and switch back and forth it works but it doesn't show side by side.
I've made a copy of the original jpg and open both, it works well but takes up disk space.
Any other ideas?
Thanks,
Ed
I've made a copy of the original layer and switch back and forth it works but it doesn't show side by side.
I've made a copy of the original jpg and open both, it works well but takes up disk space.
Any other ideas?
Thanks,
Ed
In any event, this is going to take up disk space. I tried this as an experiment, just to see if it would work, and it works fine. In your layer stack, click on the eye icon next to all the layers above the background layer to shut them down. Click on the background layer and do a Layer>Duplicate Layer and name this layer something like "Double View". Now, click on the Double View layer, and execute an Image>Canvas Size command and in the New Size, type in a new Width that is double the pixel size of the Current Size, Height the same as current. Click on the left center arrow - this will add the new pixels to the right side of your image, then click OK. Now, click on the layer with your final, edited version of the photo (usually the topmost layer). Put a rectangular Marquee around the edges of the photo, then execute Edit>Copy. Now, go back to the Double View Layer, and execute Edit>Paste. Using the Move Tool, drag the edited version to the right of the original version. Now crop the results of your side-by-side image.
Feb 1, 2014 12:34:28 #
Feb 2, 2014 06:14:39 #

Feb 2, 2014 09:58:10 #

OviedoPhotos wrote:
Is there an easy way to show the original and modified picture in CS6?
I've made a copy of the original layer and switch back and forth it works but it doesn't show side by side.
I've made a copy of the original jpg and open both, it works well but takes up disk space.
Any other ideas?
Thanks,
Ed
I've made a copy of the original layer and switch back and forth it works but it doesn't show side by side.
I've made a copy of the original jpg and open both, it works well but takes up disk space.
Any other ideas?
Thanks,
Ed
Extremely easy.
Make a copy of your edited photo.
Paste that into a new file.
You should have two tabs showing that you have two documents open.
Click on Window ► Arrange, and pick one.
The History panel is extremely handy for this task because you can go back in time, step by step, to compare edited photos to the original without taking up disk space. You don't have to save any specific edited copy unless you want to.
Feb 2, 2014 10:08:45 #
russelray wrote:
Extremely easy.
Make a copy of your edited photo.
Paste that into a new file.
You should have two tabs showing that you have two documents open.
Click on Window ► Arrange, and pick one.
The History panel is extremely handy for this task because you can go back in time, step by step, to compare edited photos to the original without taking up disk space. You don't have to save any specific edited copy unless you want to.
Thanks, I've been finding this method works best for me. Was hoping there was that "magic or hidden menu" button to save a step.
Feb 2, 2014 10:45:06 #
OviedoPhotos wrote:
Thanks, I've been finding this method works best for me. Was hoping there was that "magic or hidden menu" button to save a step.
So you want to go from three steps to two? How about one step? Create an Action that copies your edited picture, pastes it into a new document, and then arranges the windows into whatever configuration you desire. Then apply a keyboard shortcut to it.
One of my Actions takes the edited picture, reduces it to 559 pixels on the long side, zooms to fit-screen-magnification, adds a 10-pixel white border around the picture, zooms to fit-screen magnification, adds a 20-pixel black border around that, zooms to fit-screen magnification, and then saves the picture, stopping to ask me the name of the file I want to save as. I applied a keyboard shortcut to that, the F8 function key. So all I do is edit my picture to satisfaction and then hit F8.
Feb 2, 2014 11:54:15 #
russelray wrote:
So you want to go from three steps to two? How abo... (show quote)
Thanks, I don't want to appear ignorant but I have never gotten the hang of actions. I will try again today and see how I do.
Feb 2, 2014 12:15:30 #

OviedoPhotos wrote:
Is there an easy way to show the original and modified picture in CS6?
I've made a copy of the original layer and switch back and forth it works but it doesn't show side by side.
I've made a copy of the original jpg and open both, it works well but takes up disk space.
Any other ideas?
Thanks,
Ed
I've made a copy of the original layer and switch back and forth it works but it doesn't show side by side.
I've made a copy of the original jpg and open both, it works well but takes up disk space.
Any other ideas?
Thanks,
Ed
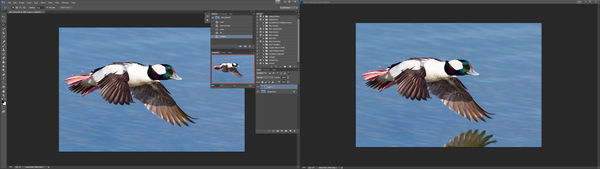
Use "Image">Duplicate. Put the duplicate image on the other screen or change view on one screen to be 2 vertical. Then do all the work on one or the other. Compare with the untouched version until you are done and then close the one you don't want without saving.
Here's an example of a duck that I captured the other day. The duplicate is on the right side with the reflection of the wing on the water and the left side is after content aware filling of the reflection so I can compare side by side.
Feb 2, 2014 12:56:39 #
OviedoPhotos wrote:
Thanks, I don't want to appear ignorant but I have never gotten the hang of actions. I will try again today and see how I do.
Actions have been around for a couple of decades, except in Word/Excel/PowerPoint and a few other programs, they were called Macros.
They are really easy. Make sure your Actions panel is showing, Window ► Actions. At the bottom of the Actions panel are your control functions: stop, begin, play, create. Create the Action, begin recording, do all the things you want to do, stop recording, and you're set.
They are huge time savers, especially if you do the same thing to, say, 500 pictures each day!
Feb 2, 2014 17:16:10 #
Feb 2, 2014 21:36:49 #
OviedoPhotos wrote:
Thanks jeepdaddy. This way actually worked the quickest for me.
Ed
Ed
You're welcome.
Feb 2, 2014 22:00:08 #
russelray wrote:
Actions have been around for a couple of decades, ... (show quote)
I used this to make a watermark in a few minutes. I did have a brush watermark but the one in an action seems so much simpler.
Thanks
Feb 2, 2014 22:00:12 #
russelray wrote:
Actions have been around for a couple of decades, ... (show quote)
I used this to make a watermark in a few minutes. I did have a brush watermark but the one in an action seems so much simpler.
Thanks
If you want to reply, then register here. Registration is free and your account is created instantly, so you can post right away.