Check out AI Artistry and Creation section of our forum.
A question for the group
Jan 15, 2014 00:57:01 #
texasdan78070
Loc: Texas Hill Country
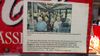
When taking pics of my die cast cars, the chrome appears to be 'blotched', but it isn't. It's not just me as I've had others tell me they have the same problem. Anyone have an answer or solution? Many thanks. I've attached a sample of my malady.

Jan 15, 2014 01:25:55 #
depth of field look. looks a bit soft focus. what was settings.
how close was you?
how close was you?
Jan 15, 2014 02:49:36 #
Check out Close Up Photography section of our forum.
Jan 15, 2014 03:10:23 #

if you would like the whole car in sharp focus use a higher f stop number like f 8 or higher. to clear up the chrome use a poloriser filter and adjust it so the chrome sparkles and the paint is tamed down so it has good color.
hope this helps
hope this helps
Jan 15, 2014 03:17:24 #
in the picture of the ford you have a very shallow depth of field the grill and front of the hood are in fairly sharp focus. the head lights and back are out of focus.
Jan 15, 2014 03:28:33 #
in your computer if you right click the photo and choose properies. click the detail tab at the top and scroll down it will tell you all the setting when the photo was took and just judging from the picture I would say it was probably taken with and f stop of f 1.8 or f2
Jan 15, 2014 04:04:43 #

What do you mean by blotched?
How did you light this one...I suspect that is a problem too.
How did you light this one...I suspect that is a problem too.
Check out True Macro-Photography Forum section of our forum.
Jan 15, 2014 06:10:12 #

rpavich wrote:
What do you mean by blotched?
How did you light this one...I suspect that is a problem too.
How did you light this one...I suspect that is a problem too.
I think rpavich has hit on the problem, Dan. Your lighting is too specular, too small of a light source. It may help to use a light box, an umbrella or a large white reflector to supply a more even lighting. You basically need a larger light source. The polarizer filter won't work unless you're able to polarize your light source as well.
In a different vein: I doubt they would polish the areas to be chromed on a die-cast model. It's probably cast in zinc, which doesn't polish well anyway. A close look at the bumper under a strong magnifying glass would likely reveal more flaws than are visible to the naked eye.
Definitely keep on trying, they'll keep coming out better and better!
:thumbup:
Jan 15, 2014 06:25:15 #
Some "clean-up" is possible in Photoshop, but it's not as good as just getting a better photo to start with...and it's very tedious work. I just did some basic, not getting real precise here.

Jan 15, 2014 07:40:01 #

Danilo wrote:
I think rpavich has hit on the problem, Dan. Your... (show quote)
Spot on! I tried photographing a diamond ring set in a gold band using a flash and each tiny nick in the gold bounced light around like a strobe--even though I couldn't 'see' the nicks. Diffused lighting would have made a huge difference if I'd had access to a diffuser. Would parchment paper held in front of a flash work? I rarely shoot indoors so have no clue how to compensate without buying user specific products.
Jan 15, 2014 07:44:38 #
dmeyer2m wrote:
Spot on! I tried photographing a diamond ring set in a gold band using a flash and each tiny nick in the gold bounced light around like a strobe--even though I couldn't 'see' the nicks. Diffused lighting would have made a huge difference if I'd had access to a diffuser. Would parchment paper held in front of a flash work? I rarely shoot indoors so have no clue how to compensate without buying user specific products.
Here is an easy solution to getting diffused images and even lighting on small stuff like this for cheap.
Get a cardboard box and cut all of the sides out but leave the corners about 2" each face...you are cutting big square "portholes" in the box.
Then tape tracing paper to the box on each side.
Put your lights on the outside of the box and viola! You've made a light tent for nothing.
This really cuts down on the lighting problems for small stuff like this.
http://digital-photography-school.com/how-to-make-a-inexpensive-light-tent
Check out Video for DSLR and Point and Shoot Cameras section of our forum.
Jan 15, 2014 07:49:07 #
you might try taking some photo's on the shady side of a building. another thing you might try is bounce flash at different setting or different distances
Jan 15, 2014 12:44:48 #
rpavich wrote:
Here is an easy solution to getting diffused image... (show quote)
Super, rpavich--thanks for the how-to and the link! I'm eager to get started and test it. :D
Jan 15, 2014 12:56:59 #
texasdan78070
Loc: Texas Hill Country
Thanks rpavich. Actually, I have a small light box but haven't been using it as it yielded the same results for me. I'll get it out and try some more pics with it and a polarizing filter and some other settings. Something has to work!!!
Jan 15, 2014 13:17:46 #

My first car was a 1950 Ford. Great experiences that ended up with me marrying the girl of my dreams/
If you want to reply, then register here. Registration is free and your account is created instantly, so you can post right away.
Check out AI Artistry and Creation section of our forum.