Check out People Photography section of our forum.
Got My Polaris Light Meter -- Any Suggestions?
Oct 30, 2013 18:02:48 #
photoman022
Loc: Manchester CT USA
My in camera light meter bit the dust quite a while ago and my manual way of figuring out exposure from my film days didn't work all that well. Reading the histogram I could get good shots, but I need the starting point to read the histogram, hence my purchase of the light meter. I lost too many good shots due to changing light and fast changing situations and (there were times) I didn't have the time to take two or three shots and view the histogram to get it right. I'm looking forward to playing with it and using it.
I never used a hand held light meter. I think I'll use it as a reflected light meter with my gray card. Do you have any suggestions as how to best use it? get the most out of it? etc?
I never used a hand held light meter. I think I'll use it as a reflected light meter with my gray card. Do you have any suggestions as how to best use it? get the most out of it? etc?
Oct 30, 2013 19:11:54 #
Oct 31, 2013 08:20:28 #
Use your meter in Incident mode for the best and most consistent results. Here's a link for a pretty good video explanation:
http://www.youtube.com/watch?v=bxfF6BGZ7SA
Note: outdoors you don't always need to stand by the subject. You may also stand at the camera position and measure the light. Of course the same light has to be falling on the subject and your position at the camera. If the subject in in shadow, and the camera in the sun, then you need to take a reading from the subject position.
I love using an incident meter. Have fun.
Check out Black and White Photography section of our forum.
Oct 31, 2013 13:42:35 #

Shakey wrote:
Use your meter in Incident mode for the best and most consistent results.
Note: outdoors you don't always need to stand by the subject. You may also stand at the camera position and measure the light. Of course the same light has to be falling on the subject and your position at the camera. If the subject is in shadow, and the camera in the sun, then you need to take a reading from the subject position.
I love using an incident meter. Have fun.
If the subject is in direct sun, you can use the meter in full sun but hold your other hand above the dome between the sun and dome for your reading. You never want direct sun light to hit the dome.
Oct 31, 2013 14:08:29 #
Los-Angeles-Shooter
Loc: Los Angeles
photoman022 wrote:
My in camera light meter bit the dust quite a whil... (show quote)
Depends on the situation but most of the time a hand held meter is most useful in the incident mode.
Oct 31, 2013 14:09:53 #
Los-Angeles-Shooter
Loc: Los Angeles
jeep_daddy wrote:
If the subject is in direct sun, you can use the meter in full sun but hold your other hand above the dome between the sun and dome for your reading. You never want direct sun light to hit the dome.
If the subject is in full sun you need to take a reading in full sun. No harm in letting direct sun hit the meter dome; in fact it's the only way to get an accurate reading in such a situation.
Oct 31, 2013 15:16:46 #
Check out Smartphone Photography section of our forum.
Oct 31, 2013 16:01:18 #
Los-Angeles-Shooter wrote:
If the subject is in full sun you need to take a reading in full sun. No harm in letting direct sun hit the meter dome; in fact it's the only way to get an accurate reading in such a situation.
Bull$hit. Check this video from Youtube. This is sponered by Sekonik company so the information is not wrong or they wouldn't support it. Go to 24:30 minute of the video for a quick view of why "specular bright spot on dome" will cause false readings; 1 1/3rd stop difference.
http://www.youtube.com/watch?v=i5rQJ-MTJio
Oct 31, 2013 16:04:35 #
Oct 31, 2013 18:32:04 #
photoman022
Loc: Manchester CT USA
Thanks for all the responses. I was out today in heavily overcast weather. I used it in both incident and reflecting modes -- some of the photos in incident mode weren't as good as the histogram said they were.
I'm on a new learning curve, but I was when I got my first (good) film camera 40 years ago.
The light meter told me f/4 after I punched in 1/125 @ ISO 400. It came very close to a good exposure. I would have had a hard time guessing the right exposure under the conditions.
Oh, please don't tell my wife I bought it! Thanks!
Oct 31, 2013 18:51:03 #
photoman022 wrote:
Thanks for all the responses. I was out today in ... (show quote)
how much money you got left? lol to sssshhhh
Nov 1, 2013 00:44:18 #

I don't have a light meter but have been studying their function as someday I would want to try one. Your response says you tried both modes but didn't really indicate which mode gave better results. You said incident mode did not do as good as the histogram indicated, but how did it compare to reflected mode? As a scientist I would also like to hear results with full sunlight in the two different modes, including results holding your hand over the bulb to block direct sunlight from hitting it, much the same I am thinking as with a camera lens hood, which is for preventing the flare effect. On the other hand, using incident light instead of reflected light would suggest that you need the light source, the sun, to hit the bulb, the only other possibility is to block direct sunlight and just read the whole surrounding light field. I have to admit it all sounds a little confusing.
photoman022 wrote:
Thanks for all the responses. I was out today in ... (show quote)
Nov 1, 2013 15:27:49 #
photoman022
Loc: Manchester CT USA
georgevedwards wrote:
I don't have a light meter but have been studying ... (show quote)
I'll be the first to admit that I didn't do anything close to a good analysis. I need to take photos under the same conditions, one reflected the other incident, and write down which is which.
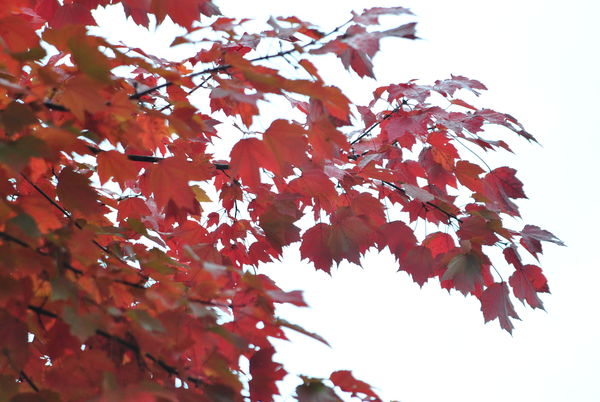
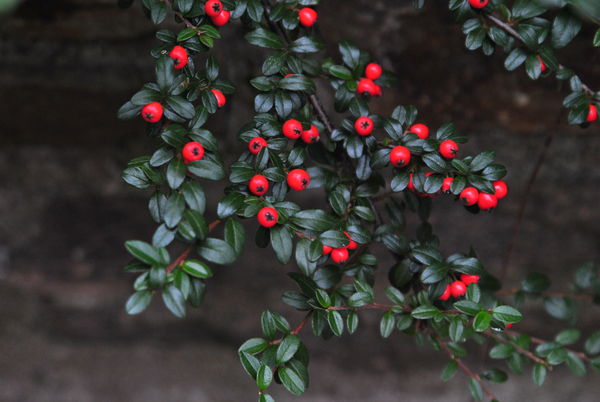
Looking at the photos (there were only a few), I think that the Polaris worked well in both settings. You have to remember that it was heavily overcast when I took the photos, something that always gives me trouble. I think that some of the problem was atmospheric conditions (as in the red leaves against a white, cloud covered sky). I used the incident setting for that because the leaves were too high to take a reflective reading. The berry bushes were taken with both modes (please don't ask me which was which, because I didn't write it down). I was just seeing how well it worked.
I don't claim any artistic beauty for any of these photos. They were part of my getting acquainted and familiar with my new light meter.
I really liked that it gave me a good starting point under adverse lighting conditions. I don't think I'd use it on a "Sunny 16" day because I pretty much know my camera settings in those circumstances, but I probably will experiment with under those conditions just to see what happens.
While I didn't take photos of those subjects, I did notice a one and two stop difference (between the modes) on some of the subjects off of which I just took light readings. I found that interesting.
BTW it was only $164 on ebay (with free shipping).
taken in the incident setting ISO 400 1/125 @ f/4
I believe this was taken in the incident setting (it not, then reflective) ISO 400 1/125 @ f/4
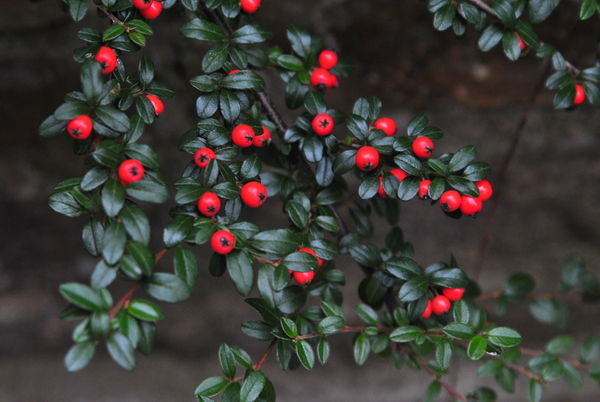
I believe this one was taken in the reflective setting (if not, incident). I walked around taking photos and decided to compare the different results. ISO 400 1/125 @ f/4
Nov 2, 2013 07:24:46 #
#2 does look like an incident reading, well it matches the kind of result that I get from my Incident meter.
Remember that your meter and your camera are two different tools. You have to experiment to find the settings that create the results you need. Here's a suggestion: set your ISO to 100, if you can do that. Select an aperture for the depth of field you need, f4 is good for the kind of subject you have above. With light falling on the subject (it does not matter if it's sunny or cloudy) take an Incident reading by pointing the cone at the camera position from the subject position. Now write theses settings in your notebook along with the subject. Set the speed indicated by the meter and take your photo.
Repeat the exercise by setting the shutter speed to what you want and the ISO stays at 100. Take a second reading from the subject and read off the aperture setting. Set your camera aperture to the same setting and shoot. Make notes.
Repeat the exercises with different subjects if time allows.
You can use any subject.
Upload your photos to your PC or laptop and check the results. You are looking for consistent exposure results. This means are your photographs consistently over-exposed, under-exposed or perfectly exposed? Compensate for any over or under exposure with your future settings.
Looking at #2 I would say that your Incident reading is spot on. But experimenting will provide the proof you need.
Good luck and have fun.
Nov 4, 2013 15:34:54 #
photoman022
Loc: Manchester CT USA
I really like my new Polaris light meter! The one thing I noticed today was that it let me get more detail in the roses I took today. In the past the reds weren't all that great -- they kind of blobbed into each other. I can actually see the detail in the roses!

If you want to reply, then register here. Registration is free and your account is created instantly, so you can post right away.
Check out Digital Artistry section of our forum.