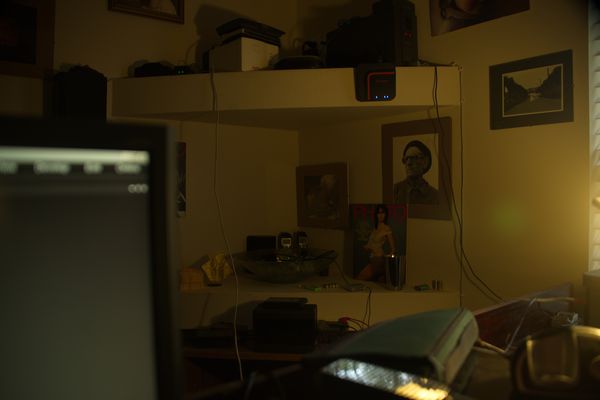
Grossly uuder exposed picture...
Aug 3, 2013 19:32:04 #

This is probably in the wrong area as I am not quite sure...
Post processing check.
Originally shot in RAW this was deliberately underexposed to check out some PS features.
What I wanted to create and correct first and foremost was noise and my camera apparently refuses to create noise!!! I also tried at 1250, no noise.
Lucky me.
Anyway, I corrected as if it had noise then did some manipulations to make the exposure and color balance right.
Lighting: Low wattage bulb and some daylight from the window on the right.
Camera is on cheap table top tripod.
My correction is very close to the original wall colors.
Upload: Original picture (converted to JPG)
and black image taken with the exact same settings.
DL size is 26.2 MB. I hope this site allows for that much space...
EXIF (You can get it from the DL option)
Camera D800e
Manual
SS 1/8
A 3.5
ISO 200
Ok, tried to upload the file but w/o success will compress it it more, sorry no 'original'
Since I had to compress the JPG I did not upload the black image as it would introduce a PP error.
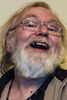
"Original, 90% level of compression"
Aug 3, 2013 19:38:04 #
Aug 3, 2013 20:03:34 #
Rongnongno wrote:
Can you correct this?
I will post my correction later on and explain a bit.
I will post my correction later on and explain a bit.
Not really sure what you are looking for - but I have changed exposure and "brought up" a couple of items.

Aug 3, 2013 22:05:39 #
What I am looking for is how will you correct this image to remove the color cast w/o fiddling with controls.
The result should the equivalent to daylight (5300k to 5600k).
I will have to find a way to create noise later as to show how it can be removed quickly and w/o change in the image quality.
The result should the equivalent to daylight (5300k to 5600k).
I will have to find a way to create noise later as to show how it can be removed quickly and w/o change in the image quality.
Aug 3, 2013 22:06:03 #
Aug 4, 2013 04:32:05 #
Rongnongno wrote:
My result is this...
Altered colour temp and added noise but cannot upload pic.
Result was as yours but with noise. Where is this going?
Aug 4, 2013 04:38:10 #
If you want an underexposed noisy photo increase your ISO to 1600 or even 3200, underexpose by several stops, in PP increase exposure to bring it round. the shadow areas will certainly show noise.

Aug 4, 2013 14:59:17 #
The noise thingy was about correcting it using a black frame. I was able to create it using 12500 ISO but THAT is not correctable!!!
Note that your noise is likely created because the picture is JPG due to the board limitation.
This thread is basically about finding a three zones onto a picture that appears to have none and use it in order to correct both the color cast and the exposure w/o creating any artifact, like the noise you mentioned.
This process uses layers and how to blend them.
To find a grey zone, white or black zone as this not limited to a singular zone.
1 - open the file (preferably RAW) JPG will do but it will more difficult
2 - create a copy of the background (Ctrl-J or CMD-J)
3 - Create a fill layer
-- Modify it as follow, using the menu
-- File edit - Fill
-- Fill options: Select 50% gray, select blend difference, click OK
-- Change the LAYER blend from 'normal' to 'difference'
(picture kind of look weird, almost like a negative)
4 - Create an adjustment layer (Threshold)
(Picture is black)
- Set the deep black
-- Slide the arrow slowly to the left (I use the number instead, more precise)
-- The first white pixels that appears are the deep black AND the white, to check which just un-check the visibility of the layer you are working on (remember to check it back to visible) YOU DO NOT WANT THE WHITE POINT!
-- Use the magnifier to enlarge the area, at pixel level (again for accuracy)
-- Right click on eye dropper tool and select color sampler option (or press I then shift-I -i- to scroll through the hidden tools)
-- Set sample average 3x3 is best and more accurate when selecting only one color (9 pixels sampling) A target with a little 1 will appear.
-- If you make a mistake just use ctrl-z or over the point until the cursor changes, right click and select delete
-- Reset the magnifier to fit screen
- Set the gray area
-- Slide the arrow all the way to the left
-- The first black pixels that appears are the grey area
-- Use the same procedure as above to set the gray point.
5 - Disable both threshold and fill layers (You can also delete them as they are not needed unless you want try other things using them)
6 - Create an adjustment layers
-- Using the eye dropper tool select first the black area, then the gray area.
-- Optional (depends on the final use of the picture) set output levels to 10 and 245
8 - Create a curve layer
-- Adjust RGB curve for luminosity
Aug 4, 2013 16:06:54 #

My question is why you would want to save that image. The best "fix" is the delete button
Aug 4, 2013 16:15:13 #

The image you posted definitely has noise in it..and some banding also when you raise the exposure 2.2 stops (which I did.)
Not saying that it's bad noise or horrible; raising an image +2 stops is bound to create some problems, but I was just saying that this image has noise in it.
Not saying that it's bad noise or horrible; raising an image +2 stops is bound to create some problems, but I was just saying that this image has noise in it.

Aug 4, 2013 17:58:20 #
Rongnongno wrote:
The noise thingy was about correcting it using a b... (show quote)
I followed you up to this point and then gave up- I don't know what you mean by "set the deep black" nor "slide the arrow.. . " What arrow? Transparency?
Quote:
- Set the deep black
-- Slide the arrow slowly to the left (I use the number instead, more precise)
-- Set sample average 3x3 is best and more accurate when selecting only one color (9 pixels sampling) A target with a little 1 will appear.
-- Slide the arrow slowly to the left (I use the number instead, more precise)
-- Set sample average 3x3 is best and more accurate when selecting only one color (9 pixels sampling) A target with a little 1 will appear.
The noise I added was simply a Photoshop filter "Add noise", you seemed very anxious to have some visible noise so I added some.
I had not realised the whole object of the exercise was then to remove the noise. I find that much easier to do in Lightroom.
Aug 5, 2013 19:59:37 #
Larrie wrote:
The best 'fix' as you put it to correct an image deliberately messed up, just for kicks. The only way to learn.My question is why you would want to save that image. The best "fix" is the delete button
Aug 5, 2013 20:08:51 #
Searcher wrote:
I had not realized the whole object of the exercise was then to remove the noise. I find that much easier to do in Lightroom.
Actually I was trying to fix two things:
1 - The noise (there is none so moot)
2 - Correct the exposure and adjust the color balance to daylight which means finding a gray area in the image w/o having a reference card shot to it.
The fix can be eye-balled using a combination of levels and curve adjustment but since I do not have a calibrated system I have to use another method that takes away the bias from the monitor and my own bias. Hence the method used.
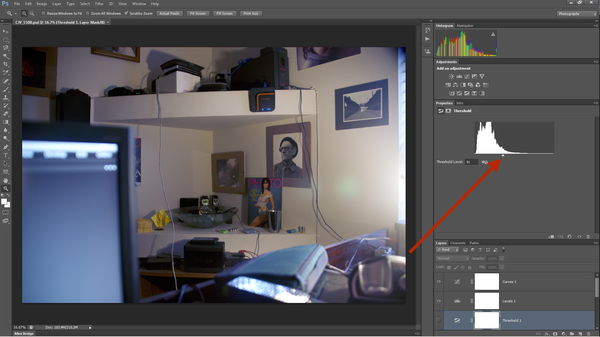
As to the arrow I mentioned, they are the sliders adjustment blow each. I am posting a screen capture with a red arrow pointing to it...
"Arrow" or slider...
Aug 5, 2013 20:19:13 #
I am sympathetic to your aims and fully understand the motivation and reasoning, though I certainly do not understand your method.
I also sometimes "rubbish" an image in order to find a way to repair it but I don't show it on the Hog, I know what would be coming.
To introduce various kinds of noise into this image is very simple, to remove is not always quite so easy. I know of two or three ways of doing this, but I confess I was unable to follow what you were doing after the type in my post.
If you would elaborate on "Set the Deep Black and slide the arrow. . ." I would be very interested in carrying on with this.
Aug 5, 2013 20:20:09 #
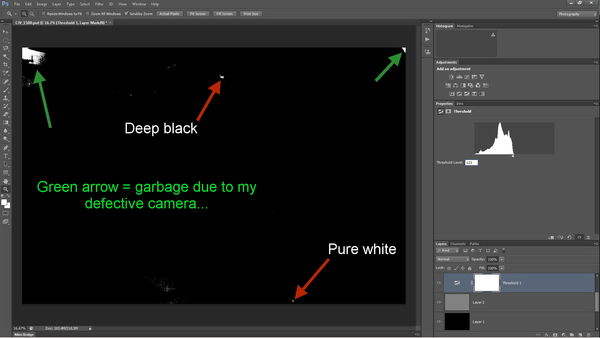
Setting the 'deep black'
This one is tricky as the pure white also appears...
Same thing a print screen may help understand better.
Note that the arrow (slider) is now slightly to the left. The numbers indicating the change is below.
This one is tricky as the pure white also appears...
Same thing a print screen may help understand better.
Note that the arrow (slider) is now slightly to the left. The numbers indicating the change is below.
Black
If you want to reply, then register here. Registration is free and your account is created instantly, so you can post right away.