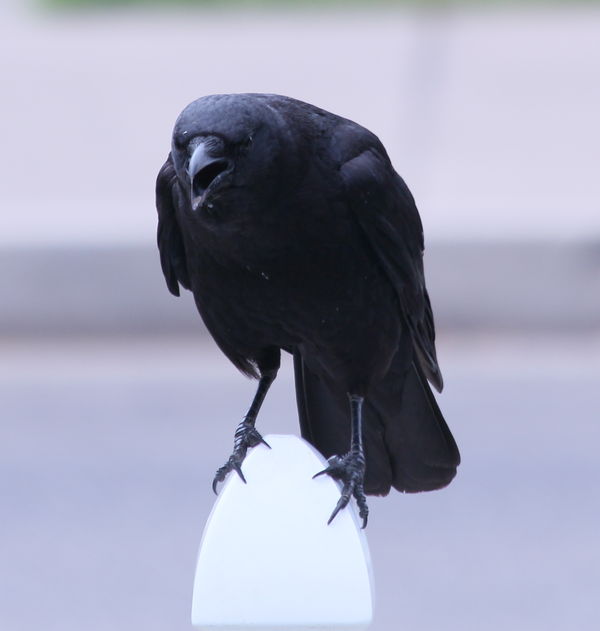
Dark bird-light background
Apr 28, 2013 14:48:41 #

Lost wrote:
This is a problem I often have, bird on a wire or on top of something with bright background. The rest of the picture is OK but the bird is too dark to see. 2nd photo is after I played with it. I would like to take a better photo not just fix it.
Canon t3i 70/300 lens at 300
P mode with single focas point
All auto 1/400 ,F 7.1 ,ISO 125, matrix metering.
Bright sunlight.
First time at this so feel free to tell me if I need to change the way I post.
Thank You Dennis
Canon t3i 70/300 lens at 300
P mode with single focas point
All auto 1/400 ,F 7.1 ,ISO 125, matrix metering.
Bright sunlight.
First time at this so feel free to tell me if I need to change the way I post.
Thank You Dennis
Change from matrix metering to spot metering on the bird. That should solve it. The bird will be properly exposed then but the background will be far worse over exposed. The disadvantage of shooting into the sky!
You may also have a program in your camera for strong background lighting. Use that too.
May 1, 2013 11:45:48 #
If your camera can do auto exposure bracketing, set one exposure value for the dark areas, and one for the light areas. Later when using your image editor, use each exposure as a separate layer: paste the exposure image for the light areas over the the image for the dark areas and use the history brush to "recover" the bird, wire, etc. If you set the exposure values properly, you should get pretty good results.
May 20, 2013 00:12:15 #

naturepics43 wrote:
Use some setting that gives you more control like aperature priority or shutter priority.
If your camera has exposure compensation, set it for +1.0 to start with. On a very sunny day I often use +1.7.
If your camera has exposure compensation, set it for +1.0 to start with. On a very sunny day I often use +1.7.
Simply using aperture OR shutter priority won't solve the problem - the camera will adjust the other and your exposure will be the same. A simple way to handle this is to make note of what settings the camera wants to use and then switch to Manual and use a combination of shutter/aperture that will give two more f stops worth of light.
May 20, 2013 08:11:39 #

Howard5252 wrote:
Simply using aperture OR shutter priority won't solve the problem - the camera will adjust the other and your exposure will be the same. A simple way to handle this is to make note of what settings the camera wants to use and then switch to Manual and use a combination of shutter/aperture that will give two more f stops worth of light.
Yes, you are correct. I did not type correctly what I was thinking. You must use a (plus) exposure compensation with aperature or shutter priority to get a better exposure on the bird. Here is the problem (as I see it) with "manual mode". When you have a partly cloudy sky and you adjust exposure for full sun and suddenly a cloud covers the sun, you must manually change settings to compensate.
May 20, 2013 14:14:25 #
Lost
Loc: Oakdale,Ca
Thanks for the comments. Update is that I have been using apeture priority with some success. Shutter priority has not worked for me. i have been ajusting the ISO and f-stop until the camera gives me the faster shutter speed I want. I have been using the settings in manual and had more and more success but I do end up with with some dark and some light as the light changes.
Dennis
Dennis
May 20, 2013 16:17:02 #
Let's keep it simple. Take note of what your camera settings are (f-stop & aperture) on AUTOMATIC. Then set camera to MANUAL and adjust either the f-stop or aperture to give you 2x more light. For example: If the auto setting was f11 @ 500th ... Use the Manual setting of f8 @500th. IF you want to keep the DOF at f11, slow the shutter to 250th. You could add some sensitivity to the ISO. My point is START with what the camera says and then go to manual to add some extra light going into the camera. Play with the camera before the birds get there - set up a dark object against a light background and PLAY.
May 20, 2013 17:43:03 #
Lost
Loc: Oakdale,Ca
Howard5252 wrote:
Thanks I will give that a try. Right now there is road construction next to the yard, even the blue jays have left.Let's keep it simple. Take note of what your camer... (show quote)
Jun 4, 2013 14:44:44 #

Lost wrote:
Thanks I will give that a try. Right now there is road construction next to the yard, even the blue jays have left.
An even better way (without having to adjust +2 or +3 or some arbitrary number of stops) is to use the palm of your hand to meter off of OR use some green grass.
That will get you close, possibly close enough that it's correct.
Jun 5, 2013 13:44:50 #
Lost
Loc: Oakdale,Ca
rpavich wrote:
As has been mentioned, you had a problem because o... (show quote)
I have improved but still having some problems. I need more practise. Have found out the T3i is a little hard to adjust with big hands while looking through the view finder. This shot needed a be a little lighter I think. Maybe F6.3?
1/200 F7.1 iso 200 spot metering
Jun 6, 2013 07:28:22 #
Lost wrote:
I have improved but still having some problems. I need more practise. Have found out the T3i is a little hard to adjust with big hands while looking through the view finder. This shot needed a be a little lighter I think. Maybe F6.3?
If you meter your hand, you should open up at least one F-Stop from the reading. Do not use the reading that you get from your hand - unless your skin is gray.
Jun 7, 2013 18:12:52 #
Dave333
Loc: Forres, Scotland
Lost wrote:
I used the suggested 5.6. I think the camera had me at 7.1 is that 2 stops?
Talking about stops can get confusing. Shutter speed remaining the same 1 stop difference of f5.6 is f11 (smaller) or f2.8 (wider). The difference between f5.6 & f7.1 is in the range of 1/3 to 1/2 of a stop difference.
My 2 penith of information for your prediciment is to select continuos on drive mode and select Ap. Set exposure bracketing to -2/3, 0, +2/3. Now whilst viewing your exposure scale use exposure compensation to set the -2/3 index mark to "0". now when you press the shutter you will take 3 shots at 0 compensation, +2/3 comp and 11/3 comp (1.33) comp. You should get a picture of decent sky and hopefully a decent picture of the bird.Merge picture of bird & pic of sky for pleasing overall picture without burnt out sky. You may need to increase bracketting space ( for brighter skys than we get in Scotland), You can use same principle using shutter priority (Tv).
If you want to reply, then register here. Registration is free and your account is created instantly, so you can post right away.