Posts for: R.G.
Apr 23, 2016 03:46:51 #
Billyspad wrote:
In case you missed it I replaced the sky. All done on PS. One wonders what the great folks on the Hog did before that nice Mr Adobe gave em
De Haze? Seems lately if its got pixels it must need De Haze lol
Distant mountains have haze built in, its natural so personally would not do a anything other than emphasize detail if your going for a natural look.
De Haze? Seems lately if its got pixels it must need De Haze lol
Distant mountains have haze built in, its natural so personally would not do a anything other than emphasize detail if your going for a natural look.
Thanks for contributing, Billy. I'd agree with what you're saying about removing haze altogether, but one thing haze does is leave things a bit on the bright side, and I'd say your edit would benefit from having the mountains darkened a smidge. Knock-out sky, though :thumbup: .
Apr 23, 2016 03:43:46 #
angela k wrote:
R.G., here's my try with your beautiful capture!
I adjusted color in PSE13 and added a painted sky, used Topaz Adjust and some Simplify.
I adjusted color in PSE13 and added a painted sky, used Topaz Adjust and some Simplify.
Thank you Angela. No problems with depth here. And the sky's very effective and appropriate for the scene.
Apr 22, 2016 15:36:45 #
Redmark wrote:
Yes, I get that, I don't know why it's not sending.Is there a add on or plug in to activate this, I have put in?
Sorry, can't answer. I don't use LR to send. My usual procedure is to upload from the destination end. I just make sure I have a suitably-sized file in the folder that I export from.
Apr 22, 2016 15:09:40 #
minniev wrote:
Thank you RG, it was wonderful late day light, but I used the heck out of Photoshop to get more from it.
It's taken me till now (better late than never) to realise that you seem to have softened the background and left the closer stuff un-softened and detailed - much in the style that we discussed previously.
Apr 22, 2016 15:00:45 #
Jim-Pops wrote:
......Hope some of this makes since.
Great job on the sky, Jim-Pops. I think the haze creates an impression of distance because it's what we're used to seeing. The up-side is that the detail behind the haze can be seen more clearly.
Apr 22, 2016 14:53:50 #
Redmark wrote:
While we are on this subject, I keep getting "failed to send email" in LR. So I follow the set up but there is something I am not doing correctly. Any ideas on procedure? Cheers
If you're trying to send a file that's too big for the internet destination it will result in a failed upload.
Apr 22, 2016 14:51:16 #
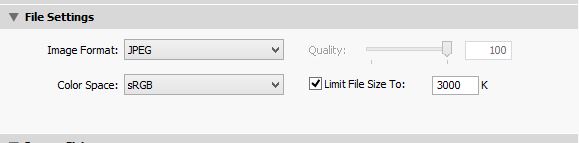
You don't need to worry about finding specific values of resolution. The simplest way is to check the box beside "Limit file size to" then choose a suitable value for your purposes.
In the snip I have 3000K ( = 3MB) because that's the setting I use for exporting to UHH when I want "Download" enabled. But for uploading on the internet I limit file size to 2000K (2MB) because that's a commonly requested file size limit.
-
In the snip I have 3000K ( = 3MB) because that's the setting I use for exporting to UHH when I want "Download" enabled. But for uploading on the internet I limit file size to 2000K (2MB) because that's a commonly requested file size limit.
-
Apr 22, 2016 14:29:50 #
Dngallagher wrote:
Without cutting anything out, and working with the existing sky, a little graduated filter to reduce exposure in the clouds and add some structure in Lightroom.
I see you found some details and colour in the clouds, Don. And a bit of de-haze?
(I'd call you DNG, but that would just get plain confusing :-) ).
Apr 22, 2016 14:26:40 #
Shellback wrote:
Here's a quick edit of the jpg version -
Nice sky, Shellback.
Apr 22, 2016 11:57:10 #
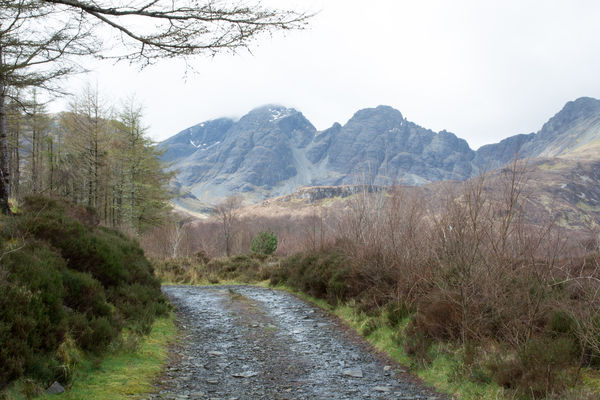
As shot, the sky's a bit flat. However, there is cloud detail in there to be brought out. Or perhaps you think a new sky is called for. Feel free to edit this in whatever way you think works best.
I'll post a link to a DNG under the JPG.
-
I'll post a link to a DNG under the JPG.
-
Apr 22, 2016 11:10:52 #
Apr 22, 2016 01:27:17 #
The main point is whether the highlights were blown or not. If they were, you'll have to resort to some very careful cloning (probably at much reduced opacity) just to get some data into the blown areas.
If the highlights aren't blown you'll obviously have to darken them, and the best way to do that is to lead with the Highlights slider (or some equivalent). It sounds like the sort of shot that would benefit from a global highlights reduction, but there'll be a limit to how far you can go with that. Beyond that you'll have to make careful selections of the highlights, and if you can, use feathering to match the rate of fall-off of the glare. Hard-edged selections won't work well with that sort of intense fall-off of light. Once you've made your selections you'll be able to make local adjustments that are less limited than the global ones.
Something I do a lot to selections is to lift the Shadows, lower the Highlights (both to the maximum) then use the Brightness slider as required. With the highlights and shadows subdued, any changes to the overall brightness are more likely to stay unnoticed and blend in more convincingly.
Apr 21, 2016 15:25:09 #
authorizeduser wrote:
.......I have tired single focus and continuous focus. If the dog is standing still I get very sharp photos. WHAT am I not doing right ......
What you're seeing as a focus issue is a shutter speed issue. Too slow a shutter speed and the subject will be soft regardless of how good or bad the focus was. A bit of motion blur on the legs won't look wrong and some might say it's a desirable thing, but if the whole subject is moving and there's camera movement on top of that, you need a fast shutter speed to prevent overall softness.
Apr 21, 2016 14:26:39 #
You say you went for a surreal kind of look - I'd say it looks like you captured the swamp on a really good day. Superreal rather than surreal (my favourite kind of editing).
Apr 20, 2016 06:51:40 #
PaulG wrote:
Hi, up there in Bonny Scotland. I've been around, ... (show quote)
I'll take it as a good sign that work is keeping you busy (and not the neighbour's cats lol).
The depth in the shot was intentional. I knew that if the weather wasn't favourable I'd have to work what I had, and when I saw that lit-up glen I knew I just needed a foreground subject to work with. Eye-catching backgrounds and attention-grabbing foreground subjects can work well together. That's the good thing about landscapes - the whole shot is the subject :-) .