Posts for: tenny52
Jul 28, 2020 01:55:10 #
Manny Jay wrote:
Try Picassa, it's free.
Go to "Create"
"Make Poster"
follow directions
(Let me know if it works. Thanks)
Manny Jay
Go to "Create"
"Make Poster"
follow directions
(Let me know if it works. Thanks)
Manny Jay
Thanks, it works with much easier operations.
Jul 27, 2020 18:39:55 #
Fotoartist wrote:
In Photoshop, crop 4 separate quadrants out of the overall image and make 4 separate files and print them separately. Use an Exacto knife and good straight edge along with spray mount. There are special graphic art techniques for doing this project perfectly which I won't go into here but you can get pretty close without them.
Yes, I don't have spray adhesive, so I use school glue stick of which the result is not bad.
My other problem is cutting the centre line of the prints to mate the picture, which is critical if the line falls on a portrait's face.
Too bad my chopper board can not cut the foam board, there is a bar to limit the thickness of material to be cut. I use a utility knife with an angle straight edge, the cut edge is not so ideal.
I probably have to learn more about the mounting picture technique from U-tube and invest on more tools.
To enlarge my print 4 times on PS, I use [New Guide Layout] to divide my prints into 4 quadrants, then select each quadrant and use [Layer via Copy] to bring it to a new layer and then use [Free Transform] to bring the quadrant to full size and Save. However, I have not figured out how to enlarge it to 2 times yet; any hint?
I laminate my laser color prints on the front side; the result is almost like costco gloss print. Of course, my laminate machines allows standard size only. I wonder if anyone use this method.
Jul 27, 2020 02:44:29 #
JohnSwanda wrote:
First of all, if you want to divide your photo into four 8x10s, it will have to be 4x5 proportion. Then under the View menu, you will find rulers, which will enable you to find the center of each side. Then you can use the crop tool to crop out each quadrant and save it as a separate file. Then size each one to 8x10 and print.
 do you think I need some excess to overlap? Since my printer cannot do it for me printing the picture into 4 pages as someone said his could, I hope some software can crop the picture into 4 equal quadrants by one button. Hence, I don't have to eyeball to set up the divide lines, crop and save my picture four times. It would be very tedious to perform such simple job, don't you think so?
Jul 26, 2020 21:52:37 #
spray adhesive onto Photoshop?
Let me rephrase my question, how to split my picture into 4 quadrants and then print them out in Photoshop?
Let me rephrase my question, how to split my picture into 4 quadrants and then print them out in Photoshop?
Jul 26, 2020 21:18:35 #
I only have a regular laser color printer, if I want to enlarge my picture into 4 pieces of (8x10)papers, and then post them onto a foam board, what is the best way to do it in Photoshop? Or by other freeware? Many thanks
Apr 5, 2020 06:12:14 #
Excuse my English interpretation: what I understand is the focusing onto the screw head, what is the big deal?
Are you using Auto or Manual focus, is this method better than lens calibrations embedded in the camera tool?
Are you using Auto or Manual focus, is this method better than lens calibrations embedded in the camera tool?
Dec 25, 2019 18:34:41 #
rebride wrote:
Open up Task Manager>Performance to see where the bottleneck is. Do while running the program as it is slowing down computer.
On my old Dell XPS with i5 6400 (and new XPS) it was the hard drive. A hard drive at 75% capacity is probably maxxed out as far performance goes. A SSD sure sped things up. I have 16GB memory and it did hit almost 14gb usage the other day, but that was a first. Probably my new camera.
The Dell XPS cases are a bit tight, but . . .
Agree! same thing happens to my Dell i5. It started to slow down when either CPU/Ram Usage is above 80%. After replacing the 8G to 16G Ram, it solved the problem.
On Task Manager, look out for the number Chrome applications, it could be numerous and use up a lot of Ram, so close off the unused applications and see the CPU/Ram usage goes down.
Dec 10, 2019 18:54:13 #
I shoot raw+jpg for the comparison of the processed raw vs camera-jpg
Nov 9, 2019 05:50:44 #
barbaradear wrote:
Thank you, thank you - I didn't expect such quick response - going to look at them all - thanks!!
for wider angle, try to shoot panorama and stitch them with freeware ICE. You could be amazed with the result without adding any new gear.
Nov 4, 2019 02:12:03 #
jerryc41 wrote:
Welcome to our forum!
1. Find an interesting subject.
2. Choose a good composition.
3. Be very steady, using something to support you and/or the camera, if possible.
1. Find an interesting subject.
2. Choose a good composition.
3. Be very steady, using something to support you and/or the camera, if possible.
4. shoot more frames at different angle, zoom and exposures(as P&S has less keepers due to missed focus, white balance, hand shaked esp when shutter is pressed); try to manipulate if your P&S allows the manual mode, exposure +/1 compensation, ISO buttons.
5. P&S is not limited to utilize free ICE software for panoramic shots(try to appreciate many of the good panoramic scenery shots are stitched); you will spend more time on each spot to do wide angle, zoom, and also panoramic shots.
6. If possible, try to view your captures on a largest possible monitors; I would say at least a 24"; let me warn you that the larger the monitor, the easier you will find faults in your shots.
I let other people to add to this list
Sep 27, 2019 19:12:29 #
Also if the pano frames include a lot of people, you may find some people appear twice on your final copy. So keep in mind if possible , if one frame has some people, the next frame should not have the same group of people or no people.
Sep 27, 2019 19:03:25 #
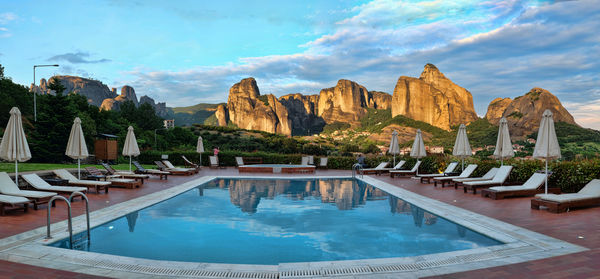
The first one is in Trikala, Greece, on top of those mountains resides one of the better known Monastery of St. Stephen.
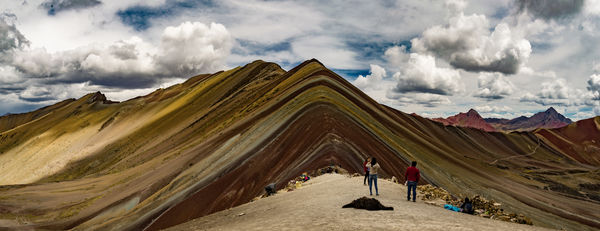
The lower one is Rainbow Mountain in Peru at 17,000ft. (very windy, can't set up tripod even if you have one)
They are all done by free hand, mainly because I need to travel light.
I switched from my D610 with 24-75mm to Fuji T-10 with 18-55 to shave 1 lb. I tried to rest my camera on some stable spot as possibly can, sometimes on my knees.
Sep 27, 2019 13:14:23 #
https://www.microsoft.com/en-us/download/details.aspx?id=52459
I use this ICE which is super-fast and has choices of modes.
After the process, a new file with _stitch will be appended to the filename.
Sometimes(30%), I still need PS to patch up some blank spots(usually the sky) and Free Transform(usually on buildings) to correct the perspective.
Allow me to show two of my best panos
Sep 27, 2019 05:35:03 #
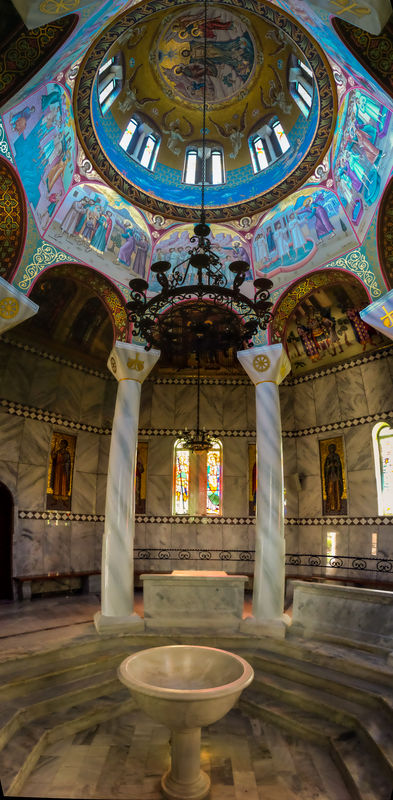
if you do pano for tall building, or the interior of a cathedral, you better do pano in landscape mold and pan upwards. 
Sep 3, 2019 16:07:46 #
Many years ago, I used flicker which was all free. I found that people could view all my uploaded photos regardless on what privacy/security settings. So I quit using it, I hope it improves but it is free up to certain number of photos, right?