Canon 5D MIV ISO question
Jan 25, 2019 07:44:52 #

Linda S. wrote:
Hi, I am an amateur. What does your above comment mean given 1/5000th is quite fast? Thank you in advance. Linda
Your shutter speed was set at this remarkably fast setting. That might stop a speeding bullet. The ISO is by necessity going to be high, in order to compensate. Your aperture is also much smaller than necessary, further exacerbating the problem.
Jan 25, 2019 08:26:15 #

Does your 5D4 body have high ISO noise reduction in the menus and was it turned on? You might also think about using the Canon DPP software for noise reduction in pp.
Jan 25, 2019 08:32:34 #
I've been using the Mark IV for over a year now. I really like how it handles the higher ISO. Much better than the Mark III. I think it will go up to 12,800 without any noise. I like the high ISO so much, I sold all my f/2.8 lenses and replaced them with f/4 lenses, 24-70 f/4 IS L USM and the 70-200 f/4 IS L USM. I recouped some $$$, the lenses are lighter to carry and the image quality is the same or better.
Jan 25, 2019 08:34:49 #
Photolady2014 wrote:
So, I have been using this for some time now and r... (show quote)
Honestly, I am not seeing a problem with these. I downloaded and looked with the magnifier. At that point I can see noise, but not objectionable. You should not be pixel peeping to see if they are "too noisy".
As Scott Kelby points out in his "Shoot Like a Pro" seminar, only the photographer notices noise. The viewer is looking at the subject, lighting, composition, and how the photo moves them. His further comment was that, on Monday morning, do the guys comment on "Did you see that pass QB whomever made?" or do they talk about how noisy the shot was? I think it will always be the former.
One other point I picked up on a blog is that the light still needs to be good - you can't just shoot in the dark (although your photos look like they were in good light).
You could try exposure compensation to a +.3 or +.7 in the backlighted situations you had, and then adjust in PS. I don't have a Canon, but have been very impressed by most photos on 500PX that were shot with the 5D - usually better shots than the ones from higher res cameras of competitors!
You might be able to improve the noise a little in PS, but remember that noise elimination is a kind of blurring of the photo to get rid of the "grain".
Jan 25, 2019 08:51:37 #
According to DXOMark's testing, you would be going backward with the Nikon 850 as far as low light goes. The Canon 5dMk4 is rated at 2995 ISO and the Nikon 850 at 2660.
I find high ISO with the 5D Mk4 to be very acceptable but if 10,000 is more than you can accept, why are you shooting at 1/5000 of a second? I shoot sports such as soccer, basketball and football from 1/400 to 1/1200 sec. depending on the lighting. 1/1000 of a second will stop all but the fastest movement and that would give you about 3 f stops lower ISO or about 1600 ISO. At 1600 ISO I find the 5D mk4 to be excellent.
Bill
Jan 25, 2019 09:31:30 #
The highest speed I've used for hummingbirds in bright light is 1/2000 with my 5DIV. I started having issues with focusing at the high end with my 100-400mm lens. At first I thought I was having lens issues due to age. I just got the camera back from Canon. The AV sensor and mirror were replaced. It still had a couple of months warranty on it.
Jan 25, 2019 10:02:31 #

it is hard to believe that you need 1/5000 in order to get these bird shots. depending upon the lens i.e. 500mm I believe you would get the results you are looking for a 1/600 or less.
Jan 25, 2019 10:46:17 #
AlfredU
Loc: Mooresville, NC
It should be pretty obvious to you by now, that the problem isn't with your camera and you do not need a Nikon 850. You probably do need a nice weekend workshop in bird or wildlife photography. It is a specialized type of photography and good instruction will definitely help you. I do a lot of this work and I do recommend Aperture priority. Shoot that Canon 100-400 wide open at f/5.6 too. It's made for that and will handle it beautifully. My rule of thumb for shutter speed is 1/250 to 1/500 for birds not flying and at least 1/1250 or higher for birds in flight. I keep track of my ISO myself, I never let my camera do it. And I rarely need to go over ISO 1600.
Jan 25, 2019 12:15:01 #
JFCoupe
Loc: Kent, Washington
After reading many articles about various cameras and ISO sensitivity, I think your expectation of not having noticeable noise at ISO = 10,000 is unrealistic. Yes, cameras can shoot at 25,000 and above, but generally there is not a need for this.
If you are going to be shooting evening light, using a monopod could help you keep your ISO significantly below 10,000.
Good luck with you African Adventure.
If you are going to be shooting evening light, using a monopod could help you keep your ISO significantly below 10,000.
Good luck with you African Adventure.
Jan 25, 2019 12:29:10 #
Linda S. wrote:
Hi, I am an amateur. What does your above comment mean given 1/5000th is quite fast? Thank you in advance. Linda
I will second JohnSwanda, 1/5000 is way too fast. It forces the ISO up to extreme levels. I use an 80D and a 5DIV and for sitting birds I use about 1/400 with my Tamron 150-600 G2 and will go down to 1/250 with my Canon 100-400L mkII raising it to 1/400 with the 1.4x. They both have good IS. Large flying birds like ducks etc in decent light I will go to anywhere from 1/800 to 1/1250. Hummingbirds I will go up to 1/2000 or 1/4000 in excellent light or up close with high speed sync on my flash.
Jan 25, 2019 12:30:12 #
amfoto1
Loc: San Jose, Calif. USA
First of all, Av is "aperture priority auto exposure mode". It makes little to no sense to ALSO use Auto ISO with that. It really only makes sense to use Auto ISO with M... which makes Manual yet another auto exposure mode (think of it as an "aperture AND shutter priority AE" mode). Using Auto ISO and Av together is sort of like a double auto exposure mode.
Next, shoot RAW. And avoid under-exposure. In fact, you might want to experiment with slight over-exposure (1/3 stop... 2/3 stop at most). RAW gives you the most latitude to make post-processing adjustments. And when it comes to image noise, it's always better to not have to increase exposure in post, because that amplifies any noise that's present in the image. Some cameras I've used in the past, I found with particularly high ISO images I got best results with slight over-exposure, pulling exposure back down in post-processing... I don't use a 5DIV yet, so can't say whether or not that would help with that model. You'll have to test it for yourself.
Shooting RAW there is no noise reduction being applied in-camera. That's a good thing! Instead apply it yourself more carefully in post-processing. How you do that depends upon the software you use for post-processing, just be sure to apply NR to the image early in the post-process workflow, while the image is still full size and 16 bit... and especially before doing any sharpening (which should be one of your final steps anyway, after re-sizing the image for it's final use).
I use Lightroom and Photoshop for post-processing. With all images, I let Lightroom apply it's default level of NR. With images that will be used small (such as online display), I might apply some additional NR in LR to higher ISO images. But if I plan to make a moderate to larger size print from an image or have some other higher use for it, I always pass it off to Photoshop for more careful and precise work. There I rarely use PS NR.... Mostly I use either Imagenomic Noiseware or Nik DFine, both set up as PS plug-ins (both also can be used as stand-alone, separate from other post-processing s'ware). Noiseware has a lot more options and I use it much more often.
Don't be overly critical of your images. Think in terms of the end use of them... what size and resolution they'll ultimately be... NOT how they look "at 100%" on your computer monitor. Think about it. The 30MP 5DIV's resolution is 6720 x 4480 pixels. On most modern computer monitors with a native resolution around 100 pixels per inch, when one of your images is displayed "at 100%", it's like viewing an almost 6 foot wide by almost 4 foot tall print from roughly 18 or 20" away! OF COURSE it looks like crap and every tiny flaw obvious, viewing it so ridiculously enlarged! Waaayyyy bigger than you'll ever use the image!
When you're evaluating your images for noise, focus accuracy, sharpness, etc., back off to a more reasonable size... something closer to how large you'll actually be using the image, whatever that might be. It's fine to zoom in to 100%, 200%, 300% or even higher if need be, to do precise retouching... but those levels of magnification are just silly for proper evaluation of your images. 25% or 33% make more sense... still might be oversize for a lot of uses (online display, for example).
Also, you might want to learn to use layers and masks in post-processing. This allows you to apply selective noise reduction, as well as selective sharpening and selective blurring effects. Often image noise isn't noticeable in sharp, detailed areas of an image... is more apparent in the out of focus, blurred areas and/or shadows. When you're able to do selective corrections to an image, much of this can be solved pretty easily. Not all software allows you to work with layers and masks, though. Lightroom doesn't, for example. But both Photoshop and Elements do.
I also agree with some previous responses... using a super fast shutter speed for your images is forcing you to use way higher ISO than necessary. All three of your sample images were done using 1/5000 shutter speed and with ISOs ranging from 3200 to 10000. You should be able to EASILY hand hold any of those shots at 1/500 shutter speed! 1/1000 at most. That's more than 2 or 3 stops slower shutter speeds, which would have allowed you to use ISO 800 to 3200 at highest for those images.
You also might want to add a Canon 1.4X III Extender to your kit and use it with the 100-400 for small subjects like these. That would allow you to do less cropping to your images (which is another thing that will magnify any noise or other flaws in your images). I am assuming here that you are using the "II" version of that lens. It works well with high quality teleconverters (the original or "I" version of it doesn't work as well with them).
When using a teleconverter with the lens, you'll lose a stop of light and the longer effective focal length will require you to use a bit faster shutter speeds. But "filling your viewfinder" better and cropping less will help offset those factors and it will be worth it, I'm sure.
Practice and experiment with these and other suggestions well before your trip, so that you're prepared to take once-in-a-lifetime shots when the opportunities arise.
Below is a low light, high ISO test shot I did with one of my Canon 7D Mark II (and the 100-400 II lens). It was shot at ISO 16000.
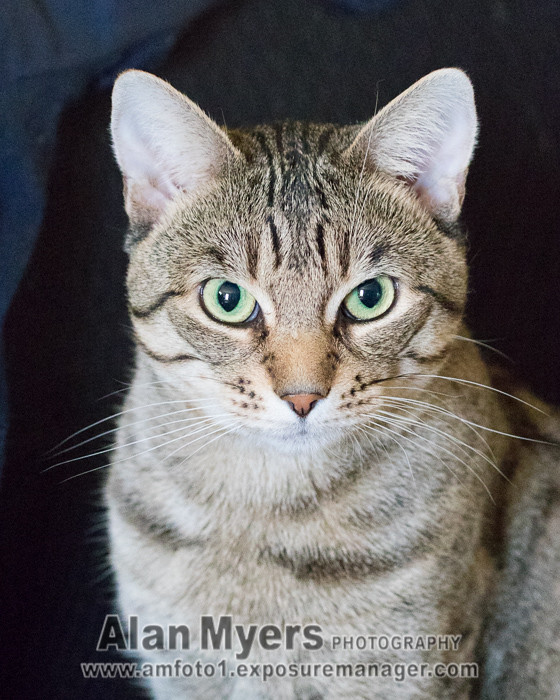
I shot this image RAW and was careful to avoid under-exposure. The only light sources were a 60 watt bulb and daylight from a small window, both roughly 8 to 10 feet from the subject. The lens was "wide open" at f/5 and I hand held the shot at 1/125 shutter speed (compare to the 1/5000 you used!)
This was intended to be a "worst case" high ISO test, so I DID NOT do my normal post-processing noise reduction to the image. I only let Lightroom apply its default level and never did anything to the image in Photoshop, which I normally would to finish it. I also slightly boosted the dynamic range of the image by increasing contrast and adjusting the black point (high ISO images also have less dynamic range and lower resolution.... sometime do a series of identical shots only adjusting the ISO and notice the difference in file size). Both of these adjustments should have increased the appearance of noise, if anything.
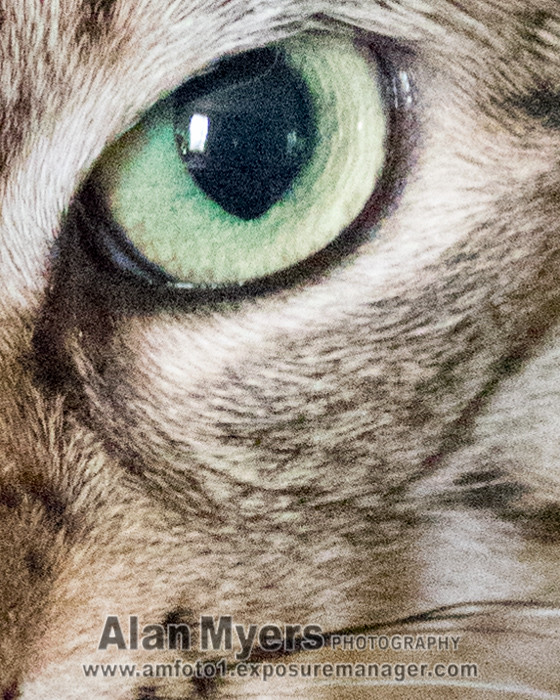
Yes, there IS noise in this image. The greatly enlarged detail below shows it (far bigger than I'd ever use the image). If you look at ANY image from ANY camera large enough, you'll find some flaws! In this case the noise "hides" pretty well in the sharper details of the subject's fur and, overall, really is pretty well handled, IMO. I'd have no problem making a quality 8x12" print from this image, if I wished.
I wish everyone shooting with modern digital could time travel back to the days when we were shooting film... highest ISO I used for color slides was 200... much of what I used was ISO 50 or 100! If I needed faster, I'd use color negative film that was ISO 400. Or I'd switch to black and white ISO 400 film that could be "pushed" to 800 pretty well, 1600 in a pinch, though it would definitely be grainy. Anything higher ISO than that saw serious loss of image quality and strong graininess. We didn't have image stabilization to help steady our shots in those days, either!
Next, shoot RAW. And avoid under-exposure. In fact, you might want to experiment with slight over-exposure (1/3 stop... 2/3 stop at most). RAW gives you the most latitude to make post-processing adjustments. And when it comes to image noise, it's always better to not have to increase exposure in post, because that amplifies any noise that's present in the image. Some cameras I've used in the past, I found with particularly high ISO images I got best results with slight over-exposure, pulling exposure back down in post-processing... I don't use a 5DIV yet, so can't say whether or not that would help with that model. You'll have to test it for yourself.
Shooting RAW there is no noise reduction being applied in-camera. That's a good thing! Instead apply it yourself more carefully in post-processing. How you do that depends upon the software you use for post-processing, just be sure to apply NR to the image early in the post-process workflow, while the image is still full size and 16 bit... and especially before doing any sharpening (which should be one of your final steps anyway, after re-sizing the image for it's final use).
I use Lightroom and Photoshop for post-processing. With all images, I let Lightroom apply it's default level of NR. With images that will be used small (such as online display), I might apply some additional NR in LR to higher ISO images. But if I plan to make a moderate to larger size print from an image or have some other higher use for it, I always pass it off to Photoshop for more careful and precise work. There I rarely use PS NR.... Mostly I use either Imagenomic Noiseware or Nik DFine, both set up as PS plug-ins (both also can be used as stand-alone, separate from other post-processing s'ware). Noiseware has a lot more options and I use it much more often.
Don't be overly critical of your images. Think in terms of the end use of them... what size and resolution they'll ultimately be... NOT how they look "at 100%" on your computer monitor. Think about it. The 30MP 5DIV's resolution is 6720 x 4480 pixels. On most modern computer monitors with a native resolution around 100 pixels per inch, when one of your images is displayed "at 100%", it's like viewing an almost 6 foot wide by almost 4 foot tall print from roughly 18 or 20" away! OF COURSE it looks like crap and every tiny flaw obvious, viewing it so ridiculously enlarged! Waaayyyy bigger than you'll ever use the image!
When you're evaluating your images for noise, focus accuracy, sharpness, etc., back off to a more reasonable size... something closer to how large you'll actually be using the image, whatever that might be. It's fine to zoom in to 100%, 200%, 300% or even higher if need be, to do precise retouching... but those levels of magnification are just silly for proper evaluation of your images. 25% or 33% make more sense... still might be oversize for a lot of uses (online display, for example).
Also, you might want to learn to use layers and masks in post-processing. This allows you to apply selective noise reduction, as well as selective sharpening and selective blurring effects. Often image noise isn't noticeable in sharp, detailed areas of an image... is more apparent in the out of focus, blurred areas and/or shadows. When you're able to do selective corrections to an image, much of this can be solved pretty easily. Not all software allows you to work with layers and masks, though. Lightroom doesn't, for example. But both Photoshop and Elements do.
I also agree with some previous responses... using a super fast shutter speed for your images is forcing you to use way higher ISO than necessary. All three of your sample images were done using 1/5000 shutter speed and with ISOs ranging from 3200 to 10000. You should be able to EASILY hand hold any of those shots at 1/500 shutter speed! 1/1000 at most. That's more than 2 or 3 stops slower shutter speeds, which would have allowed you to use ISO 800 to 3200 at highest for those images.
You also might want to add a Canon 1.4X III Extender to your kit and use it with the 100-400 for small subjects like these. That would allow you to do less cropping to your images (which is another thing that will magnify any noise or other flaws in your images). I am assuming here that you are using the "II" version of that lens. It works well with high quality teleconverters (the original or "I" version of it doesn't work as well with them).
When using a teleconverter with the lens, you'll lose a stop of light and the longer effective focal length will require you to use a bit faster shutter speeds. But "filling your viewfinder" better and cropping less will help offset those factors and it will be worth it, I'm sure.
Practice and experiment with these and other suggestions well before your trip, so that you're prepared to take once-in-a-lifetime shots when the opportunities arise.
Below is a low light, high ISO test shot I did with one of my Canon 7D Mark II (and the 100-400 II lens). It was shot at ISO 16000.
I shot this image RAW and was careful to avoid under-exposure. The only light sources were a 60 watt bulb and daylight from a small window, both roughly 8 to 10 feet from the subject. The lens was "wide open" at f/5 and I hand held the shot at 1/125 shutter speed (compare to the 1/5000 you used!)
This was intended to be a "worst case" high ISO test, so I DID NOT do my normal post-processing noise reduction to the image. I only let Lightroom apply its default level and never did anything to the image in Photoshop, which I normally would to finish it. I also slightly boosted the dynamic range of the image by increasing contrast and adjusting the black point (high ISO images also have less dynamic range and lower resolution.... sometime do a series of identical shots only adjusting the ISO and notice the difference in file size). Both of these adjustments should have increased the appearance of noise, if anything.
Yes, there IS noise in this image. The greatly enlarged detail below shows it (far bigger than I'd ever use the image). If you look at ANY image from ANY camera large enough, you'll find some flaws! In this case the noise "hides" pretty well in the sharper details of the subject's fur and, overall, really is pretty well handled, IMO. I'd have no problem making a quality 8x12" print from this image, if I wished.
I wish everyone shooting with modern digital could time travel back to the days when we were shooting film... highest ISO I used for color slides was 200... much of what I used was ISO 50 or 100! If I needed faster, I'd use color negative film that was ISO 400. Or I'd switch to black and white ISO 400 film that could be "pushed" to 800 pretty well, 1600 in a pinch, though it would definitely be grainy. Anything higher ISO than that saw serious loss of image quality and strong graininess. We didn't have image stabilization to help steady our shots in those days, either!
Jan 25, 2019 13:47:10 #

Photolady2014 wrote:
So, I have been using this for some time now and r... (show quote)
First, you don't need to use a shutter speed of 1/5000th. That said, you could have lowered the ISO and lowered your shutter speed and get less noise. But the woodpeckers don't really look too noisy to me so you might just be a little too critical.
But I am guessing that you know this by all the other comments about your high shutter speed. I shoot birds at about 1/1000th to 1/2000th of a second. Sometimes I shoot with a much lower shutter when the sun is going down. If I'm having trouble getting a sharp image using the low shutter speed, then I'll raise the ISO. Practice this technique and you'll get less noise and learn your camera buttons and how to change them on the fly better.
Jan 25, 2019 14:10:55 #

amfoto1 wrote:
First of all, Av is "aperture priority auto e... (show quote)
Thank you very much for taking time to respond. I am taking in what everyone is saying and will go out and work more and with a slower shutter speed!
Jan 25, 2019 15:16:32 #
This should not surprise you - ISO 10K is way too high. No camera is going to give you clean images at that setting. That being said it is remarkably clean for that ISO. I would be pleasantly surprised with this result.
Photolady2014 wrote:
Yes, I had the ISO on auto in AV mode. But regardless, the amount of noise at 10,000 ISO is what surprises me.
Jan 25, 2019 17:36:31 #
I have the Canon 5D Mark III and I never ever had the need to use anything higher than 400 ISO. The problem that I see here is that nowadays people want the camera to give them perfect images regardless of what they do without knowing anything about photography. People have to learn photography first before they start using any camera, of course, this is not going to happen, people will continue to look for the perfect camera that takes the perfect pictures without learning ANYTHING about photography. Good luck with that.
If you want to reply, then register here. Registration is free and your account is created instantly, so you can post right away.