Ugly Hedgehog - Photography Forum
Home Active Topics Newest Pictures Search Login Register
Main Photography Discussion
Night Photos - A Tutorial
Page <prev 2 of 5 next> last>>
Jan 20, 2019 18:23:33   #
Fred Harwood Loc: Sheffield, Mass.
 
rmalarz wrote:
Fred, I would guess they do. Since these were taken at 1/6 and .6 seconds respectively, they were definitely too slow a shutter speed to catch any variation is luminosity.
--Bob


Thanks. Wondered about the speed.

Reply
Jan 20, 2019 20:46:10   #
Einreb92 Loc: Philadelphia
 
Much obliged, my friend!

Reply
Jan 20, 2019 23:35:27   #
rmalarz Loc: Tempe, Arizona
 
You're welcome, Fred.
--Bob
Fred Harwood wrote:
Thanks. Wondered about the speed.

Reply
 
 
Jan 20, 2019 23:35:49   #
rmalarz Loc: Tempe, Arizona
 
My pleasure, Einreb.
--Bob
Einreb92 wrote:
Much obliged, my friend!

Reply
Jan 21, 2019 07:09:23   #
awis01
 
Thanks much! Excellent info. I know just the spot to try this on.
rmalarz wrote:
In a previous post, https://www.uglyhedgehog.com/t-574456-1.html , I was asked to provide a tutorial on how I approached taking these photographs. It's actually quite simple. I spot metered the brightest source of light in both scenes. These are denoted with a red rectangle in the two images posted here. After spot metering the lights, I increased my exposure 4 stops. This places those bright sources of light in Zone IX. This is white without any texture and similar to specular reflections (The reflection of the sun from a chrome bumper, or any shiny surface).

By increasing the exposure for those bright lights I also increased the exposure of the darker areas of the scene as well. This is all well and good, as I can then tone them back down in processing. Additionally, by exposing for the brightest light, the others, such as the neon lights were kept at an exposure that prevented them from being blown out or simply a smudge of color where in reality they are individual tubes of neon light. I attempted to retain that presentation as best I could.

I hope this explains the process sufficiently.
--Bob
In a previous post, https://www.uglyhedgehog.com/t... (show quote)

Reply
Jan 21, 2019 07:22:38   #
biry
 
Thank you. I am going to try this.

Bill

Reply
Jan 21, 2019 07:45:21   #
melueth Loc: Central Florida
 
Thanks very much for this Bob!

ML

Reply
 
 
Jan 21, 2019 07:58:16   #
grichie5
 
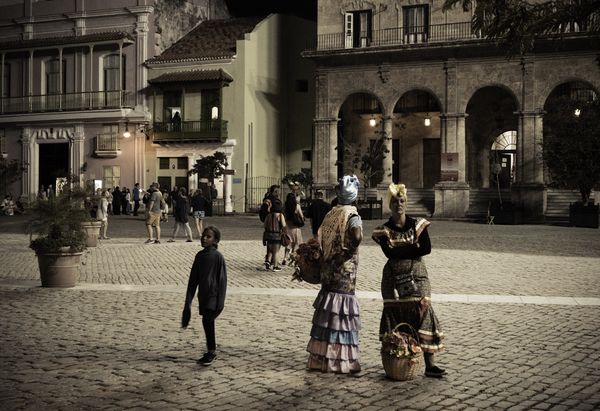
I have also enjoyed taking photos at night. They are usually taken with a F1.9 25 mm (50 equivilent) lens.
Metering is done by the camera aimed at the scene.
Attached is one recently taken in Havana.


Reply
Jan 21, 2019 08:06:21   #
Blair Shaw Jr Loc: Dunnellon,Florida
 
Thanks Mr. Bob......that was very informative and makes sense to me. Sometimes when we can't get our cameras to do what we want we need little tricks to overcome our lack of technical skill in special conditions like low light availability. I must learn to do some post processing soon to expand my abilities. Thanks again sir.

Jimbo

Reply
Jan 21, 2019 08:16:57   #
catchlight.. Loc: Wisconsin USA- Halden Norway
 
Good advise ...

But I think getting all in one shot is becoming less important today.

Bracketing is a better answer for night photography. I can't imagine today trying to get a single shot to capture it all. In the film days yes, but this is 2019.

ETTR and similar ideas are no longer valid in my opinion but, you do make a good point for understanding optimum exposure.


rmalarz wrote:
In a previous post, https://www.uglyhedgehog.com/t-574456-1.html , I was asked to provide a tutorial on how I approached taking these photographs. It's actually quite simple. I spot metered the brightest source of light in both scenes. These are denoted with a red rectangle in the two images posted here. After spot metering the lights, I increased my exposure 4 stops. This places those bright sources of light in Zone IX. This is white without any texture and similar to specular reflections (The reflection of the sun from a chrome bumper, or any shiny surface).

By increasing the exposure for those bright lights I also increased the exposure of the darker areas of the scene as well. This is all well and good, as I can then tone them back down in processing. Additionally, by exposing for the brightest light, the others, such as the neon lights were kept at an exposure that prevented them from being blown out or simply a smudge of color where in reality they are individual tubes of neon light. I attempted to retain that presentation as best I could.

I hope this explains the process sufficiently.
--Bob
In a previous post, https://www.uglyhedgehog.com/t... (show quote)

Reply
Jan 21, 2019 08:27:53   #
John from gpwmi Loc: Michigan
 
Thanks Bob. I printed it for future reference.

Reply
 
 
Jan 21, 2019 08:56:27   #
durango Loc: Marietta, Ohio
 
Thanks, I'm looking forward to giving this a try.
Lou

Reply
Jan 21, 2019 09:19:17   #
AirWalter Loc: Tipp City, Ohio
 
Thank You so much Bob for the link to this tutorial. Love that barber shop photo. I'll be watching for the updated post.

Reply
Jan 21, 2019 09:28:44   #
Blaster34 Loc: Florida Treasure Coast
 
rmalarz wrote:
In a previous post, https://www.uglyhedgehog.com/t-574456-1.html , I was asked to provide a tutorial on how I approached taking these photographs. It's actually quite simple. I spot metered the brightest source of light in both scenes. These are denoted with a red rectangle in the two images posted here. After spot metering the lights, I increased my exposure 4 stops. This places those bright sources of light in Zone IX. This is white without any texture and similar to specular reflections (The reflection of the sun from a chrome bumper, or any shiny surface).

By increasing the exposure for those bright lights I also increased the exposure of the darker areas of the scene as well. This is all well and good, as I can then tone them back down in processing. Additionally, by exposing for the brightest light, the others, such as the neon lights were kept at an exposure that prevented them from being blown out or simply a smudge of color where in reality they are individual tubes of neon light. I attempted to retain that presentation as best I could.

I hope this explains the process sufficiently.
--Bob
In a previous post, https://www.uglyhedgehog.com/t... (show quote)


Thanks Bob, appreciate it and what a great simple procedure

Reply
Jan 21, 2019 09:46:14   #
jerryc41 Loc: Catskill Mts of NY
 
Thanks for that.

Reply
Page <prev 2 of 5 next> last>>
If you want to reply, then register here. Registration is free and your account is created instantly, so you can post right away.
Main Photography Discussion
UglyHedgehog.com - Forum
Copyright 2011-2024 Ugly Hedgehog, Inc.