12,800 ISO Ilford HP5
Jan 7, 2019 10:35:09 #

E.L.. Shapiro wrote:
Thanks for your comment. Here's the drill on my p... (show quote)
Thank you VERY much EL - valuable information which I intend to implement the next batch of B&W I run.
Cheers
Jan 7, 2019 11:17:35 #

E.L.. Shapiro wrote:
Thanks for your comment. Here's the drill on my processing method. There is nothing exotic or expensive involved. ....
Living in Florida I find it difficult to adhere to the temperature controls that people are accustomed to use in colder climates. I do all of my B&W development at room temperature (under A/C between 70 and 77) and vary my development time according to the prevailing temperature.
In fact, I have been successful with much looser controls over the entire process. I don't use distilled water except with Photo Flow (I don't wipe the film at all) and a couple of the more finicky developers. I have a water softener that does an adequate filtering job for stop, fix, Perma Wash and final wash.
I don't have a problem with dust or particles during the development process but I have to be careful handling the film during scanning where, as a last resort, I occasionally have to spot the result.
I realize this may seem disturbingly careless to some but it works.
Jan 7, 2019 12:43:55 #
nadelewitz
Loc: Ithaca NY
RWR wrote:
Hopefully you'll have the good sense not to post pictures in the Main Photography Section.
Why not?
Jan 7, 2019 12:50:41 #

I like Thanks for sharing!
Crombie wrote:
Hi,
35mm HP5 exposed at ISO 12,800. The scale and density of the negs suggest another .5 stop is reasonable.
There's some interest to package this developer for online sale and so I can tell you the processing time is 1.5 hrs at 70F. Most important is some of the chemistry during mixing must be handled with great caution!!!
Jan 7, 2019 13:14:56 #

Good advice re NOT to squeegee your film after washing except what Ed does.
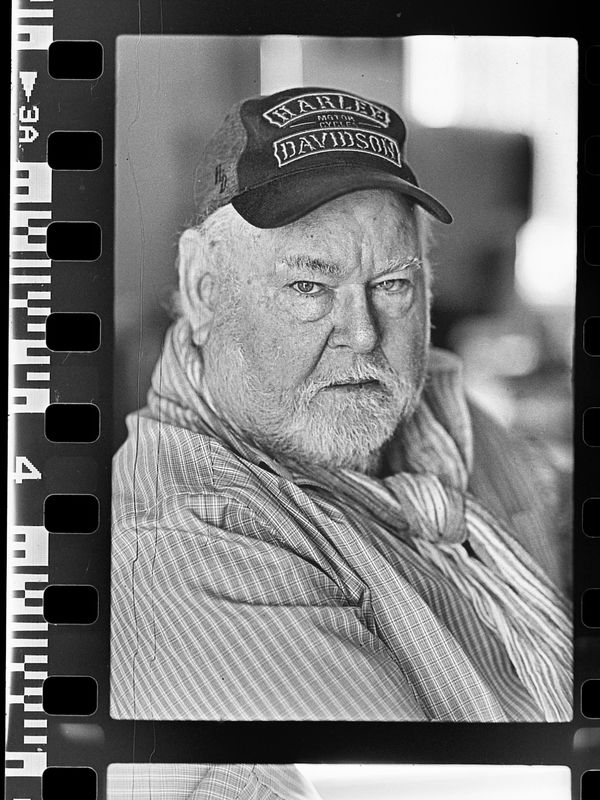
This shot of my close friend was also made at ISO 12,800.
This shot of my close friend was also made at ISO 12,800.
Jan 7, 2019 16:47:57 #

selmslie wrote:
Living in Florida I find it difficult to adhere to... (show quote)
Whatever method works for you! I am not telling anyone what to do. I only elaborated on my method because someone asked. I brought it into the discussion when Crombie mentioned a lengthy development time and I wanted to get his take on the matter.
My method was geared to make very large prints on a condenser enlarger and found that the grain structure and sharpness were vastly improved in 24x30 and 30x40 prints made for 35mm and roll film negatives. Nowadays, I can do that on digital with no issues. Mind you, we were processing between 50 and 100 rolls per week at one time- in batch of 9 rolls each run in 3 1/2 gallons tanks so we had to be very careful, especially about scratches and spotting- I hate spotting!
As far as temperature control- I worked in South East Asia with very hot ambient temperatures. We were processing special aerographic films and were able to bring down the temperature to 68 degrees. The color materials, however, required 100 degrees- that was easy at room temperature!
I'm sure that somebody somewhere is washing their film in swamp water. When I worked at a newspaper there were guys processing their film in Dektol 1:1 for a couple of minutes- dumping it in rapid fixer, giving it a quick rinse and drying it in in alcohol or printing in wet in a glassless carrier. To each their own!
Funny! Whenever I post a cautionary concept in answer to a question- like folks with old flash units concerned about high trigger voltages for there new digital cameras or how to properly discharge a flash capacitor before attempting to repair a strobe- someone always comes on and with a shortcut! "Who needs a resistor?- just get a big old screwdriver and BANG"! OR "It's OK, A Nikon can tolerate 200 Volts"- Bang? Maybe! Then again, my grandmother never cooked or baked by measuring or weighing anything. Her stove had no temperature adjustment- it was either on or off! Yet- I never again tasted cooking or baking as good as grandma's! I'm very precise in the kitchen but my wife usually keeps me out of there and the cat won't even eat my cooking. I do great job of washing the dishes though!
By the way gang- Crombie knows his onions- if he says it's 12,800 it's 12,800! Stay tuned!
Jan 7, 2019 17:05:24 #
E.L.. Shapiro wrote:
Whatever method works for you! ...
By the way gang- Crombie knows his onions- if he says it's 12,800 it's 12,800! Stay tuned!
By the way gang- Crombie knows his onions- if he says it's 12,800 it's 12,800! Stay tuned!
I get all of that. You might also be aware that it seawater makes a good film wash.
But there are still two ways to look at film speed. Kodak and Ilford did not agree with each other or with anyone else. See also: A Practical Guide to Film Characteristic Curves.
The Massive Development Chart is full of contributions where the film speed was measured based on middle gray, not FB+fog. One person's version of 12,800 might be measured as 3200 by someone else.
Jan 7, 2019 17:46:48 #
selmslie wrote:
I get all of that. You might also be aware that i... (show quote)
True enough! Old ASA ratings and current ISO ratings were and are determined under laboratory sensitometric conditions. In theory, you can not push the film beyond these "standards" or some of the intrinsic characteristic will differ or becom altered. Once you get into so-called push processing, dynomite developers, all kinds of additives, homebrews and othere shenanigans the ISO designation goes out of the window and each photogrhaer or operator establishes his or her own EXPOSURE INDEX! Even the zone system involves major deviation from the norms.
I remember whe some decade ago, Kodak suddenly increasd all their published film speed for all their black and white negative films by 100% There was not change the emulsions or or did actually boost the speed in any way. It's just that they issued the ratings with a "SAFETY FACTOR" in that an overexposed negative was easier to salvage for a print that an underexposed one. So-called professional films were packed with instructions that suggested that photographers establish their own exposure indexes based on their equipment and working methods. The folks at Weston- the famous exposure meter maker of that era, had their own exposure indexes.
There are probably 20 ways of looking at film speed.
In the end- the final images tell the truth!
Jan 7, 2019 18:13:51 #

Crombie wrote:
I'm not an alchemist, but after years of experimen... (show quote)
Join and post your findings here. All of them would be extremely interested:
https://www.photrio.com/forum/
Jan 7, 2019 19:42:45 #

in my long past experience, Ilford FP 5 developed in microdol 110 tested out to be ASA (ISO?) 250 (not even coming up to the ASA 400 advertised film sensitivity). If you can wrench ISO 12. 500 from the same film , with good tone range and minimal grain, you may have revolutionized B&W photography.
Handled with great caution you say, Why, explosive? off-gas noxious stuff? poisonous?
Handled with great caution you say, Why, explosive? off-gas noxious stuff? poisonous?
Jan 7, 2019 20:07:11 #
VTMatwood wrote:
1.5 hours of developing time... what is the agitation schedule for that duration? My arm would get tired!
I wonder if this is a good application for a motorized drum rig like the Jobo. 1-1/2 hour developing film in custom mixed chemistry. I remember pushing Tri-X in the 1960's 3 stops for dim lit HS Basketball, so 5 stops for a good emulsion like HP5 50 years later--I'm a believer.
What's hard to believe is in 2019, is WHY??????????????????? This sounds like a good argument for high ISO Digital.
Jan 7, 2019 23:29:06 #
Hi, this ISO 12,800 is for real and I've been at this for a long time and I hit upon this by pure accident by trying something unconventional, even a tad radical.
The hazard issue is handling the unmixed chemistry, once mixed it's more or less okay if handled with a bit of extra caution, and no it's not explosive.
You can see scratches evident on the left side of photo, this happen as a result of extended time in solution which softens and causes swelling of the emulsion. So, take Ed's advice or just air dry without heat.
Jan 8, 2019 04:15:05 #

Crombie wrote:
Good advice re NOT to squeegee your film after washing except what Ed does.
This shot of my close friend was also made at ISO 12,800.
This shot of my close friend was also made at ISO 12,800.
See how the rebate edges of the film aren't actually black...they are black-ish-grey because of the lightening during scanning?
Can you lower the brightness or exposure of your neg so that the clear part of the film is black (matching the sprocket holes) and then repost?
I'm curious about that.
It's sort of like making a darkroom "proper proof sheet" to see how your exposure actually is.
Jan 8, 2019 04:24:08 #
Also, can you just take a picture of the neg and post that? I'm interested in what it actually looks like, not a scan. Just put against a window with a piece of paper behind it or something or put it on a light table. I'd be interested to see how much detail is in the shadow areas.
Jan 8, 2019 04:47:09 #
rpavich wrote:
See how the rebate edges of the film aren't actually black...they are black-ish-grey because of the lightening during scanning?
Can you lower the brightness or exposure of your neg so that the clear part of the film is black (matching the sprocket holes) and then repost?
I'm curious about that.
It's sort of like making a darkroom "proper proof sheet" to see how your exposure actually is.
Can you lower the brightness or exposure of your neg so that the clear part of the film is black (matching the sprocket holes) and then repost?
I'm curious about that.
It's sort of like making a darkroom "proper proof sheet" to see how your exposure actually is.
Sounds like memories of Fred Picker...
Depending on how you set up the scan, you can get the same effect by setting the black point to the film edge density and pick a white point wherever you find the densest part of the image. Or you can adjust the scan afterwards in PP by following the same steps.
Either way, the image's contrast will increase which is what we might expect fro such a low exposure.
If you want to reply, then register here. Registration is free and your account is created instantly, so you can post right away.