changing photo size, so not so much noise
Apr 9, 2018 12:49:06 #
How can one change the size of the photo so when it is enlarged it won't get too busy?? Thank you kindly, for any and all input.
Apr 9, 2018 12:51:33 #

Photoflea wrote:
How can one change the size of the photo so when it is enlarged it won't get too busy?? Thank you kindly, for any and all input.
Don't really understand the question. Why change the size before enlarging? Do you have a sample of what you mean?
Apr 9, 2018 12:56:55 #
What is the best way to do a watermark.
I do it in PNG, change it to JPG, and lose the WM. If I live to be 500 I won't learn everything about photography. Thank you kindly for any and all suggestions, Photoflea/Liz ps I use Photodirector, picasso, and coral for editing.
I do it in PNG, change it to JPG, and lose the WM. If I live to be 500 I won't learn everything about photography. Thank you kindly for any and all suggestions, Photoflea/Liz ps I use Photodirector, picasso, and coral for editing.
Apr 9, 2018 13:00:48 #
The size it is when it taken, which will effect it greatly if you chose to enlarge it.... or you had judges enlarging it and saying it is too busy.
It was shot at a slow shutter speed. I'm not 100 % sure what they meant either. Thank you for any and all suggestions, Photoflea/ Liz
It was shot at a slow shutter speed. I'm not 100 % sure what they meant either. Thank you for any and all suggestions, Photoflea/ Liz
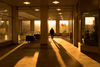
Apr 9, 2018 13:07:01 #
This is one that was stated to have too much noise..... what am I missing. Thank you for any & all replies, Photoflea/ Liz
Apr 9, 2018 13:19:17 #
Photoflea wrote:
This is one that was stated to have too much noise..... what am I missing. Thank you for any & all replies, Photoflea/ Liz
Noise has nothing to do with the size of the photo, it has to do with ISO. If you are taking photos with a high ISO, and high ISO varies with different camera models, then you will get noise. No amount of cropping will reduce the noise. You need to learn the maximum noise your camera will tolerate and make sure you do not exceed that level. Good luck in the future and don't give up.
Apr 9, 2018 13:47:25 #

I'll focus simply on image size and noise. You appear to have several unrelated issues you've added into this discussion. You'd be better served on getting those separate questions resolved by asking them in separate posts specific to each question.
Print Size
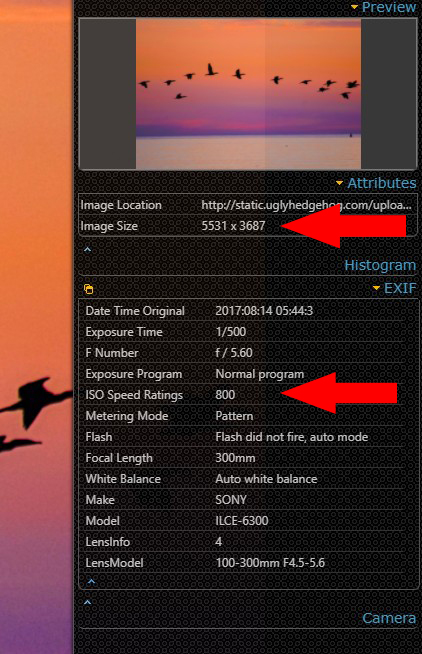
As shown in the attachment, this image has dimensions 5531x3687 pixels. Printing at 300 PPI, you'd have a printed image at 18x12-inches; at 250 PPI, 22x15-in; at 200 PPi, 28x18-in. That's simply printing the file attachment you've attached this discussion thread with no additional actions.
Noise
As expressed already, noise is not a result of selecting a print size. Note ISO-800 for this image in the EXIF data. Without seeing the SOOC version of this image, it's hard to say whether your post processing, the camera and / or your exposure decisions are to blame. Without more details of your actions before presenting this image, there's no way to know how much each possible source contributed to this current result. Certainly, tools exist to clean this image of the relatively minor noise that is present. You mention multiple software. Which, if any, includes noise processing capabilities?
You might also post the original straight out of camera (SOOC) into the post processing section along with the names and versions of all your software. See if someone there can clean the image and give guidance on how to perform that processing on your own.
Print Size
As shown in the attachment, this image has dimensions 5531x3687 pixels. Printing at 300 PPI, you'd have a printed image at 18x12-inches; at 250 PPI, 22x15-in; at 200 PPi, 28x18-in. That's simply printing the file attachment you've attached this discussion thread with no additional actions.
Noise
As expressed already, noise is not a result of selecting a print size. Note ISO-800 for this image in the EXIF data. Without seeing the SOOC version of this image, it's hard to say whether your post processing, the camera and / or your exposure decisions are to blame. Without more details of your actions before presenting this image, there's no way to know how much each possible source contributed to this current result. Certainly, tools exist to clean this image of the relatively minor noise that is present. You mention multiple software. Which, if any, includes noise processing capabilities?
You might also post the original straight out of camera (SOOC) into the post processing section along with the names and versions of all your software. See if someone there can clean the image and give guidance on how to perform that processing on your own.
Apr 9, 2018 16:11:50 #
Thank you for your help.!! I do have a program that reduces noise, so I'm going to do it over and see what happens. Again thank you ps is there a trick to resizing the photograph? Not an enlargement, a digital copy Thank you kindly for any and all hep. Photoflea/ Liz
Apr 10, 2018 08:26:16 #
With softer images and a little extra noise, I have used Matte paper for the print--seems to hide of lot of imperfections. Might work with this image. Just a poor man's work-around.
Apr 10, 2018 13:17:02 #
RRS
Loc: Not sure
Photoflea wrote:
This is one that was stated to have too much noise..... what am I missing. Thank you for any & all replies, Photoflea/ Liz
Take your photo and take it to 100% and you will see that it has the appearance of having been printed on fine sandpaper. That is the "noise" not busy that they are referring to. With Topaz DE Noise you could have easily have eliminated or toned down the noise considerably. There are other software options that you could also use. I do hope that this helps.
Apr 10, 2018 14:38:07 #
Photoflea wrote:
What is the best way to do a watermark.
I do it in PNG, change it to JPG, and lose the WM. If I live to be 500 I won't learn everything about photography. Thank you kindly for any and all suggestions, Photoflea/Liz ps I use Photodirector, picasso, and coral for editing.
I do it in PNG, change it to JPG, and lose the WM. If I live to be 500 I won't learn everything about photography. Thank you kindly for any and all suggestions, Photoflea/Liz ps I use Photodirector, picasso, and coral for editing.
Picasa 3 (assuming that is what you meant by picasso) can add a simple text watermark via the File menu --- Export Picture to Folder. You should also add a number to the filename to make sure you are not overwriting the original. I would do this JPG to JPG, leaving the PNG (or other original) untouched.
Apr 10, 2018 15:15:17 #
Photoflea wrote:
How can one change the size of the photo so when it is enlarged it won't get too busy?? Thank you kindly, for any and all input.
Other than (maybe) Picasa 3 for printing, I do not use any of the software you mention later. However, the basic process to enlarge the digital image, and remove excess noise is this:
1. Sharpen the image if necessary.
2. Export the image (using Lightroom for example) into a larger format, preferably 4 times. I use Lightroom to export a 20 to 42 megapixel RAW image into a 10800x7200 pixel JPG image. This is 300dpi for a 36x24 inch print. Do this at least twice, but preferably 4 times, to 4 different files. Adjust the exposure/color etc. for each file or sync the adjustments across the four pictures.
3. Suck the four images into Photoshop (or some program that can blend layers), or send them over from Lightroom to Photoshop, as Layers. Align the layers then blend them together into one stacked exposure. Save the stacked/merged enlarged exposure. The stacking should help eliminate a lot of the noise from the original. The original export as an enlarged file should (depending on the quality of the software program) increase the apparent detail of the picture (assuming it was in focus to start with).
There are videos online that demonstrate this process. Look up exposure stacking videos (or exposure merging, or exposure blending).
I would have attached an example, but the UHH notes apparently cannot handle either 45mb files or .DNG formats?
If you want to reply, then register here. Registration is free and your account is created instantly, so you can post right away.