Lightroom Question - Radial Filters
Jan 7, 2018 18:31:31 #
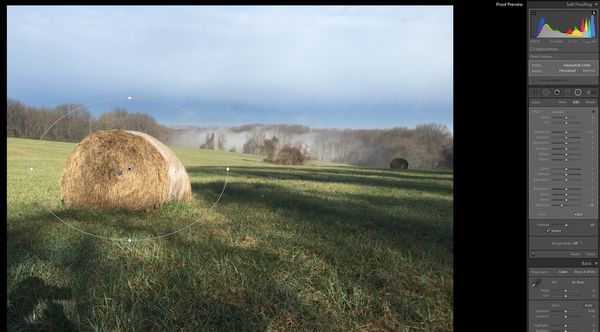
I've done some research, but am still missing "something" in the logic of how radial filters work. When you add one, everything outside of it becomes the masked area by default, and I'm trying to figure out the logic for this as when I use one, it typically to affect the area inside of the circle or oval....for instance to pull down highlights from a light fixture, or window that's "blown out".
I realize I can select "invert", but I find that this is every time for me, which means scrolling down, selecting "invert" and then scrolling back up to start the adjustments which doesn't seem right..... Am I missing something regarding the intended use for them? Perhaps I should be using the adjustment brush for this type of thing instead of the radial filter?
Thanks,
-Ed G.
Jan 7, 2018 19:13:43 #
There is a check box button on the right side menu that reverses the effect and makes it on the inside of the filter. The box is called invert. Hope this helps because it is a great tool tool
Jan 7, 2018 19:17:25 #
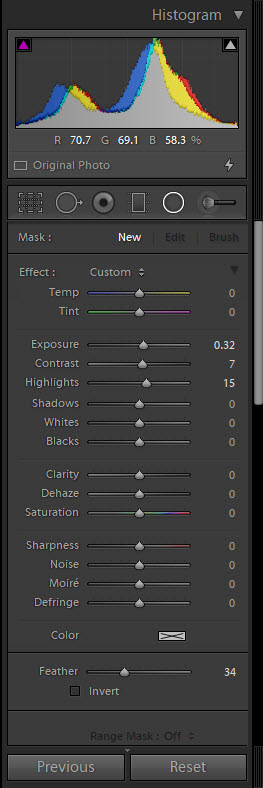
There is a checkbox, near the feather slider, but I have to scroll down to get to it, then scroll back up to make adjustments....I'm on the PC version...perhaps it's different on Mac?
Jan 7, 2018 19:39:17 #
I do use a Mac and you do not have to scroll down to the feather line it should be right below the basic effects panel. Maybe is different on a PC?? All of the panels below are part of the regular Develop module. But once you click invert checkbox the effects you want takes place only inside the filter. I have provide a Mac screen shot. Hope this helps
Jan 7, 2018 19:43:31 #
Steve DeMott
Loc: St. Louis, Missouri (Oakville area)
CaptainEd wrote:
I've done some research, but am still missing &quo... (show quote)
Try Selecting the radial filter, Press the apostrophe key, then select the area.
update: the apostrophe key can be used as a switch after selection. Same as clicking on the invert box
Jan 7, 2018 19:52:11 #
A couple CC iterations ago I found that if you select the radial filter, set the parameters (including the invert checkbox), then just unselect the filter without applying it to any image, it sets new defaults that will be there next time you select it.
If you select the radial filter, apply it to an image, then set the parameters and unselect it, it will revert to the default parameters you had set when you started the process.
So if the invert is on (or off) when you start using it, and you usually want it off (or on), just select it, set it the way you want, and unselect it.
Jan 7, 2018 20:22:21 #

CaptainEd wrote:
I've done some research, but am still missing &quo... (show quote)
From the Adobe site:
With the Radial Filter tool, you can make local adjustments with an elliptical mask. You can use the Radial Filter tool to draw an elliptical area around the subject, and choose to reduce the exposure, saturation, and sharpness of the portions outside the selected mask.
Jan 7, 2018 22:16:22 #

I'm confused about your statement that you have to scroll down to select the 'invert' check box.
On my PC running LR Classic CC the feather slider and the invert check box are directly below the 'tool bar' with crop, spot removal, red eye correction the graduated filter and the radial filter.
On my PC running LR Classic CC the feather slider and the invert check box are directly below the 'tool bar' with crop, spot removal, red eye correction the graduated filter and the radial filter.
Jan 7, 2018 22:56:29 #
Steve DeMott
Loc: St. Louis, Missouri (Oakville area)
I use the latest version of LR classic CC. When I select the radial filter the invert check box is at the end of the drop box. Can this Section be moved up?
Jan 7, 2018 23:03:24 #
CaptainEd wrote:
I've done some research, but am still missing &quo... (show quote)
If you click on the radial filter, then click on invert, and then draw the filter, the invert flag should remain in the state you left it. If you click on the radial filter, draw the filter, then click on invert, the invert flag will revert to the previous state.
This is also how the default brushes work (versus user defined brushes).
A new feature with the graduated and radial filters is the ability to use adjustment brushes on the region. So you apply a filter, then with the filter still active you click on the adjustment brush, and you can add (or erase..the cool part of this feature) using the brush.
Jan 8, 2018 06:48:58 #
rdubreuil
Loc: Dummer, NH USA
CaptainEd wrote:
I've done some research, but am still missing &quo... (show quote)
Hey Capt.,
There are two views (standard and extended) of the drop down pallet/panel, note the little black triangle to the right at the top on the panel in line with the words effect/custom.

Jan 8, 2018 08:05:43 #
I guess I missed the intent of the original post. It appears you don't have enough space on your screen to show the whole panel with the invert checkbox.
There are several ways to manage the real estate on your screen in LR. First you should have the resolution of your screen set to the maximum consistent with a good display. That will allow you the most pixels you can easily read. If that's not enough to show the whole radial filter adjustment panel you could click on the triangle by the histogram to hide that. You will get more vertical space. But of course that's an action (like scrolling) you have to take unless you don't use the histogram. Another possibility is to either reduce the size of the thumbnails at the bottom of the screen (go to the bottom of the main panel and drag it downward) or hide the thumbnails (click on the arrow at the bottom of the screen).
There are several ways to manage the real estate on your screen in LR. First you should have the resolution of your screen set to the maximum consistent with a good display. That will allow you the most pixels you can easily read. If that's not enough to show the whole radial filter adjustment panel you could click on the triangle by the histogram to hide that. You will get more vertical space. But of course that's an action (like scrolling) you have to take unless you don't use the histogram. Another possibility is to either reduce the size of the thumbnails at the bottom of the screen (go to the bottom of the main panel and drag it downward) or hide the thumbnails (click on the arrow at the bottom of the screen).
Jan 8, 2018 09:50:47 #

jcboy3 wrote:
If you click on the radial filter, then click on invert, and then draw the filter, the invert flag should remain in the state you left it....
This solved the mystery for me about why invert would not stay on. Nasty of Adobe to bury this convenience. Thanks for posting about this and using the brush along with the other filters.
The radial filter is certainly one of the best editing tools ever. Works like a charm. Experiment with changing the shape and rotation. I use it constantly and rarely resort to the adjustment brush. For those of us who printed in the darkroom, the radial and linear filters are welcome upgrades to how we used to dodge and burn in. And used ferricyanide for local reduction.
Jan 8, 2018 13:58:17 #
steve DeMott wrote:
Try Selecting the radial filter, Press the apostrophe key, then select the area.
update: the apostrophe key can be used as a switch after selection. Same as clicking on the invert box
update: the apostrophe key can be used as a switch after selection. Same as clicking on the invert box
That works....thanks!
Jan 8, 2018 14:01:06 #
jcboy3 wrote:
If you click on the radial filter, then click on i... (show quote)
This worked as stated...thank you for the tip! This may also explain why some of the tutorial videos I've watched showed the radial filter working inverted by "default", which was part of my confusion.
If you want to reply, then register here. Registration is free and your account is created instantly, so you can post right away.