Exposing for birds that are High Dynamic Range
This topic is locked to prevent further replies.
Nov 16, 2013 12:15:31 #
Tom O has written me, via PM, and asked if I would do a segment about setting exposure for birds like Eagles that have both very light and dark areas. He was concerned about blowing out the whites and keeping detail in the darks.
This is a common problem and can seem to be insurmountable at times but it is possible to keep detail in both the lights and darks if we set our exposure accurately. Wedding Photographers wrestle with the problem all the time with white wedding gowns and black tuxedoes and they manage to get it right. How do they do it? Most often, by using an incident light meter and setting their exposure manually. They are measuring the amount of light falling on the subject rather than how much light is being reflected by the subject back to the camera.
Our cameras reflective light meter is easily fooled when metering off high dynamic range subjects. The area that the subject takes up in the viewfinder, the relative amounts of lights and darks in the subject and the brightness values of the non-subject areas of the view can all affect the meter reading.
In the field, we could use an incident meter. The wedding photographer would go right up to the bride and groom and meter the light, either ambient or flash, and get his or her reading. We cant really do that when our subject is likely to flee the scene the minute we tried to do that. Luckily, we only need to be in the same light as our subject to get a correct exposure.
Most of us dont carry an incident light meter into the field but there is a way to get the same basic exposure value. For this we meter off either an 18% gray card or the gray bark of a tree, green grass or something else that approximates middle gray. As long as what we are metering from is in the same light as our subject, then we will be OK. We set our exposure manually as we dont want or need it to change as long as the light doesnt change. In bright sunlight, our setting will be an equivalent of the sunny 16 rule. (You know, 1/ISO is our shutter speed at f/16. i.e. ISO 400, 1/400 at f/16 or ISO 400 at 1/1600 at f/8.) We are effectively trying to get our exposure to be at the middle point between the brightest and darkest parts of the subject.
The other part of the equation is that it will be helpful to shoot in RAW. You will probably need to do some adjustments in post processing to tone down the highlights and open up the shadows. RAW will give you more latitude to work with. Our printers and monitors are just not up to the task of displaying the full dynamic range that is recorded in our picture.
Another way to set your exposure, if you have the time and a cooperative subject, is to set your camera to "Highlight Alert". That's the "blinkies" where anything that has been overexposed will flash on the LCD. Increase your exposure untill the hghlights blink and then back off just enough so you don't see the blinkies any more. That will retain highlight detail and keep you from blocking out the shadows. As with the above method, post processing will be needed.
A third method, again with sufficient time, is to spot meter off the highlights, spot meter off the shadows and split the difference.
All of this relies on having the sun somewhere in the half circle that is behind us. Much farther forward and we are dealing with back lighting which would then require us to increase exposure as now even the whites are in shadow. Having a low sun angle will also be a help as this can avoid very dark shadows under the bird. Winter season shooting with a sun that never gets very high in the sky is a bonus as is shooting with a snow cover since the snow reflects a lot of light up under our subject.
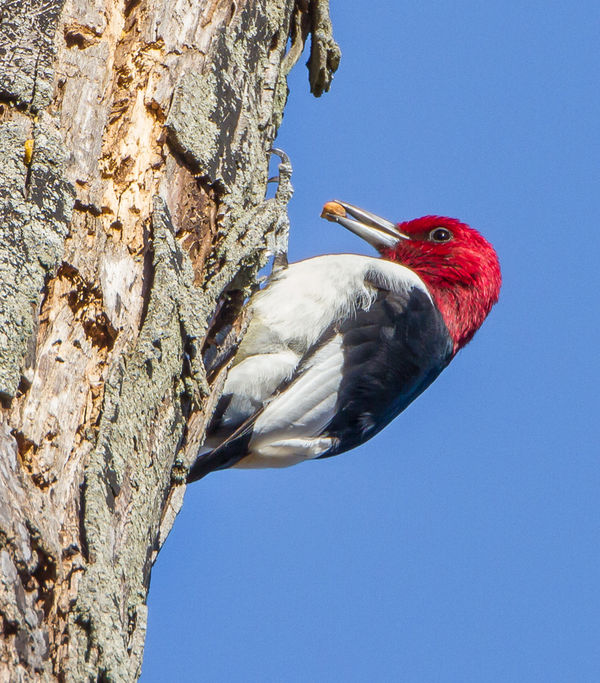
I have attached a photo I took just the other day of a Red-headed Woodpecker. It is the ultimate black and white bird with a bright red head. It was shot at ISO 400, 1/320at f/13. It needed the highlights brought down and the shadows opened up but you can see that I have been able to retain detail at both ends of the range. And just as an aside, this was shot with my Canon 500mm lens with a 2X teleconverter attached, manually focused!
Also, because TomO asked specifically about Bald Eagles, I have attached one I shot at Conowingo Dam last fall. It was shot at 1/1000, f/6.3, ISO 400 and it too needed the highlights brought down and the shadows opened up.
This is a common problem and can seem to be insurmountable at times but it is possible to keep detail in both the lights and darks if we set our exposure accurately. Wedding Photographers wrestle with the problem all the time with white wedding gowns and black tuxedoes and they manage to get it right. How do they do it? Most often, by using an incident light meter and setting their exposure manually. They are measuring the amount of light falling on the subject rather than how much light is being reflected by the subject back to the camera.
Our cameras reflective light meter is easily fooled when metering off high dynamic range subjects. The area that the subject takes up in the viewfinder, the relative amounts of lights and darks in the subject and the brightness values of the non-subject areas of the view can all affect the meter reading.
In the field, we could use an incident meter. The wedding photographer would go right up to the bride and groom and meter the light, either ambient or flash, and get his or her reading. We cant really do that when our subject is likely to flee the scene the minute we tried to do that. Luckily, we only need to be in the same light as our subject to get a correct exposure.
Most of us dont carry an incident light meter into the field but there is a way to get the same basic exposure value. For this we meter off either an 18% gray card or the gray bark of a tree, green grass or something else that approximates middle gray. As long as what we are metering from is in the same light as our subject, then we will be OK. We set our exposure manually as we dont want or need it to change as long as the light doesnt change. In bright sunlight, our setting will be an equivalent of the sunny 16 rule. (You know, 1/ISO is our shutter speed at f/16. i.e. ISO 400, 1/400 at f/16 or ISO 400 at 1/1600 at f/8.) We are effectively trying to get our exposure to be at the middle point between the brightest and darkest parts of the subject.
The other part of the equation is that it will be helpful to shoot in RAW. You will probably need to do some adjustments in post processing to tone down the highlights and open up the shadows. RAW will give you more latitude to work with. Our printers and monitors are just not up to the task of displaying the full dynamic range that is recorded in our picture.
Another way to set your exposure, if you have the time and a cooperative subject, is to set your camera to "Highlight Alert". That's the "blinkies" where anything that has been overexposed will flash on the LCD. Increase your exposure untill the hghlights blink and then back off just enough so you don't see the blinkies any more. That will retain highlight detail and keep you from blocking out the shadows. As with the above method, post processing will be needed.
A third method, again with sufficient time, is to spot meter off the highlights, spot meter off the shadows and split the difference.
All of this relies on having the sun somewhere in the half circle that is behind us. Much farther forward and we are dealing with back lighting which would then require us to increase exposure as now even the whites are in shadow. Having a low sun angle will also be a help as this can avoid very dark shadows under the bird. Winter season shooting with a sun that never gets very high in the sky is a bonus as is shooting with a snow cover since the snow reflects a lot of light up under our subject.
I have attached a photo I took just the other day of a Red-headed Woodpecker. It is the ultimate black and white bird with a bright red head. It was shot at ISO 400, 1/320at f/13. It needed the highlights brought down and the shadows opened up but you can see that I have been able to retain detail at both ends of the range. And just as an aside, this was shot with my Canon 500mm lens with a 2X teleconverter attached, manually focused!
Also, because TomO asked specifically about Bald Eagles, I have attached one I shot at Conowingo Dam last fall. It was shot at 1/1000, f/6.3, ISO 400 and it too needed the highlights brought down and the shadows opened up.

Nov 16, 2013 13:55:06 #
Fergus wrote:
Fergus, the sunny 16 rule does not need a light meter. Direct sun is such a constant standard that you can reliably set your camera to those settings and get good exposure. In fact, the old Kodak Brownie box cameras relied on it completely and many hundreds of thousands if not millions of pictures were taken that way.When using the rule of 16 are you using spot metering?
I used the sunny 16 rule here as a reference. Any meter reading I get in direct sun that is far off from one of those equivalent settings is automatically suspect. This is true for whatever metering mode you are in, spot, Matrix, Evaluative, Center-weighted etc.
When relying on the sunny 16 rule one must always be aware that we are talking about clear, natural, daylight. Any high thin clouds, haze, smog, light filtering between leafless tree branches or low sun angle can reduce the amount of light on a subject and you would need to compensate for it. Reflection off snow, sand or water can increase the available light, too. As photographers we must always, always, always be alert to the quality and quantity of light we are dealing with and adjust accordingly.
Nov 17, 2013 09:50:35 #

All good advice. I typically shoot down 1/3 to 2/3 EV on any bird with white and a dark color combination. Down 2/3 to 1 EV for all white birds to avoid the blow-out you have described. I think the aperture priority mode, generally, works well if you stop down a bit to preserve the whites and absolutely shoot in RAW so you can bring up the slightly under-exposed shadow (darker) areas of the bird.
Dec 18, 2013 21:09:24 #

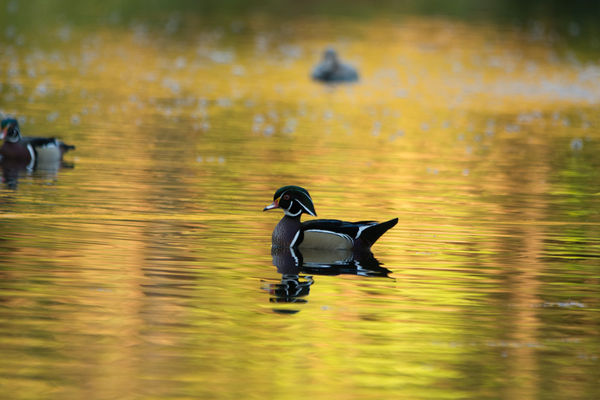
In looking back, they all seem under-exposed. However, the duck is significantly darker than the background. I appreciate your time!
Dec 18, 2013 23:28:49 #
Georgia,
A few suggestions:
1. Shoot in RAW format for maximum post processing flexibility
2. Expose to the right of the histogram but make sure you are not blowing out your highlights. This will allow you to get as much exposure as possible on the duck.
3. In post processing, reduce the highlights and bring up the shadows (the duck).
That should work in a similar situation but sometimes, when the dynamic range is too great, there is little that we can do. In landscape photography they do HDR but, with moving birds it's not practical here. One other method I have seen is with fill flash. It is done with a "Better Beamer" to concentrate the light. Never done it myself but have run into people who use it regularly.
Dec 19, 2013 06:40:38 #
Thanks so much for your help! I did shoot this in RAW. The PP just takes much longer than I would like so want to have it better from the get go. I agree that perhaps I should have tried flash. I need to always remember to check the histogram more often. Again, I appreciate your help. I am going to attach one that I processed.

Dec 19, 2013 07:28:13 #
beautiful! The background color really compliments the Wood Duck.
If you want to reply, then register here. Registration is free and your account is created instantly, so you can post right away.