How to adjust the size of a photo so it will fit Ugly Hedgehog
May 26, 2022 17:12:09 #

I usually crop a photo to get it down to size (20mp) when using a medium format camera. I am renting a Fujifilm GFX 50S II with a 63mm lens. I find I don’t want to crop them but they range in the mid 30mp size. Is there a simple way to adjust the size down to 20mp without losing detail? I have Photos (Mac) and Affinity but am a novice at both. I did try to resize one by lowering the number of pixels on one side (it automatically lowered the other). Is that the proper way to do it? Thanks so much for any advice.
May 26, 2022 17:14:23 #

Save as JPG and use the compression ratio. Usually 75 will so the trick w/o visible loss on a computer screen.
If you already are using JPG, use the same name with - compressed added to is so...
001.jpg becomes 001-compressed.jpg
If you already are using JPG, use the same name with - compressed added to is so...
001.jpg becomes 001-compressed.jpg
May 26, 2022 17:25:34 #
Rongomongo, thanks for the quick reply. I do use .jpg. Where do I find the compression ratio?
May 26, 2022 17:51:26 #
NMGal wrote:
Rongomongo, thanks for the quick reply. I do use .jpg. Where do I find the compression ratio?
More likely than not, in your post processing software.
I used to use Paint Shop Pro pretty much exclusively for image manipulation and editing. When I went to save an image I could adjust the JPG quality to anything I wanted. I usually kept it at 100% (no additional compression) for best quality, but could lower it.
I have Photoshop Elements on my phone and just checked it. On the "save page" the dimensions and quality are shown with quality defaulted to 100%, but in blue meaning it was clickable. Clicking on the 100% I was given the option to save at a number of pre-set quality settings or a slider bar to set it to a specific percentage.
Hope this helps.
May 26, 2022 17:55:27 #

NMGal, since you already know how to reduce pixels on one side and keep the ratio, why not continue to do that? That's how I've always changed photo size for sharing online (called "resize" in my PS Elements).
There is really no reason to post a 20 mb photo to UHH. About 2000 pixels on the horizontal side will fill most screens. See Chg_Canon's tutorial: https://www.uglyhedgehog.com/t-512745-1.html
.
There is really no reason to post a 20 mb photo to UHH. About 2000 pixels on the horizontal side will fill most screens. See Chg_Canon's tutorial: https://www.uglyhedgehog.com/t-512745-1.html
.
May 26, 2022 18:06:48 #
When I resize a photo in Elements I click bicubic sharper and the downsized image on screen is actually sharper than the original.
May 26, 2022 18:07:37 #
therwol
Loc: USA
Linda From Maine wrote:
NMGal, since you already know how to reduce pixels on one side and keep the ratio, why not continue to do that? That's how I've always changed photo size for sharing online (called "resize" in my PS Elements).
There is really no reason to post a 20 mb photo to UHH. About 2000 pixels on the horizontal side will fill most screens. See Chg_Canon's tutorial: https://www.uglyhedgehog.com/t-512745-1.html
.
There is really no reason to post a 20 mb photo to UHH. About 2000 pixels on the horizontal side will fill most screens. See Chg_Canon's tutorial: https://www.uglyhedgehog.com/t-512745-1.html
.
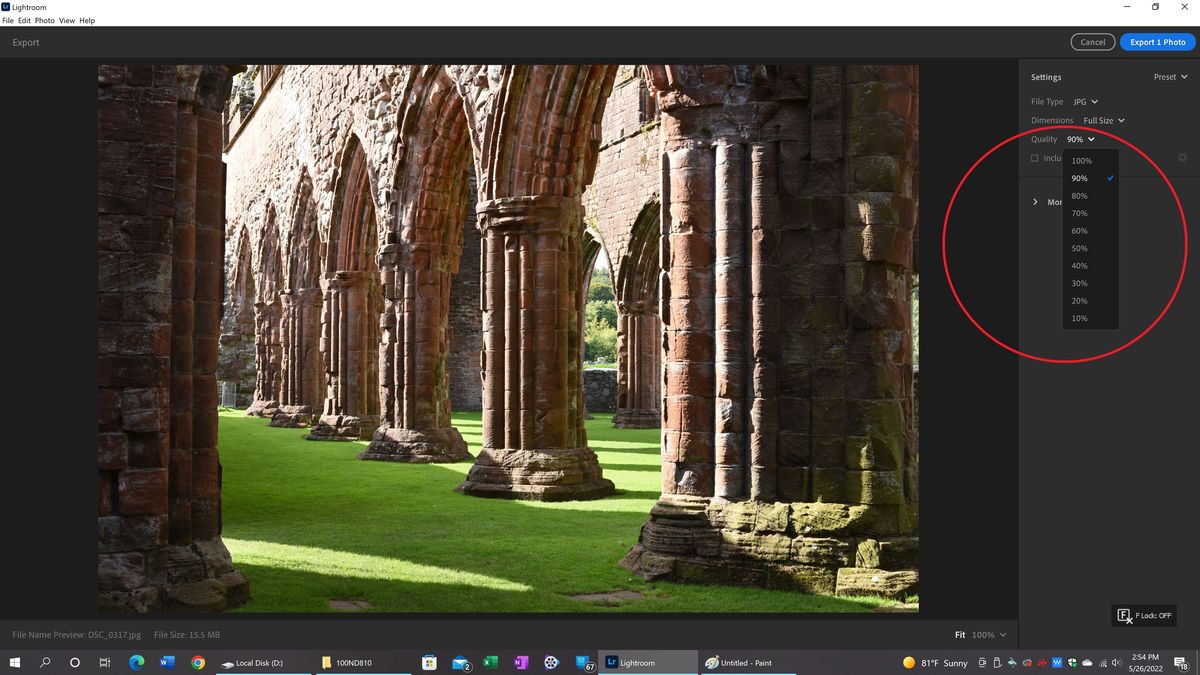
I mostly agree with this for posting to this site. Also, if you want to send a picture to someone in its full glory, you can't usually do that either with such a large file, and you have to put it somewhere in the cloud for the other person to download. But I'm guilty of posting full size photos myself when I do want to show maximum detail for some reason. I use a Windows 10 machine and find that if I simply open a large photo in Paint and then save it without doing anything else, Paint applies more compression, and the size of the file is reduced. But you have a Mac, and I'm not familiar with your software. But let me show you something.
I took this photo with a Nikon D810, and this is a jpeg without any editing. The highlights are a bit blown. Sorry. Anyway, the original is a 28 megabyte file. After opening the photo in Lightroom and exporting it at 90%, the saved file became a 15.5 megabyte file. I was able to post it. Download the screenshot to read the settings better. I'm sure your software has similar settings.
PS. Inside of the ruins of the Sweetheart Abbey near Dumfries, Scotland.

May 26, 2022 18:45:28 #

I just use the Image Resizer Power Toy for Windows.
I simply right-click on the image file, select "Resize Image" from the pull-down, and select what size I want (Small, Medium, Large, Custom).
That's all the size needed for the web for viewing the image.
(I don't post gigundo files, and pixel peepers probably hate that; don't need no stinkin' formulas or calculations, no editor needed.)
May 26, 2022 19:19:17 #

This post presents a lot of discussion on why 2048px on the long-size is the best approach. There's a few screen prints at the bottom for multiple software on how to resize. Even if you go with 4096px, you likely will fall under the 20MB limit without having to toy with the JPEG quality.
Recommended resizing parameters for digital images
Recommended resizing parameters for digital images
May 26, 2022 20:01:44 #
NMGal wrote:
... Where do I find the compression ratio?
You say you have a Mac with Photos and Affinity. I don't use Affinity, so I can't address that program but here's how to do it from Photos:
Select your photo in Photos. Then go to File => Export => Export 1 photo
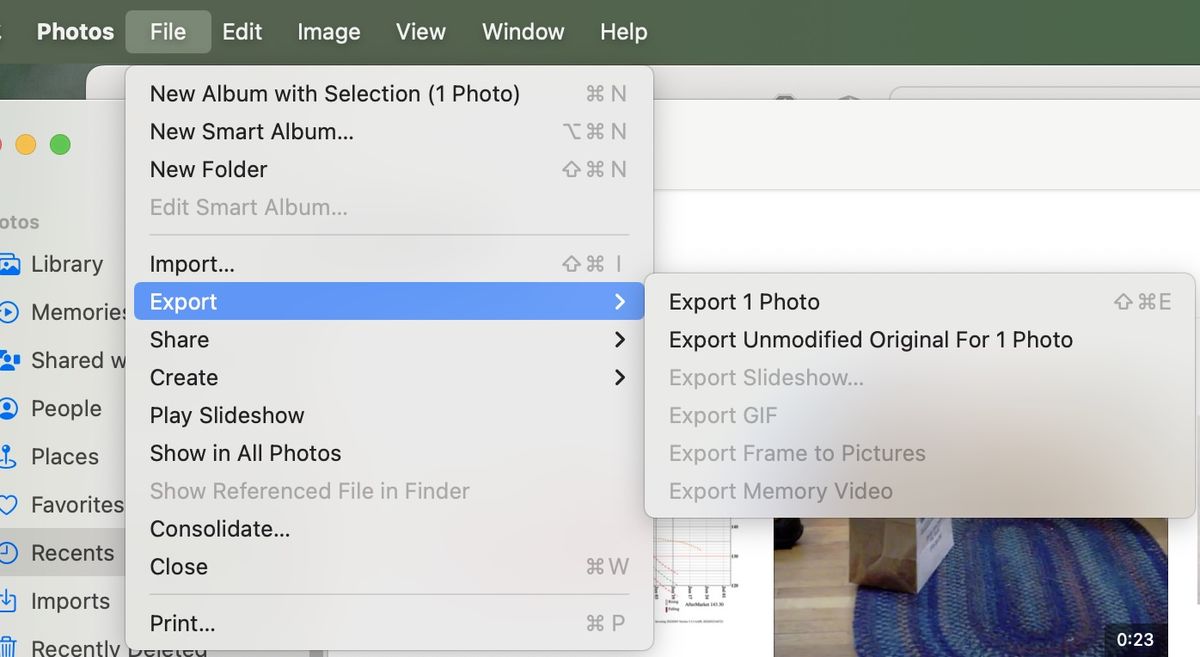
That will give you a dialog showing the parameters you can use to export the photo
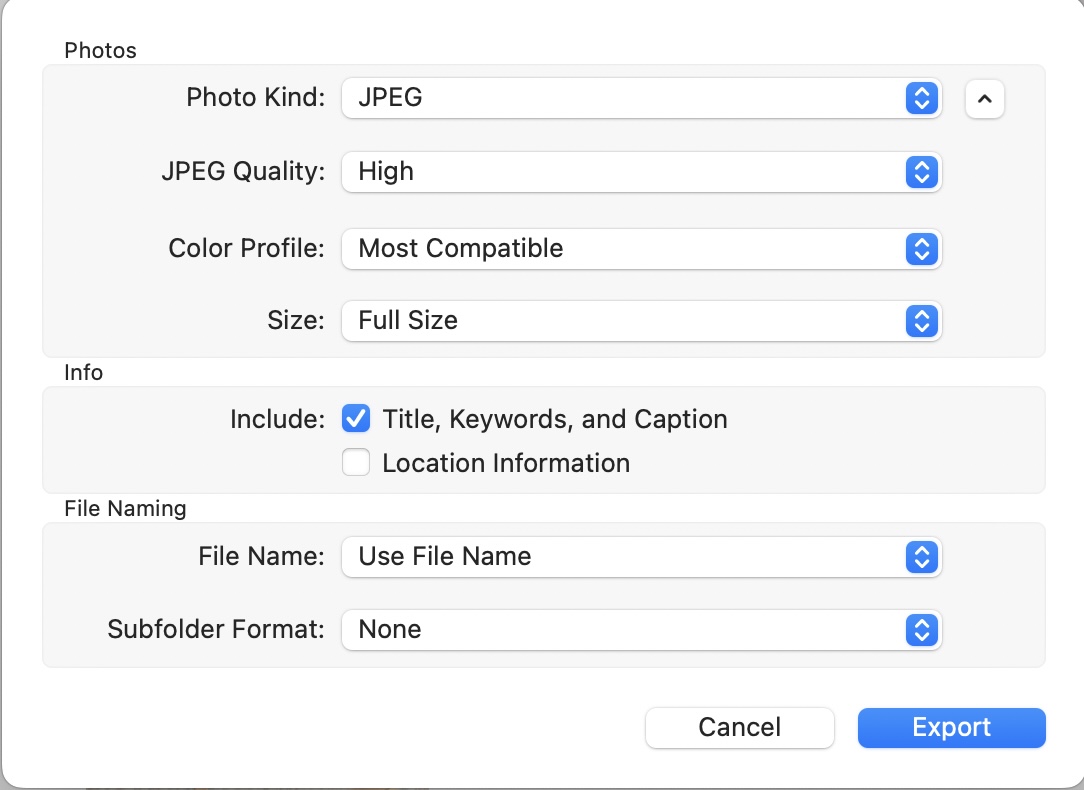
If you click on the blue box with the up and down arrows to the right of the JPEG Quality line, it will give you some choices:
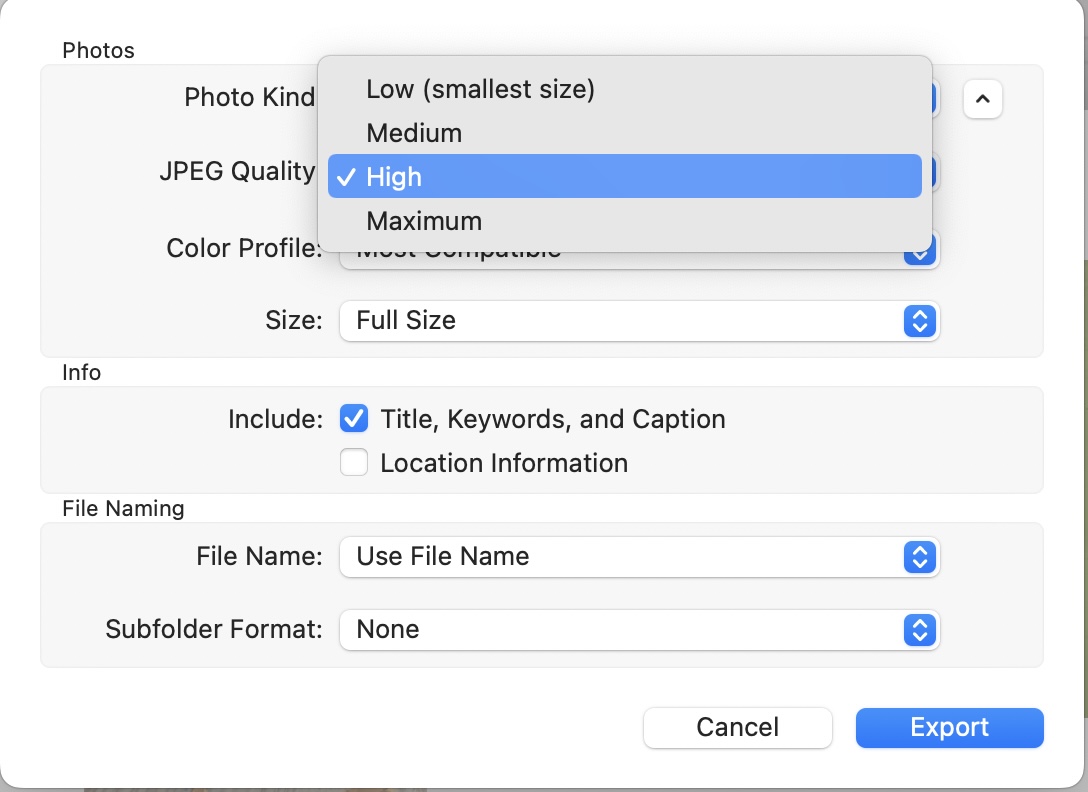
If you choose Medium or Low, it will change the compression to give you a smaller file size without changing the dimensions of the image.
If you click on the blue box with the up and down arrows to the right of the Size line, it will give you some choices:

Choosing something other than Full Size will reduce the dimensions of the image and thereby reduce the file size.
Hope that helps.
May 27, 2022 09:53:04 #

NMGal wrote:
I usually crop a photo to get it down to size (20m... (show quote)
Yes.... Set the long side to 1980 pixels, on export.
May 27, 2022 11:51:42 #

In AFFINITY, when you come to export your image it gives you the size of the image in whatever format you want to export in - and a slider 0 - 100%, set at 100% default. Just move the slider a touch to the left and watch the file size tumble.
May 27, 2022 12:41:30 #

I use Photo Shop Elements as well. Using Resize feature I select the percent size and calculate the resize based upon the maximum MB is allowable for a site. Sometimes I crop to a 4x5, 5x4, 8x10 or square and just by doing that fall into a postable size within allowed limits. I find that messing with the compression more often than not, ends up with a less than sharp photo. But thats just me. 🤣
May 27, 2022 13:43:08 #

therwol wrote:
I mostly agree with this for posting to this site.... (show quote)
Extremely beautiful and serene 🟠💚🟠💚🟠
May 27, 2022 14:14:20 #

There are 2 ways to reduce pixel count. The OP has used cropping when compressing is preferred. The type of compressing here is to only use alternate pixels which is what your computer does when displaying a full photo of more pixels than the monitor. My camera takes 6000 X 4000 pixel (24 MP) shots yet my video chip in the computer can only display 1152 X 864, just less than 1 MP or roughly 1 out of every 5 of the pixels in each of width and length.
If you want to reply, then register here. Registration is free and your account is created instantly, so you can post right away.