Comparing film to digital - part V
Mar 16, 2021 07:51:10 #

When shooting with a digital camera, most types allow for creating monochrome images. The camera sensor still captures the image in full-color. The only difference is the processing performed in the camera where a monochrome JPEG is created. If you capture in RAW, you'll note the RAW file is still in color when opened in your editor on your computer.
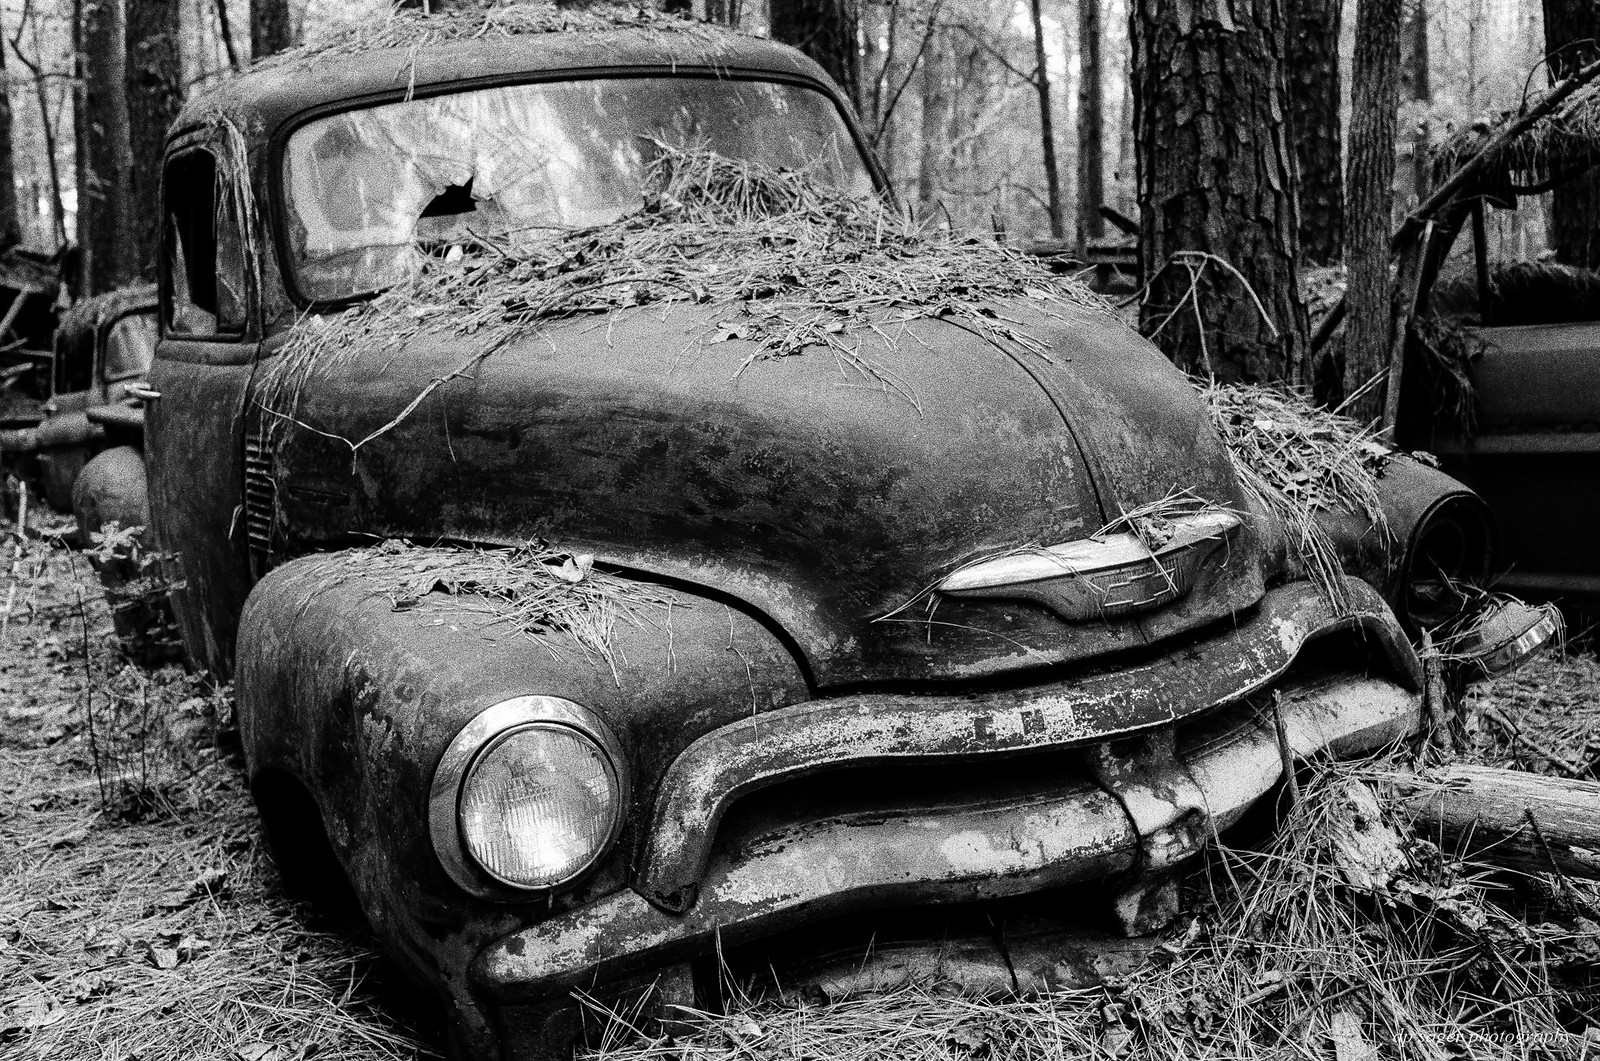
You can also use your image editor to convert the RAW to a black and white image, using one of several different filters, maybe even mimicking the use of colored filters. Below are two examples of using color filters, the first captured using film and a red 'high contrast' filter and the second is a digital conversion of a RAW capture of the same abandoned vehicle.
Old Car City
White, GA
October 2018
Version 1
Body - EOS 1v
Lens - EF 35mm f/1.4L USM
Film - Kodak Tri-X 400 with B+W 091 8x MRC Dark Red filter
Exposure - 8 seconds at f/5.6, ISO 400
Old Car City on film by dpsager, on Flickr
Version 2
Body - EOS 5DIII
Lens - EF 50mm f/1.2L USM
Exposure - 1/8 sec at f/5.6, ISO 100
Old Car City

This model of B+W Dark Red filter gives a surrealistic effect in landscape and architectural photography by producing a "storm-like" cloud effect or "moonlight" effect to landscapes. The filter has a factor of 8, requiring exposures to be increased by 3 stops.
The film image was processed and scanned by North Coast Photography Services of Carlsbad, California. Their high-resolution scan created a JPEG of 5035x3339-pixels, the same resolution as a 16MP digital camera. The digital image was captured as a RAW image at 5760x3840-pixels (22MP) and processed in Lightroom using LR's Red filter B&W preset. Both images have additional processing steps in LR to achieve the final results as presented.
The two images are remarkably similar with only subtle differences, where (to my eyes) the primary differences are still a bit more contrast in the film version, the film grain, and the lower resolution / details of the scanned film image. Note the comment of needing a 3-stop adjustment to the exposure when using the 8x factor B+W Dark Red filter. This makes the filter essentially a still-photography with tripod tool, see the 8-second film exposure. The digital conversion method can be applied to any image file with no special consideration to the exposure when capturing the image.
Shown below are the EXIF data from the two Flickr pages of the images above. Note the EXIF details displayed for each image, even the film version.

As discussed in prior posts in this series, I've tried multiple camera bodies for film photography. The camera I've landed on is the EOS 1v where I can seamlessly share EF lenses between a digital EOS 5DIII and the film EOS 1v. I've also tried the EOS Rebel G, a basic model from 1996 that also can use all my EF lenses from 1987 to releases of today. But, the Rebel has only 3 focus points where the EOS 1v has a 45-point AF system almost as sophisticated as the EOS 5DIII model. Around $35 from online sources, the Rebel G is a very economical way to put your L-Series lenses on a film body (any EF lens), with full autofocus functionality and IS, when provided by the lens.
An additional benefit unique to the EOS 1v is the data capture feature. Beyond the rugged build and technical sophistication of the Canon's final 1-series film camera, the 1v also captures 17 attributes of the image, such as the shooting mode, exposure mode, focal length, EC amount, shutter speed and so forth. I use a third-party tool (Meta35 from Promote Systems) to extract the data from the camera to my computer. Meta35 is a custom-tool that fits into the remote control connection on the camera with a USB connection on the other end to the target computer. Meta35 is also the software that extracts the camera data into a database where that data can then be written as EXIF data into the scanned JPEG files. Similar data-capture film bodies are supported by Meta35, such as the Nikon bodies N90 / N90 / F100, and Minolta bodies Maxxum 9 / Dynax 9 / Alpha 9.
Merging the camera data to the scanned JPEGs is a multi-step and multi-tool process. Shoot me a reply or PM is you're interested in more details.
To complete the comparison, below is the completed digital version, prior to the B&W conversion.
Old Car City by dpsager, on Flickr

Final Thoughts
Although I mentioned slowing down in shooting and the variety and technical differences of the available film types, film isn't some sort of religion for me. Now that digital cameras commonly have a 24MP resolution or higher, even entry-level DSLRs exceed the resolution of most types of 35mm film. For the 35mm format vs digital full-frame, there's no objective measure where "film is better". Rather, film is just something different.
Film can be expensive, time consuming and most typically disappointing, rather than the process and results being something "magical" like you can find glowingly referenced across the Internet. I don't develop my own film nor scan it. Most of my low light or fast action work is simply a non starter for using film. To my eyes, underexposed or color shift (poor white balance) are even uglier in film than digital. Getting acceptable results from the challenge of film has a level of satisfaction, but still not "magically" better than digital. It's just something slightly different by way of a process to create interesting images.
Of the three images above, each is pleasing in it's own way. I find the digital b&w version to be the least attractive of the three. The final example below shows how Kodak Ektar responds to the reds and greens of the north Georgia forest in late October; not by underexposing, but rather, by adding 1-stop of exposure compensation for the lower light of the situation. It's not a one to one comparison to the truck above; but hopefully, this example does help to show that film does have a 'look' that is different from digital.
Body - EOS 1v
Lens - EF 35mm f/1.4L USM
Film - Kodak Ektar
Exposure - 1/15 at f/5.6, ISO 100
Old Car City on film

Earlier posts in the series
Comparing film to digital - part I
Comparing film to digital - part II
Comparing film to digital - part III
Comparing film to digital - part IV
The images are sized to fill your wide-screen display. Try using <F11> to maximize your browser window for the full effect. If the images overshoot your display, such as a laptop, just click on the image or the URL link and they'll resize to your screen from the host Flickr site. You can click a bit further into the image details on the Flickr page, if desired. EXIF data is available from the host Flickr pages as well. On the Flickr site, use your <L>key for Large and the <F11> for the full-screen.
If the images are not filling your widescreen display due to recent UHH changes, follow this link and update your UHH profile: https://www.uglyhedgehog.com/t-572300-1.html
You can also use your image editor to convert the RAW to a black and white image, using one of several different filters, maybe even mimicking the use of colored filters. Below are two examples of using color filters, the first captured using film and a red 'high contrast' filter and the second is a digital conversion of a RAW capture of the same abandoned vehicle.
Old Car City
White, GA
October 2018
Version 1
Body - EOS 1v
Lens - EF 35mm f/1.4L USM
Film - Kodak Tri-X 400 with B+W 091 8x MRC Dark Red filter
Exposure - 8 seconds at f/5.6, ISO 400
Old Car City on film by dpsager, on Flickr
Version 2
Body - EOS 5DIII
Lens - EF 50mm f/1.2L USM
Exposure - 1/8 sec at f/5.6, ISO 100
Old Car City
This model of B+W Dark Red filter gives a surrealistic effect in landscape and architectural photography by producing a "storm-like" cloud effect or "moonlight" effect to landscapes. The filter has a factor of 8, requiring exposures to be increased by 3 stops.
The film image was processed and scanned by North Coast Photography Services of Carlsbad, California. Their high-resolution scan created a JPEG of 5035x3339-pixels, the same resolution as a 16MP digital camera. The digital image was captured as a RAW image at 5760x3840-pixels (22MP) and processed in Lightroom using LR's Red filter B&W preset. Both images have additional processing steps in LR to achieve the final results as presented.
The two images are remarkably similar with only subtle differences, where (to my eyes) the primary differences are still a bit more contrast in the film version, the film grain, and the lower resolution / details of the scanned film image. Note the comment of needing a 3-stop adjustment to the exposure when using the 8x factor B+W Dark Red filter. This makes the filter essentially a still-photography with tripod tool, see the 8-second film exposure. The digital conversion method can be applied to any image file with no special consideration to the exposure when capturing the image.
Shown below are the EXIF data from the two Flickr pages of the images above. Note the EXIF details displayed for each image, even the film version.
As discussed in prior posts in this series, I've tried multiple camera bodies for film photography. The camera I've landed on is the EOS 1v where I can seamlessly share EF lenses between a digital EOS 5DIII and the film EOS 1v. I've also tried the EOS Rebel G, a basic model from 1996 that also can use all my EF lenses from 1987 to releases of today. But, the Rebel has only 3 focus points where the EOS 1v has a 45-point AF system almost as sophisticated as the EOS 5DIII model. Around $35 from online sources, the Rebel G is a very economical way to put your L-Series lenses on a film body (any EF lens), with full autofocus functionality and IS, when provided by the lens.
An additional benefit unique to the EOS 1v is the data capture feature. Beyond the rugged build and technical sophistication of the Canon's final 1-series film camera, the 1v also captures 17 attributes of the image, such as the shooting mode, exposure mode, focal length, EC amount, shutter speed and so forth. I use a third-party tool (Meta35 from Promote Systems) to extract the data from the camera to my computer. Meta35 is a custom-tool that fits into the remote control connection on the camera with a USB connection on the other end to the target computer. Meta35 is also the software that extracts the camera data into a database where that data can then be written as EXIF data into the scanned JPEG files. Similar data-capture film bodies are supported by Meta35, such as the Nikon bodies N90 / N90 / F100, and Minolta bodies Maxxum 9 / Dynax 9 / Alpha 9.
Merging the camera data to the scanned JPEGs is a multi-step and multi-tool process. Shoot me a reply or PM is you're interested in more details.
To complete the comparison, below is the completed digital version, prior to the B&W conversion.
Old Car City by dpsager, on Flickr
Final Thoughts
Although I mentioned slowing down in shooting and the variety and technical differences of the available film types, film isn't some sort of religion for me. Now that digital cameras commonly have a 24MP resolution or higher, even entry-level DSLRs exceed the resolution of most types of 35mm film. For the 35mm format vs digital full-frame, there's no objective measure where "film is better". Rather, film is just something different.
Film can be expensive, time consuming and most typically disappointing, rather than the process and results being something "magical" like you can find glowingly referenced across the Internet. I don't develop my own film nor scan it. Most of my low light or fast action work is simply a non starter for using film. To my eyes, underexposed or color shift (poor white balance) are even uglier in film than digital. Getting acceptable results from the challenge of film has a level of satisfaction, but still not "magically" better than digital. It's just something slightly different by way of a process to create interesting images.
Of the three images above, each is pleasing in it's own way. I find the digital b&w version to be the least attractive of the three. The final example below shows how Kodak Ektar responds to the reds and greens of the north Georgia forest in late October; not by underexposing, but rather, by adding 1-stop of exposure compensation for the lower light of the situation. It's not a one to one comparison to the truck above; but hopefully, this example does help to show that film does have a 'look' that is different from digital.
Body - EOS 1v
Lens - EF 35mm f/1.4L USM
Film - Kodak Ektar
Exposure - 1/15 at f/5.6, ISO 100
Old Car City on film
Earlier posts in the series
Comparing film to digital - part I
Comparing film to digital - part II
Comparing film to digital - part III
Comparing film to digital - part IV
The images are sized to fill your wide-screen display. Try using <F11> to maximize your browser window for the full effect. If the images overshoot your display, such as a laptop, just click on the image or the URL link and they'll resize to your screen from the host Flickr site. You can click a bit further into the image details on the Flickr page, if desired. EXIF data is available from the host Flickr pages as well. On the Flickr site, use your <L>key for Large and the <F11> for the full-screen.
If the images are not filling your widescreen display due to recent UHH changes, follow this link and update your UHH profile: https://www.uglyhedgehog.com/t-572300-1.html
Mar 16, 2021 22:00:25 #

Very interesting information. I didn't want to go to digital at first but now I wouldn't go back. However, I can see the fun and fascination of still using and experimenting with film. I liked your comment that film isn't better, just different. I never did my own developing or printing so for me digital is a blessing. Your knowledge of all aspects of photography is amazing.
Mar 22, 2021 08:23:39 #
Cwilson341 wrote:
Very interesting information. I didn't want to go to digital at first but now I wouldn't go back. However, I can see the fun and fascination of still using and experimenting with film. I liked your comment that film isn't better, just different. I never did my own developing or printing so for me digital is a blessing. Your knowledge of all aspects of photography is amazing.
Thank you Carol! I've been working on some 'x' vs 'y' comparisons of different film types. I've also found some newer work (2019 to now) that support more thoughts on this film vs digital theme, where the film grain and the film itself is designed to be scanned and 'look' like digital.
Mar 26, 2021 18:19:43 #
mikegreenwald
Loc: Illinois
I've truly enjoyed the discussion and examples, as well as memories brought back.
My first camera post Brownie was Kodak folding camera using 116 film - try and find that now! I still have the camera. The first 35mm was an Argus C3, also the first camera in which I used color film - Kodachrome, equivalent ASA 10! I owned it when Tri-X came on the market, which I also used (or Plus-X Pan for better detail and less grain). Twin lens reflexes using 120 film followed.
Today I have numerous cameras of different ages. The film cameras in use are Rollei 6008i with 43mm, 80mm, and 350mm lenses. That is a highly versatile camera, though I miss a tilt-shift lens that I've lost somewhere along the line.
Another great camera is the Mamiya 7, a rangefinder/viewfinder 6x7, 120 film camera with a couple of lenses that I've used for air to air and aerial photographs. I like it too for landscapes in the autumn, using Fujichrome 50. The color balance of the Fuji 50 for autumn foliage is difficult to match with digital.
Then there's the motorized Mamiya 645,a good and versatile medium format, but not in use for a long while. I also had an RB67, but body and lens were badly damaged in a hailstorm at around 12,000' in an area called "Electric Pass" for obvious reasons - Colorado. Memory of that storm is not a happy one.
I have not converted any film images to digital, so it's impossible to post them. Most of my darkroom work I did myself until about twenty-one years ago, when I moved but did not rebuild the darkroom.
The posted photos from Arches reminded me of the advantages of tilt-shift lenses. I don't have a one, but I will get one very soon.
There have been some wonderful photos posted on this site, a source of pleasure for all of us!
Mar 26, 2021 18:34:54 #
mikegreenwald wrote:
I've truly enjoyed the discussion and examples, as... (show quote)
Thank you Mike! I spent some time auditing all my scans this year, adding the proper / approximate dates and the film types. It helps with ideas to compare film types and these film vs digital posts. Glad you enjoyed. My experience is exclusively 35mm.
Aug 23, 2021 19:11:19 #

CHG_CANON wrote:
When shooting with a digital camera, most types al... (show quote)
Excellent examples! A good conversion to B&W on something like this is so eye catching vs the color version. You stare at and contemplate on the rich B&W images and think about perhaps some old time farmer using that very truck. And with the color version, you just look at it and move on. It doesn't cause you to think very far.
Feb 3, 2022 02:40:23 #
TimHGuitar
Loc: San Francisco, CA
mikegreenwald wrote:
I've truly enjoyed the discussion and examples, as... (show quote)
Sounds like you have experience in aerial photography (you mentioned 1200' during a storm). Did you know Robert Cameron? He was a friend of mine and I was his photographic printer of choice. He left me his thousands of transparencies after he passed away in 2009 at the age of 98. Bob was the publisher and photographer of the "Above" series of books.
Feb 3, 2022 02:54:50 #
TimHGuitar
Loc: San Francisco, CA
CHG_CANON wrote:
When shooting with a digital camera, most types al... (show quote)
I enjoyed reading this. I'll have to read the first 4 posts as well, I noticed that the car reproduced black and red when shot with the Kodak color film but came out gray/cyan with more of a rust color when shot with the digital camera and reproduced in color. The Kodak Ektar film was one film I never liked when it first came out because it seemed to have too high of a color contrast, and I believe it was designed in order to compete with Fuji's film which was known to exaggerate color as well. How did the car appear to you when you made the exposure? Did the digital capture reproduce a more natural (and accurate) color print than the Ektar film? I suspect it did. I'm just wondering.
I always preferred Kodak's natural color film.. forgot what it was called now... I think it was Portra film. Actually I liked the final version of their VPS film before they discontinued that film. VPS = Vericolor Professional Slow VPL was their tungsten film and was meant for "long" exposures.
I also noitced that the high value detail in the color digital capture had a lot more detail than the converted black and white version (apparently because of the red filter conversion) while the film version of the red filtered exposure preserved that detail. You can see this in the edge of the windshield where there is presumably some snow.
Thanks for posting!
Feb 3, 2022 07:43:37 #
mikegreenwald
Loc: Illinois
Responding to TimHGuitar:
In fact I've done a lot of aerial photography, mostly some years ago. You misread my note though - it Said 12,000', not 1200'. Electric pass is a very high mountain pass in Colorado, and I was walking, not flying at the time.
Most of my aerial photography was plane to plane, or in many cases shots of gliders taken from airplanes. Additionally there was some shooting of homes, farms, and hunting clubs.I I still have the Mamiya 7, but all of my film cameras except that one have been sold.
I did not know Cameron; I had my own color darkroom for many years.
Feb 3, 2022 08:52:46 #
Thank you Tim! I'm not sure I can answer your few questions as I can't go back in time completely to speak the specifics. Rather, I'll say I really like the results of Kodak Ektar. They're saturated like digital results, very sharp, but in a way that is different vs digital. But, fresh film is expensive, both to buy and to process. I don't develop it myself.
I have some good examples of Ektar in a few situations at:
https://www.uglyhedgehog.com/t-695257-1.html
Kodak Portra is more muted / less saturated, but just as sharp. It's taken me some time to decide how to shoot Portra 400, where I've settled on adjusting the ISO in the camera, overriding to ISO-200, adding 1-stop.
https://www.uglyhedgehog.com/t-695387-1.html
Mostly nowadays, I shoot expired film, a lot of Fuji Superia. Yes, it does have a more saturated look. One Fuji film that no longer exists is Fuji NPH 400, renamed to Fuji Pro 400H and now discontinued too. This film kind of slots between Kodak's Ektar and Portra in the saturation of the colors. If I was shooting fresh film regularly without regard to cost, the PRO400H might be what I'd use.
Feb 3, 2022 12:01:42 #
TimHGuitar
Loc: San Francisco, CA
You just jogged my memory. Now I remember. My favorite film, when it was available, was Portra NC. I shot mainly 120 roll film but also ordered quite a bit of 8x10.
I really dislike even small amounts of crossover color which occurs mainly with high color saturated (designed) films. like neutral blacks and if the highlights have less than neutral whites, it bugs me so I tended to prefer the NC film.
Thanks for the jog.
I really dislike even small amounts of crossover color which occurs mainly with high color saturated (designed) films. like neutral blacks and if the highlights have less than neutral whites, it bugs me so I tended to prefer the NC film.
Thanks for the jog.
Feb 3, 2022 15:24:22 #
mikegreenwald
Loc: Illinois
How about Fujichrome Velvia 50 or 160 or 400?
I have to check my freezer - I believe I have something in ASA 800.
In recent years I've used Portra color films and TriX B&W
I have to check my freezer - I believe I have something in ASA 800.
In recent years I've used Portra color films and TriX B&W
If you want to reply, then register here. Registration is free and your account is created instantly, so you can post right away.